
- 200 pages
- English
- ePUB (mobile friendly)
- Available on iOS & Android
eBook - ePub
Builders' Detail Sheets
About this book
This book contains a unique set of information sheets, covering all aspects of building from sit setting-out to roofs and floors. It gives builders and students of building a sound knowledge of materials, their properties and limitations, and shows the practice of using these materials for sound construction. The sheets also give information on the Building Regulations and how to comply with them.
Trusted by 375,005 students
Access to over 1 million titles for a fair monthly price.
Study more efficiently using our study tools.
Information
SETTING OUT 1
PROCEDURE
1, ascertain position of the frontage line from the layout plan or block plan. This will be given relative to the road, adjacent buildings etc.
2, establish a base line (the frontage line) by driving stout pegs at each end ‘A’ & ‘B’, clear of the building position (fig 1), marking the exact position of the line by nails in the tops of the pegs, and straining a line between (fig 2).
3, drive pegs ‘C’ & ‘D’ marking the position of the front quoins. A steel tape should be used for measuring.
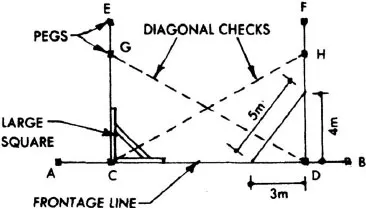
FIG 1
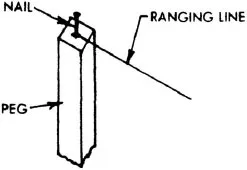
FIG 2
4, drive pegs ‘E’ & F’ so that E-C and F-D are perpendicular to C-D. Right angles may be set out by (i) using a large builders square. (left hand corner fig 1). (ii) by measurement, using the 3:4:5 method. This is an application of the theorem of pythagoras. A triangle having sides in the proportion 3:4:5 is measured out, this will be a right angled triange. One metre is a convenient unit to adopt for this purpose. (Right hand corner fig 1). (iii) using a site square.
5, drive pegs ‘G’ & ‘H’ marking the position of the rear quoins.
6, the main rectangle should be checked for square by measuring opposite sides and the diagonals, i.e. C-D=G-H and C-H=D-G.
7, the positions of breaks, offsets and crosswalls can now be pegged out. N.B. When setting out a building where lengths exceed 15 metres it is advisable to use a theodolite.
PROFILES
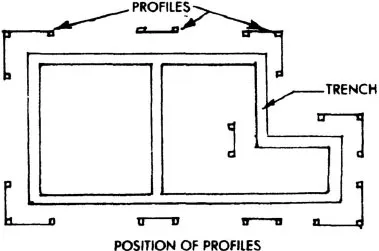
When the pegging out has been checked, profiles are set up clear of the trench runs and the positions of the ranging lines transferred to them. Fig 3 profiles consist of horizontal boards fixed to stout posts, the position of the wall and trench being marked on the boards by sawcuts. Profiles are placed at all corners and at the ends of the cross walls Fig 4. The positions of trenches and walls can be obtained from lines strained between them Fig 5.
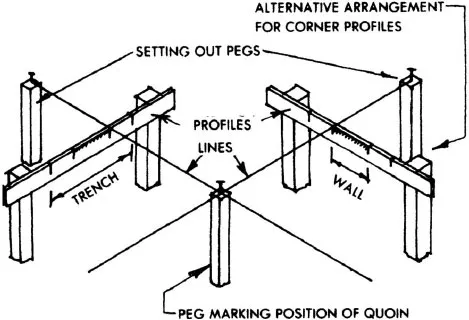
FIG 3
N.B. BEFORE SETTING OUT IT IS ADVISABLE TO CHECK THE DRAWINGS, ADDING THE OPENINGS AND PIERS ALONG EACH WALL AND COMPARING THE TOTAL WITH THE OVERALL LENGTH.
FIG 4
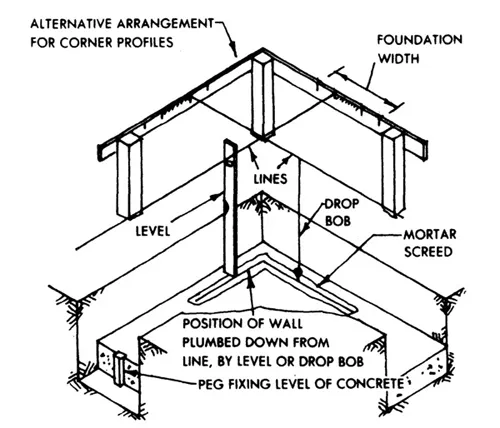
FIG 5
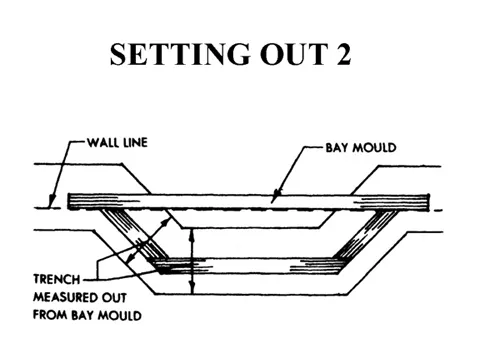
SETTING OUT 2
WHEN THE WALL REACHES THE GROUND LEVEL THE BAY MOULD IS PLACED ON TOP AS FINAL CHECK
FIG 1
SQUINT BAY
When setting-out squint bays, (sometimes known as ‘cant’ bays) it is common practice to make a light timber bay mould, the size and shape of the wall. The bay mould is then lined up with the main wall line and the position of the trench measured out f from it Fig 1.
When the trench has been excavated and the foundation concrete placed, the bay mould is again placed in position (supported on two boards across the trench) and the line of the wall plumbed down.
When the wall reaches ground level the bay mould is placed on top as a final check.
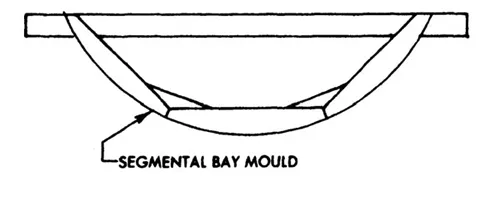
FIG 2
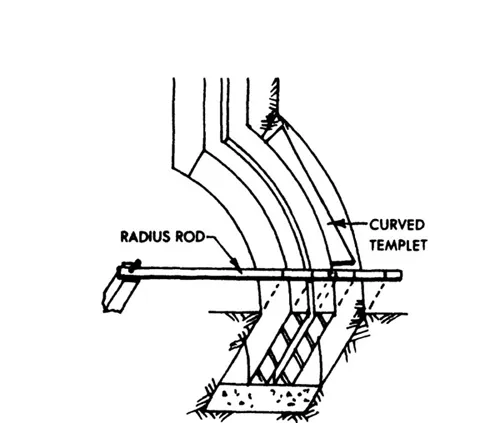
FIG 3
CURVED WALLS
A curved bay may also be set out by using a bay mould. Fig 2. An alternative method is to use a radius rod as in Fig 3. A curved templet as shown will assist the bricklayer.
For curves having a long radius or where the striking point is at the ends of the curve and at the mid point. A light timber frame is then made as shown. If the peg at ‘A’ is removed and the frame moved across keeping it pressed against the pegs, then point ‘A’ will describe the required arc.
Large curves may be set out in a number of ways. One method is to erect calculated ordinates from a chord line, outlining the curve with pegs. Fig 5. A templet may be used between the pegs.

FIG 4
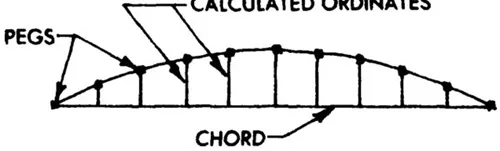
FIG 5
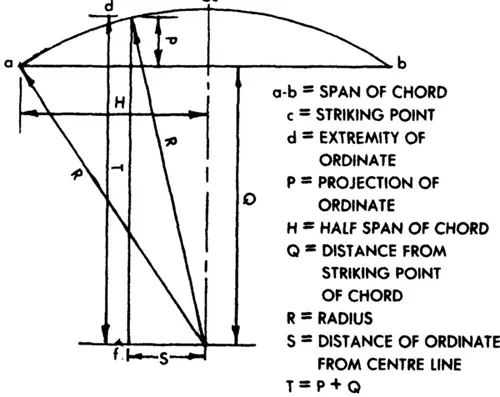
FIG 6
CALCULATING ORDINATES
A curve having chord a-b and radius ‘R’ is shown in Fig 6.
Required to c...
Table of contents
- COVER PAGE
- TITLE PAGE
- COPYRIGHT PAGE
- PREFACE
- BUILDING PRELIMINARIES
- SETTING OUT 1
- LEVELLING
- EXCAVATING
- TIMBERING TRENCHES 1
- FOUNDATIONS 1
- BASEMENTS 1
- CONCRETE 1
- BRICKS 1
- BONDING BRICKWORK I
- MORTARS FOR BRICKWORK
- POINTING & JOINTING
- DAMP-PROOF COURSES
- GROUND FLOORS 1
- FLOOR SCREEDS
- FLOOR FINISHES 1
- UPPER FLOORS
- CAVITY WALLS 1
- PITCHED ROOFS 1
- FLAT ROOFS 1
- FIREPLACES & FLUES 1
- CONCRETE BLOCKS
- PARTITIONS 1
- SHORING I
- UNDERPINNING 1
- WAFFLE FLOORS 1
- CHIPBOARD FLOORING 1
- CLADDING 1
- STAIRS 1
- ROOF COVERINGS 1
- ROOF DECKINGS
- STEEL ROOF TRUSSES
- STEEL FRAMES 1
- PLASTERING 1
- SCAFFOLDING 1
Frequently asked questions
Yes, you can cancel anytime from the Subscription tab in your account settings on the Perlego website. Your subscription will stay active until the end of your current billing period. Learn how to cancel your subscription
No, books cannot be downloaded as external files, such as PDFs, for use outside of Perlego. However, you can download books within the Perlego app for offline reading on mobile or tablet. Learn how to download books offline
Perlego offers two plans: Essential and Complete
- Essential is ideal for learners and professionals who enjoy exploring a wide range of subjects. Access the Essential Library with 800,000+ trusted titles and best-sellers across business, personal growth, and the humanities. Includes unlimited reading time and Standard Read Aloud voice.
- Complete: Perfect for advanced learners and researchers needing full, unrestricted access. Unlock 1.4M+ books across hundreds of subjects, including academic and specialized titles. The Complete Plan also includes advanced features like Premium Read Aloud and Research Assistant.
We are an online textbook subscription service, where you can get access to an entire online library for less than the price of a single book per month. With over 1 million books across 990+ topics, we’ve got you covered! Learn about our mission
Look out for the read-aloud symbol on your next book to see if you can listen to it. The read-aloud tool reads text aloud for you, highlighting the text as it is being read. You can pause it, speed it up and slow it down. Learn more about Read Aloud
Yes! You can use the Perlego app on both iOS and Android devices to read anytime, anywhere — even offline. Perfect for commutes or when you’re on the go.
Please note we cannot support devices running on iOS 13 and Android 7 or earlier. Learn more about using the app
Please note we cannot support devices running on iOS 13 and Android 7 or earlier. Learn more about using the app
Yes, you can access Builders' Detail Sheets by S. Smith,Mr P Stronach,P. Stronach in PDF and/or ePUB format, as well as other popular books in Architecture & Architecture General. We have over one million books available in our catalogue for you to explore.