![]()
One
PREREQUISITE PHOTO 101
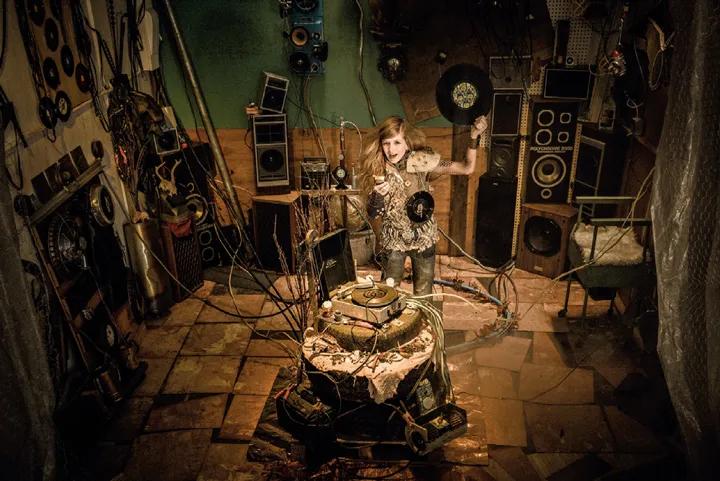
FIGURE 1.1
IMAGE © ANDY BATT, THE RECORD KEEPER, 2008.
In this chapter, we take a broad look at some essential camera skills—controlling time, focus, exposure, and color—that will allow you to pick up any camera and put it to work. If you already have these skills down cold, then feel free to skim over the chapter, stopping to read the topics you want to review. Note: There are some great tips in Overcoming LCD Variables and Setting a Brightness Level for Your Camera towards the end of the chapter, so be sure to check them out.
The Camera Is Not a Photographer—You Are
Cameras are smart and capable, but there’s one thing they are not: photographers. We’re the photographers, and to create the photos we really want to make, we have to understand our cameras and take control of them. That’s the point of this book—to give you control.
Digital photography is a curious thing. Because it’s easy to point, shoot and end up with good images, many of us approach our cameras as though they’re mysterious magic boxes we don’t need to understand. They’re pretty good at taking photos, so we take them for granted. To become an adept photographer, you need to open the “magic box” and understand what goes on inside of it. When you learn take full control of your tools—by controlling time, focus, composition, aperture, shutter speed, exposure and composition—you’ll improve your artwork.
This book occupies the territory between seeing the camera as a magic box and knowing it as a tool for making art. We’ll share our way of doing things and show you some ways that other photographers work. We’ll give you a strong foundation in camera work and explore everything from exposure and digital workflow strategies to working with a crew and deciding when to hire a retoucher. Along the way, we’ll work in a practical manner, experimenting and questioning the photographic process so that you can pick up any camera and use it creatively.
I try to keep things fairly straightforward, since one of the challenges is just how many options there are every step of the way, from cameras to lens choices—and everything down the line to the infinite possibilities when working in Photoshop. If you can keep things somewhat simple and consistent, you get to a point where you anticipate what your images are going to look like. That anticipatory process is vital to my photography.
—Jeff Conley
Philosophy: Put It on Manual
It may seem like an antiquated idea to use manual controls at a time when cameras can be re-focused in post-production and we can apply retro-style photo filters to our snapshots with our smartphones. With access to smart autofocus systems, color analysis, facial recognition, and specialty modes for just about anything we might photograph— and countless other innovations—we can create good images without knowing much of anything about photography.
But if you want to make images that have a life longer than five seconds online, if you want to be in control of your process and create images with meaning, ideas and story, then it’s time to take control of your camera and put it on Manual Mode. Only you can determine what your goal is in any given situation. Your camera doesn’t know whether you want your sunny scene to be captured as a silhouette against a blue sky or as a backlit portrait against a blown-out white sky. You are the only one who knows how you want an image to turn out and which techniques you’ll apply to achieve that goal. The reason to work manually is to create the photographs you want to take.
“Put It on Manual” is an imperative; it’s also a metaphor. When you choose “M” on your camera, you are in charge. You choose your shutter speed, F-stop and white balance. You choose whether to use shallow depth of field (DoF) or deep focus. You decide how to expose your images: dark and moody or bright and sunny. You adjust your shutter speed to add motion blur or stop the action. You determine how your lens choice will affect the image. These decisions speak directly to the kind of story your photo will tell.
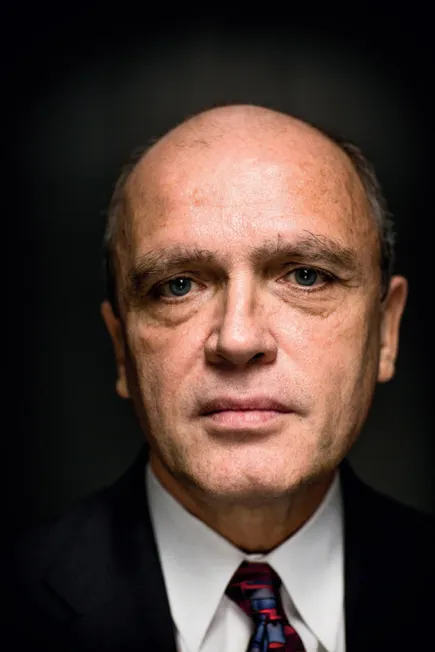
FEATURED PHOTOGRAPH
Randy Leonard Portrait
Andy shot this photo of Randy Leonard (Figure 1.2A) for Portland Monthly magazine. Leonard is a retired politician and fire commissioner for Portland, Oregon. The creation of this portrait exemplifies the “Put It on Manual” concept. By controlling all aspects of the camera work, subject and lighting, Andy made deliberate choices that crafted the final image.
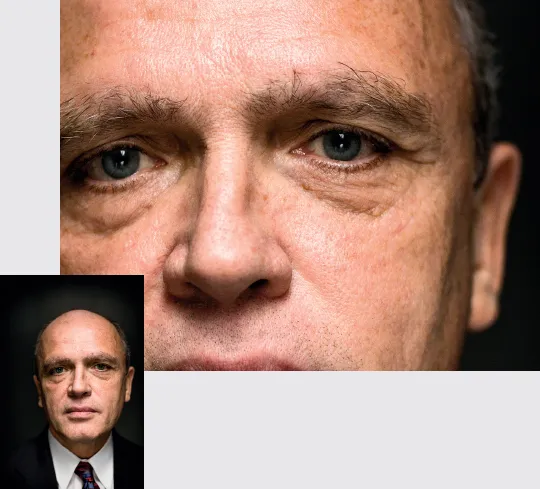
Andy: The decision-making process began with the knowledge that the magazine was going to run the image as a full page, 8.5 × 11 inches. Shallow DoF works great at that size. If the same image were printed small (Figure 1.2B), it wouldn’t reveal the qualities that make it work.
I used an 85mm lens on a full-frame camera1 for this shot, because it’s a clean, neutral lens that does a nice job of portraying subjects without distortion or heavy compression. It performs very well when the aperture is wide open (“WFO,” in the trade, for wide-freakin’ open), and even better slightly stopped down. I’ve tested this lens for accuracy and distortion and use it frequently, so I’m confident of how it will perform during a job. I made the choice to use ƒ/2.8 so that the shallow DoF would focus the viewers’ attention on Randy’s eyes and help them see him in a unique way (Figure 1.2C).
Because the goal was to emphasize Randy’s eyes, I kept the lighting and background simple. I wanted a shallow focus and planned on taking advantage of my camera’s clean high-ISO speed so I could shoot at a wide-open F-stop and high shutter speed. This meant I could use a single continuous light source instead of a strobe. I shot in my studio with an 800-watt HMI2 in a strip soft box positioned over the camera, with a silver card below the camera. With this setup, I could photograph quickly and concentrate on working with my subject to get a range of interesting looks.
Simplicity is a big part of this photo’s appeal. I wanted the viewer to make an immediate connection with Leonard’s eyes, so all of my technical choices reflected that. I call this the Sushi Principle: With Nigiri sushi, there is only the fish, the rice, the seaweed—and maybe some wasabi. With so few elements, each one needs to be right. The same thing applies to photography. When an image has only a few elements, each one needs to be as perfect as you can make it.
FIGURE 1.2A
Andy always tries to implement the “Put It on Manual” idea. For this photograph it meant thinking about how the final image would be reproduced and making a deliberate aperture choice to produce a shallow depth of field.
IMAGE © ANDY BATT, RANDY LEONARD FOR PORTLAND MONTHLY MAGAZINE, 2012.
Figure 1.2B
It’s important to know what size...