Building Services Engineering Spreadsheets is a versatile, user friendly tool for design calculations. Spreadsheet application software is readily understandable since each formula is readable in the location where it is used. Each step in the development of these engineering solutions is fully explained.
The book provides study material in building services engineering and will be valuable both to the student and to the practising engineer. It deals with spreadsheet use, thermal transmittance, building heat loss and heat gain, combustion analysis, fan selection, air duct design, water pipe sizing, lumen lighting design, electrical cable sizing, at a suitable level for practical design work.
Commercially available software, while very powerful and comprehensive, does not allow the user any facility to look into the coded instructions. The user has to rely upon the supplier for explanation, updates and corrections. The advantage that the spreadsheet applications provided with the book have over purchased dedicated software, is that the user can inspect everything that the program undertakes. Parts of the worksheets can be copied to other cells in order to expand the size of each worksheet. Experienced spreadsheet operators can edit the cells to change the way in which data and calculations are used, and with guidance from the explanatory, build their own applications.
- 332 pages
- English
- ePUB (mobile friendly)
- Available on iOS & Android
eBook - ePub
Building Services Engineering Spreadsheets
About this book
Trusted by 375,005 students
Access to over 1 million titles for a fair monthly price.
Study more efficiently using our study tools.
Information
1 Computer and spreadsheet use
INTRODUCTION
The users of this book will range from those who are new to using a computer, through those who have not used a spreadsheet previously, and up to those who are experienced in computer spreadsheets. This chapter reminds those who need to be reminded of, and instructs those who do not know, the basic rules for using a computer, for handling files and for using a spreadsheet. All users are strongly advised to be rigorous in their saving of files under unique name and numbering systems, and to organize their files efficiently. There is nothing worse for an engineering computer user than wasting anything from 15 minutes to a whole day of work through the basic oversight of not saving a working file of the master version.
The spreadsheet applications have been produced with As-Easy-As software running under DOS. This product is compatible with the other spreadsheet products that are commonly available. There should be no difficulty with retrieving these files from disk with any of the popular products, whether they be DOS based or Windows based. The author and the reviewers have run these files from other software products, including MicrosoftR WindowsTM 95 versions.
LEARNING OBJECTIVES
Study of this chapter will enable the user to:
1. know how to handle, store and file the original application files;
2. know how to transfer, copy and store files;
3. understand and use directories and file conventions;
4. create working job files and disks;
5. become proficient in the use of a spreadsheet;
6. know how to edit spreadsheet application files;
7. use spreadsheets to solve a variety of building services engineering design work;
8. understand the difference between numeric and alphabetic entries in spreadsheet cells;
9. use the graphical facilities of a spreadsheet;
10. print ranges of cells from a spreadsheet.
Key terms and concepts
alphanumeric
backup copy
bytes
cell
cell format
cell range
chart
CHKDSK
computer faults
COPY
corrupted
data range
directory
disk
disk operating system
DISKCOPY
drive
edit
edit cell
escape key
exponent
file
filename
floppy disk
format
graph
hard disk
home
index
justified
master disk
mouse
numbers
numeric
original file
page down
page up
quit
quotation marks
RAM
retrieve
save
slash key /
software
source disk
spreadsheet files
subdirectory
target disk
volume
working files
worksheet
COMPUTER USE
This section explains how to use the disk provided with the book. The very first thing that you must do is make a duplicate copy of the disk. This will ensure that the original files that you have purchased will not be damaged, changed or deleted. Once you have made the copy, seal the original disk in an envelope, write the name of the disk, the date and the fact that this is the master version on the envelope. Store the master disk in a safe place, where other people cannot find it but you can. A locked disk-storage box can be used for all your master disks.
Experienced computer users may not need to spend much time reading these notes. New users must read them. Years of painful experience have been distilled into a few brief recommendations. Ignore them at your peril!
Have with you four things: this book, the master 3.5 in disk and one or, better still, two blank 3.5 in double-sided double-density or high-density floppy disks and a disk label or two. Lay the master disk on top of the pages of this book, and not in the disk drive slot of the computer. The computer needs to be an IBM model or one that is fully compatible with IBM personal computers. It has two or more disk drives. Drive C is the internal hard disk that contains the disk operating system, or DOS, and all the frequently used software. Drive A is the 3.5 in floppy disk slot in the front panel, or in the side of a portable machine. Drive B might be an additional floppy disk drive and drive D another internal hard drive.
Switch the computer and display screen on. This is fairly obvious, but people do forget. They then call for help because the hardware is not working! The disk operating system will start up or ‘boot’ the computer into use. Some information will be briefly displayed on the screen, and will pass too quickly to be read unless you press the pause key, followed by the enter key to restart the scrolling text. The screen now has the default drive prompt,
C:\>, on display. Now it is your turn to make the computer do something. Try these;1. Directory
C:\>dirYou type the letters
DIR in lower case or capitals at the C:\> prompt. The screen display changes to something like that shown in Table 1.1.Table 1.1 Directory of a disk drive
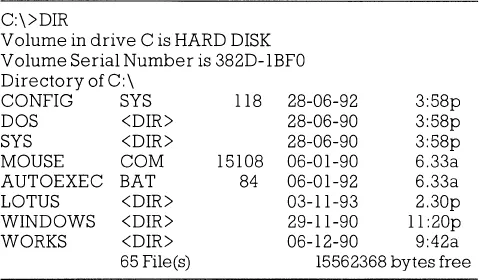
The first column is the name of a file. A file is an area of a magnetic disk that stores information. This is just like a file in a drawer of a filing cabinet. A directory, or index, is needed to know the names of all the files. You invoked the
DIRECTORY command of the disk operating system, DOS, to display the contents of the hard disk drive.2. The directory also shows the space available for new files. In this case, the free space amounts to 15 562 368 bytes. This is over 15.5 megabytes (15.5 MB). Some software requires 5 MB before it can be loaded. The master disk contains less than 1 MB of files.
3. Carefully insert the master disk into drive A. It only fits in one way. Look for the arrow on the disk case.
4. Type
A:DISKCOPY and press the ENTER key.5. The screen displays the instruction to insert the
SOURCE disk. This is the one containing the master files to be copied. This is already in drive A, so press the ENTER key. The master disk is now being read into the random access memory (RAM) chips.6. When the RAM is nearly full, you are requested to take out the master disk and replace it with the
TARGET disk. This is the blank unformatted disk that you have ready. Remove the master and insert the blank disk. Press ENTER.7. The blank disk is now being formatted and will then have the copied files transferred onto it.
8. The computer may not be able to transfer all the files in one go. You will be asked to insert the master disk again. When this occurs, remove the
TARGET disk and put back the SOURCE or master disk. Press ENTER.9. The second batch of master files is now being read into RAM. When this is completed, you are asked to insert the
TARGET disk again. Remove the SOURCE disk and insert the TARGET disk. Press ENTER.10. The
DISKCOPY process should be completed in these two processes.11. You will then be asked if you wish to
DISKCOPY another disk. If there were the recommended two blank disks, then yes you do want to DISKCOPY another one. Type Y for yes, then ENTER. From now on, the ENTER key instruction will not be stated. You have the idea by now, and do not need reminding.12. There is no need to use the master disk again, so lock it away as recommended.
13. Now
DISKCOPY the first copy disk onto the new blank unformatted disk exactly as just done from the master: that is, go back to step 5. The new SOURCE disk is already in drive A.14. You now have two disks containing the original program files, plus the master, which is safely stored out of sight. Label one disk Building Services Engineering Spreadsheets, original files, disk 1.
15. Label the second copy Building Services Engineering Spreadsheets, working files, disk 2.
16. Disk 1 will be kept in the original form, but disk 2 will be used for modifying the files for your own use. Further copies of the files and disks can be created for the various jobs that you undertake.
17. When you have finished the
DISKCOPY process for drive A and have labelled the floppy disks, respond N for no to the DISKCOPY another? question. The C:\> prompt returns.18. If you have your own personal computer, then the files can be copied onto the hard disk drive C. You must create a directory for the worksheets so that they can be easily identified in the root directory. This will be explained now.
19. If you are using someone else’s computer, or a college computer that anyone can use, ignore the next copy ...
Table of contents
- Cover
- Halftitle
- Title
- Copyright
- Contents
- Preface
- Acknowledgements
- The use of SI units
- Symbols
- Introduction
- 1 Computer and spreadsheet use
- 2 Thermal transmittance
- 3 Heat gain
- 4 Combustion of a fuel
- 5 Building heat loss
- 6 Fan and system selection
- 7 Air duct design
- 8 Water pipe sizing
- 9 Lighting
- 10 Electrical cable sizing
- References
- Answers
- Index
Frequently asked questions
Yes, you can cancel anytime from the Subscription tab in your account settings on the Perlego website. Your subscription will stay active until the end of your current billing period. Learn how to cancel your subscription
No, books cannot be downloaded as external files, such as PDFs, for use outside of Perlego. However, you can download books within the Perlego app for offline reading on mobile or tablet. Learn how to download books offline
Perlego offers two plans: Essential and Complete
- Essential is ideal for learners and professionals who enjoy exploring a wide range of subjects. Access the Essential Library with 800,000+ trusted titles and best-sellers across business, personal growth, and the humanities. Includes unlimited reading time and Standard Read Aloud voice.
- Complete: Perfect for advanced learners and researchers needing full, unrestricted access. Unlock 1.4M+ books across hundreds of subjects, including academic and specialized titles. The Complete Plan also includes advanced features like Premium Read Aloud and Research Assistant.
We are an online textbook subscription service, where you can get access to an entire online library for less than the price of a single book per month. With over 1 million books across 990+ topics, we’ve got you covered! Learn about our mission
Look out for the read-aloud symbol on your next book to see if you can listen to it. The read-aloud tool reads text aloud for you, highlighting the text as it is being read. You can pause it, speed it up and slow it down. Learn more about Read Aloud
Yes! You can use the Perlego app on both iOS and Android devices to read anytime, anywhere — even offline. Perfect for commutes or when you’re on the go.
Please note we cannot support devices running on iOS 13 and Android 7 or earlier. Learn more about using the app
Please note we cannot support devices running on iOS 13 and Android 7 or earlier. Learn more about using the app
Yes, you can access Building Services Engineering Spreadsheets by David Chadderton in PDF and/or ePUB format, as well as other popular books in Technology & Engineering & Architecture General. We have over one million books available in our catalogue for you to explore.