If you are a digital artist, illustrator, cartoonist, graphic artist, designer, or serious hobbyist looking for new and interesting ways to use Photoshop, this is the book for you! You already know how to use Photoshop as an image editing tool; now, challenge yourself and discover the more artistic aspects of the program with one of the world's best teachers by your side. In addition to four brand new chapters on real world projects, this new edition of award-winning digital artist Derek Lea's bestselling Creative Photoshop contains several brand new features such as "What you'll learn in this chapter summaries, so you can quickly find projects using the specific tools you'd like to focus on, and supplementary information at the end of each chapter, containing useful resources and additional gallery images to provide further study and inspiration. As you work through Derek's fantastic artistic methods, be sure to visit www.creativephotoshopthebook.com for more information, including the project files for each chapter, available for download for you to work with, a reader forum, and more.
Trusted by 375,005 students
Access to over 1.5 million titles for a fair monthly price.
The simulation of natural media is always a tricky prospect when working digitally. There are endless filters and niche applications out there that promise convincing results. However, quick fixes and prefab effects often are disappointing. When you are painting digitally, the old saying “If you want something done right, do it yourself” comes to mind, and this is exactly what you’ll learn to do in this chapter. Photoshop may not be the first application that you think of when you’re setting out to paint. However, a closer look at what Photoshop has to offer in terms of paint tools will reveal that everything you need is there. The tools and features at your disposal are a bottomless pit of options and flexibility. There is a little something in there to suit any user or simulate almost any artistic style.
Equally as valuable when it comes to painting are all of the image compositing tools at your disposal. A successful painted result relies not only on actual brush strokes but also on the way the image is carefully constructed within Photoshop. In this chapter, rather than predictably going through every single appropriate tool and feature like a list, you will focus more on establishing a logical method of working as well as explore the techniques involved in building up a realistic-looking painted file.
You’ll need a very basic understanding of the Layers palette and Photoshop’s paint tools. You don’t need to know anything about image editing tools or selection tools or anything like that. We are simply discussing the act of painting digitally in a methodical way.
What you’ll learn in this chapter
Creative Techniques and Working Methods
Think of Photoshop as your digital studio
When it comes to working, Photoshop nicely addresses the issue of translating your traditional tools from within the tactile realm into their digital counterparts. The Swatches palette can be thought of as your artist’s palette, allowing you to store all of the colors you’re going to use. The Tool Preset picker is a fantastic place to store your brushes as you create them, allowing you to instantly switch back and forth between your own custom tools.
When you decide to use Photoshop as your digital paint tool, you’ll never run out of paint or canvas, you’ll never misplace your favorite tool, and you’ll never have to worry about cleaning your brushes at the end of the day. As you work your way through this chapter, not only will you learn to paint methodically, but you’ll also gain an understanding of the organizational potential within Photoshop.
Photoshop Tools, Features, and Functions
The Brushes palette
The Brushes palette is an excellent resource for crafting convincing and customized brush looks. Whether you want to simply tweak a preset brush tip or create something entirely new with which to paint, everything you need is there.
Painting on layers
Layers are invaluable tools when painting too, as they allow you to separate applications of paint, giving you the flexibility to edit specific painted regions and colors without affecting the rest of your image. In addition to editing advantages, layers also allow you to easily and gently build up brush strokes within your file, resulting in a beautiful and authentic appearance.
PART ONE: Getting ready to paint
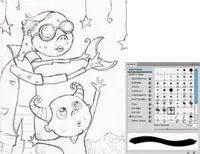
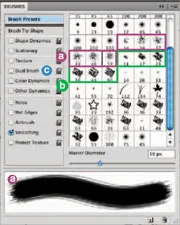
1 Open up the sketch.webp file. Starting with a sketch is an essential part of the process when painting in the tactile realm, and working in Photoshop is no exception. The main difference here is that in this case the sketch is scanned rather than being drawn directly onto the canvas. Once you’ve opened up the sketch, select the Brush tool. In the Brushes palette, enable the Smoothing option at the left. We’re going to work with this option enabled for the entire chapter because smoothing guarantees that your brush strokes contain nice, smooth curves. And that is an essential quality when you want your painting to look convincing.
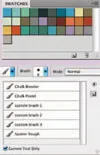
Default brushes
Although Photoshop is equipped with a plethora of excellent brush libraries, we’re going to focus on some simple default brushes capable of producing exceptional results.
a The spatter brushes may not look like much within a vast list of presets, but these simple clusters of spots are very useful. There are a number of different tips and sizes to choose from. Regardless of which option you go with, any spatter brush gives the effect of using a brush with some stray dry bristles sticking out around the edges. Painting over the top of the colored regions of the canvas with a spatter brush allows you to create a bristled, tactile effect.
b The chalk brushes are denser than the spatter brushes but equally as useful. Strokes created with chalk brushes do not have any stray bristles sticking out the sides, but they do provide a nice rough effect at the beginning and at the ending of each stroke. They are ideal for establishing basic, yet convincing, colored regions within your painting.
c The Dual Brush option is an excellent tool that allows you to combine two different brushes within a single tip. Why do we point out this single feature amid a sea of others? Well, using the Dual Brush option allows you to quickly and easily combine two brush tips to create a new one. We’ll explore this feature in detail using custom brush tips later in the chapter.
Project files
All of the files needed to follow along with this chapter and create the featured image are available for download on the accompanying Web site in the project files section. Visit www.creativephotoshopthebook.com.
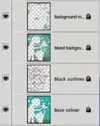
Saving swatches
When you hit upon a combination of swatches you like, it is possible to save them for use at a later date. Simply choose the Save Swatches option from the Swatches Palette menu. This option allows you to name and then save your swatches as a library file. Save this file anywhere you like. You can always reload your saved swatches by choosing the Load Swatches option from the Swatches Palette menu and navigating to your saved preset file. If you place your library file in the presets/swatches folder within the Photoshop program folder, the library will appear within the list at the bottom of the Swatches Palette menu the next time you launch Photoshop.
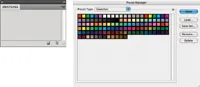
2 Now, the next thing we’re going to do is establish the Swatches palette as our paint palette and fill it with our own set of colors unique to this painting. By doing this, we can return to the Swatches palette and select one of our custom colors at any point later on. Choose Edit > Preset Manager from the menu. Choose Swatches from the Preset Type menu. The Preset Manager can also be accessed via the Swatches Palette menu. If you access it via the Swatches Palette menu, the Preset Type is automatically set to Swatches. When the swatches appear, click on the first swatch and then Shift-click on the last swatch. This will target all of the swatches. When all of the swatches are targeted, click on the Delete button. After they’re all deleted, click on the Done button to exit the Preset Manager, and you’ll notice that the Swatches palette has been emptied.
3 When the Swatches palette is ...
Table of contents
Cover
Title
Copyright
Contents
Foreword
Introduction
Acknowledgments
PART 1. Drawing and Painting
PART 2. Unconventional Methods
PART 3. Real World Photoshop
PART 4. Illustrative Photography
Index
Frequently asked questions
Yes, you can cancel anytime from the Subscription tab in your account settings on the Perlego website. Your subscription will stay active until the end of your current billing period. Learn how to cancel your subscription
No, books cannot be downloaded as external files, such as PDFs, for use outside of Perlego. However, you can download books within the Perlego app for offline reading on mobile or tablet. Learn how to download books offline
Perlego offers two plans: Essential and Complete
Essential is ideal for learners and professionals who enjoy exploring a wide range of subjects. Access the Essential Library with 800,000+ trusted titles and best-sellers across business, personal growth, and the humanities. Includes unlimited reading time and Standard Read Aloud voice.
Complete: Perfect for advanced learners and researchers needing full, unrestricted access. Unlock 1.5M+ books across hundreds of subjects, including academic and specialized titles. The Complete Plan also includes advanced features like Premium Read Aloud and Research Assistant.
Both plans are available with monthly, semester, or annual billing cycles.
We are an online textbook subscription service, where you can get access to an entire online library for less than the price of a single book per month. With over 1.5 million books across 990+ topics, we’ve got you covered! Learn about our mission
Look out for the read-aloud symbol on your next book to see if you can listen to it. The read-aloud tool reads text aloud for you, highlighting the text as it is being read. You can pause it, speed it up and slow it down. Learn more about Read Aloud
Yes! You can use the Perlego app on both iOS and Android devices to read anytime, anywhere — even offline. Perfect for commutes or when you’re on the go. Please note we cannot support devices running on iOS 13 and Android 7 or earlier. Learn more about using the app
Yes, you can access Creative Photoshop CS4 by Derek Lea in PDF and/or ePUB format, as well as other popular books in Design & Graphic Design. We have over 1.5 million books available in our catalogue for you to explore.