![]()
CHAPTER 1
Use a Project Code to Track Your Projects
A Folder-Naming System for Tapeless Media
Which Files Should Be Copied From a Camera Card?
Is There a Better Way to Copy Files Than Using the Operating System?
Why Not Store Media on the Boot Disk?
Are USB Drives Fast Enough for Video Editing?
What if I Have, or Want to Add, an SSD Drive?
It Isn't Just the Size, It's the Speed
Connections Are Everything
Picking the Right Storage
Pick the Right RAID
How Much and How Fast
What's A Scratch Disk?
Configure Your Media Drives
Where Are Media Files Stored by Default?
What Files Can You Safely Keep in Your Home Directory?
Can Multiple Editors Work on the Same Project?
What Is the Mercury Playback Engine?
What Does the Mercury Playback Engine Do?
In CS6, the Mercury Playback Engine Powers Some MacBook Pros
What Is Field Dominance?
Why All This Confusion Over Formats?
What Video Format Should I Shoot?
When Does Transcoding Make Sense?
When Should I Delete Files?
Premiere Fully Supports RED
Changing Video Resolution Means Faster Preview Rendering
Premiere Now Has Stop Lights
Use Audio Timecode for DSLR Video
Fixing Dropped Frame Errors
The Safe Boot Procedure
Get Ready
Welcome!
The goal of this book is to help you become faster and more proficient. But before we start editing, we need to get ready. This chapter covers the basics—from showing how to organize your system to explaining scratch disks and video formats. Much of the material that we cover here applies to all of the media applications in Production Premium.
Let's start by getting organized.
Use a Project Code to Track Your Projects
I, uh, stole this system from Hollywood
Several years ago, I was editing behind-the-scenes documentaries for inclusion on DVDs created by two of the major Hollywood studios and I noticed that all of their master tapes had a consistent project number:
• A two-letter code for the show
• A single number for the season of the show
• A two-number code for the episode of the show within that season
Hmmm … this was such an efficient way to track projects that I borrowed the idea. Because I don't do network series work but do do a lot of corporate work, I dropped the series number and created my own Project Code:
• Two letters that represent the name of the client
• Two numbers that represent the particular job for a client
For example, in the illustration given here, “JM” refers to the client—“Just a Moment Productions”—and the numbers refer to the third job we did for this client.
A Folder-Naming System forTapeless Media
Get organized from the very beginning
The most important rule to keep in mind when working with tapeless media is that you are handling the master footage from the camera. Back It Up! Most professional editors who are working with tapeless media make at least three copies of the card. Storage is cheap compared to reshooting a scene.
Second, always copy the entire contents of the card to its own folder on your hard disk. Never copy just a portion of the card.
Also, I strongly recommend not storing media to the boot disk; rather, use a second drive. (The “boot disk” is the hard drive that contains your Applications folder and operating system.) For instance, on that second drive, I create a folder called Source Media, which will contain the source media for each project.
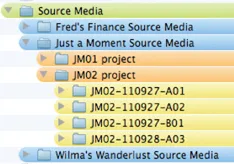
Each of these folders follows a consistent folder structure:
• Within the Source Media folder, I create a folder for each client or series. (Blue)
• Within the Client folder, I create a folder for each project. (Orange)
• Within the Project folder, I create a folder for each card, and give each folder a consistent name. (Yellow) I always store the entire contents of each camera card in its own folder.
For example, in the screen shot given here, my folder name starts with the Project Code, followed by the date the card was shot, followed by a reference for whether this is the A/B/C camera, followed by the card number for that camera (first card shot, second card shot, third card shot, and so on).
Now I can tell at a glance, simply by looking at the folder name, who the client was, what the job number was, the date it was shot, and which camera was used.
Prelude and Premiere Pro both track this folder name during ingest so that if at any point in the future, you need to go back and recapture footage, both of these programs know exactly where it is.
Keep in mind that it is a lot easier—and faster—to get organized at the beginning of a project than at the end when both deadlines and tempers are short.
Which Files Should Be Copied From a Camera Card?
Everyone is in a hurry; what's the minimum number of files that need to be copied?
All of them. Absolutely everything on the card needs to be copied. No exceptions.
Select the entire contents of the card, even the folders and files that you don't recognize, and copy the entire contents of the card into its own folder on your hard disk.
Always.
Is There a Better Way to Copy Files Than Using the Operating System?
Prelude should be your first choice for copying files
Adobe Prelude CS6 is designed to easily copy tapeless media files from the camera card to your hard disk.
If, for some reason, Prelude isn't available, there is a great utility for both Mac and Windows that simplifies the file copy process called: Shotput Pro, by Imagine Products (www.imagineproducts.com). Other options include media handling utilities from most of the camera manufacturers.
Shotput Pro, like Prelude, allows you to copy files to multiple destinations, verifies the accuracy of file copies, and works at a very high speed.
Why Not Store Media on the Boot Disk?
You can, but it isn't a wise decision
The basic problem with storing media on your boot disk, or boot drive (I use the terms interchangeably) is that the boot drive is too distracted to pay proper attention.
The absolute top priority for the boot drive is finding and recording data for the operating system. The second priority is processing data for the active foreground application. The third priorit...