- 216 pages
- English
- ePUB (mobile friendly)
- Available on iOS & Android
eBook - ePub
About this book
Focal Digital Camera Guides: Sony A300/A350
Just bought a Sony A300 or A350 and looking to combine practical know-how with inspiration? This one-stop, easy-to-read guide covers all the basic functions of the camera, and everything beyond.
For the basics, turn to the quick start guide, which will get you up and running in five minutes.
For an understanding of your camera's many controls and features, check out the section called "The Camera." If all you need is a quick explanation, you'll find it. If you're looking for the Whole Story, you'll find that, too. Settings that affect how your pictures look are accompanied by full-color examples that show you exactly what you can expect. This section also covers the camera's menus, playback features, memory, and power sources.
The section called "Software" shows you how to get the most out of your camera's software. It covers tethered shooting, color management, RAW conversion, storing your images, managing your library, and backup strategies - to name just a few topics.
Ultimately, this book's greatest strength isn't its focus on the camera or the software; it's the detailed, easy-to-follow instruction it offers on using your camera to take truly superior photographs. Sections devoted to lenses, subject matter, and light cover these variables in depth, always presenting the most effective techniques in the context of the Sony A300/A350.
Written by a widely acclaimed photographer, Sony A300/A350 shows you how to get the shots you can see in your head but have never been able to capture with a camera.
* The quick start guide will have you taking great photos in five minutes.
* In-depth coverage of every feature and control ensures that you have access to the tools you need for every shot.
* Full-color examples demonstrate how different settings affect your photos.
* Expert coverage of lenses, lighting, and subject matter gives you the practical knowledge you need to go after any shot.
* Step-by-step instructions on photo editing and image management help you get the most out of your camera's software.
* A detailed review of accessories for your camera explains which of these add-ons offer the most value for your needs.
* Dozens of tips and tricks prepare you for every situation you're likely to encounter - in the field, at the studio, or at your next wedding or family reunion.
Trusted by 375,005 students
Access to over 1.5 million titles for a fair monthly price.
Study more efficiently using our study tools.
Information
Subtopic
Digital MediaPart 1
The camera
Section A: Record Modes
Section B: Viewing the Images
Section C: Menus
Section D: Memory Cards,
Batteries, and Maintenance
Batteries, and Maintenance

Section A: Record Modes
Before you start making great photographs, you have to become familiar with the tools at your disposal. Although the Sony A300/A350 is a well-designed camera that is easy to use, it has many modes and features that you should know about and learn to use so that you can select the right mode for the photo you want to make. We’ll go over them briefly to give you a good idea of what your Sony Alpha SLR can do.
VIEWFINDER MODES
The Sony A300 and A350 have two distinct viewfinder modes: One is the normal mode of the single-lens-reflex camera, using the optical viewfinder; the other is a hybrid system that uses a second sensor inside the optical viewfinder area to capture a live viewfinder image and convey it to the tilting 2.7-inch LCD.

OPTICAL MODE
This first mode needs little explanation, except that in most digital SLR cameras, looking through the optical viewfinder is the preferred method for framing your images. Autofocus is generally faster than most Live View methods, you don’t have to struggle to see in bright daylight, and you’re getting a truly live view of your scene at the speed of light. Both the Sony A350 and A300 have overcome that first limitation, because they use the same autofocus sensors in Optical mode as they’d in Live View mode. It’s still a little more comfortable to compose your images via the optical viewfinder in bright daylight, though, and there is still some electronic delay when using the Live View mode when compared to the Optical mode. So when speed is important, stick with the optical viewfinder.
LIVE VIEW MODE
Live View mode still offers the advantage of framing your images from odd angles, including overhead. The Sony A300 and A350 have the further advantage of a tilting LCD screen that allows shooting from overhead or down low quite a bit more easily.

You can activate Live View mode by finding the Live View/OVF switch on the camera’s top deck and sliding it forward. This moves a mirror inside the viewfinder that redirects the light to a small mirror, lens, and sensor inside the viewfinder that captures your Live View image. This switch also closes a shutter over the optical viewfinder to keep out stray light, making Live View mode a great way to shoot on a tripod, as it prevents light entering through the optical viewfinder from disturbing your camera’s meter.

Display screens
Live View mode has a few display screens you can choose from. The first is the default screen, which includes battery life, resolution settings, number of images remaining, capture mode, flash status, ISO settings, and a duplication of the status bar you see in the Optical viewfinder. This bar includes focus status, shutter speed, aperture, an exposure scale, and an anti-shake warning and the Super SteadyShot status, plus a few more depending on what’s active on your camera.
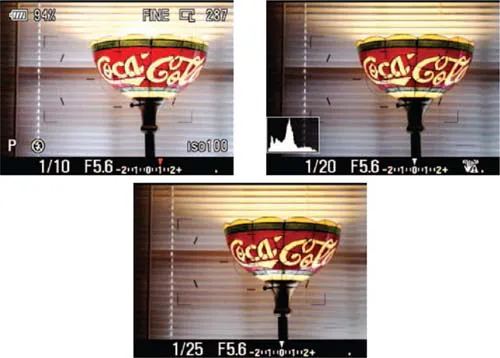
Pressing the display button while in Live View mode removes all but the status bar, but adds a very helpful Histogram display, to ensure your exposure settings look right before you press the shutter button (see section on the Histogram on page 57).
A third press on the Display button clears the screen of all but the bottom status bar, allowing for easy composition without distracting overlays.
Changes you make to the exposure in Live View are reflected on the LCD screen. Note the orange EV adjustment indicator that appears on the exposure scale in the Status display in the first image in the series.
Zoom mode

Live View mode also has a digital zoom function, which effectively crops the image to the size you see onscreen. Just press the Zoom button to the right of the AEL button on the back panel and the camera will zoom the view, first to 1.4x, then to 2x. Note that the AF area is automatically set to the center AF point, and the metering mode is set to Multi-segment.

For the A300, the image is cropped to a 2,768 + 1,840-pixel or 2,032 + 1,360-pixel image at 1.4x and 2.0x respectively.
For the A350, the image is cropped to a 3,264 + 2,176-pixel or 2,416 + 1,600-pixel image at 1.4x and 2.0x respectively.
Also note that you can’t use the Live View zoom mode when your capture resolution is set to RAW.
Tilting the LCD
Taking advantage of the A300 and A350’s tilting LCD is quite simple: Just place two fingers under the LCD’s Sony logo and lift gently. From there you can pull the LCD’s hinge out and tilt it up well over 90 degrees, or down 45 degrees for easy overhead shooting. If you’re only going to shoot with the camera overhead, it’s almost as easy to place a finger on top of the LCD and tilt downward in one motion.

FULL AUTO MODES
The first mode is called Auto, but all of these Full Auto modes put the camera in full control of exposure. The Scene modes following Auto mode simply bias a few of the settings in one direction or another to suit a particular photographic purpose. Dynamic Range Optimization is turned on in these modes, and color, contrast, and sharpening are adjusted to suit the subject.
AUTO
Also known as Full Auto mode and Green mode, Auto mode puts the Sony A300/A350 in complete control of the exposure and focus decisions. It’s important to know that you can still adjust the EV or Exposure Compensation setting to modify what the camera is doing, either underor overexposing your image by up to two stops. I encourage you to explore this capability at first in your shooting. Because the flash on the A300/ A350 is manual, you’ll need to pop up the flash if you think it’s necessary.
FLASH OFF
Because the Sony A300/A350’s pop-up flash deploys automatically in Full Auto modes, Sony included a mode that keeps the flash from firing. As such, there’s no difference between Flash Off and Auto mode, except that it cannot deploy its flash in Flash Off mode. Use this mode in places where flash is either undesirable or prohibited, like museums and theaters.
PORTRAIT
Portrait mode biases the exposure toward wider apertures that will blur the background so that your subjects stand out in the image. Skin tones are also adjusted, for more flattering portraits. Again, you’ll need to pop up the flash if you want a little fill with shadows in direct sunlight.
LANDSCAPE
Landscape mode—essentially the opposite of Portrait mode—biases the camera’s settings toward smaller apertures to ensure that more of the image is in focus. Colors are also made more vibrant.
MACRO
Use Macro mode for extreme close-up shots. This mode sets apertures to the middle range to help optimize macro images. Be sure not to use the flash while shooting close-ups, and Super SteadyShot may cause blurring of images at close distances, because it was not designed for use in Macro mode.
SPORTS
Sports mode biases exposures toward faster shutter speeds to stop action. Autofocus is switched to continuous mode, so that it can track subjects moving toward or away from the camera, and drive mode is also set to continuous, so that you can capture multiple shots of the action just by holding down the shutter release button.
SUNSET
Unique to Sony digital SLRs (single-lens reflex cameras), the Sunset mode sets the camera’s aperture to smaller settings, like in Landscape mode, but optimizes color settings for warmer colors. Normally, the camera would set the white balance to make the sunset appear white.
NIGHT VIEW/NIGHT PORTRAIT
Probably the most valuable of Scene modes, Night View/Night Portrait mode makes the camera ready for night shots. Getting good shots at night is really difficult, but setting the camera to this mode makes it easy. With the flash down, you’re in Night View mode, and the camera will keep the dark areas dark and expose for the highlights...
Table of contents
- Cover
- Halftitle
- Full Title
- Copyright
- Contents
- Introduction
- Breaking Down the Mysteries
- Quick Start
- First Principles
- Visual Tour
- Part 1 The Camera
- Part 2 The Software
- Part 3 The Light
- Part 4 The Lenses
- Part 5 The Subjects
- Part 6 Accessories
- Glossary
- Links
- Index
Frequently asked questions
Yes, you can cancel anytime from the Subscription tab in your account settings on the Perlego website. Your subscription will stay active until the end of your current billing period. Learn how to cancel your subscription
No, books cannot be downloaded as external files, such as PDFs, for use outside of Perlego. However, you can download books within the Perlego app for offline reading on mobile or tablet. Learn how to download books offline
Perlego offers two plans: Essential and Complete
- Essential is ideal for learners and professionals who enjoy exploring a wide range of subjects. Access the Essential Library with 800,000+ trusted titles and best-sellers across business, personal growth, and the humanities. Includes unlimited reading time and Standard Read Aloud voice.
- Complete: Perfect for advanced learners and researchers needing full, unrestricted access. Unlock 1.5M+ books across hundreds of subjects, including academic and specialized titles. The Complete Plan also includes advanced features like Premium Read Aloud and Research Assistant.
We are an online textbook subscription service, where you can get access to an entire online library for less than the price of a single book per month. With over 1.5 million books across 990+ topics, we’ve got you covered! Learn about our mission
Look out for the read-aloud symbol on your next book to see if you can listen to it. The read-aloud tool reads text aloud for you, highlighting the text as it is being read. You can pause it, speed it up and slow it down. Learn more about Read Aloud
Yes! You can use the Perlego app on both iOS and Android devices to read anytime, anywhere — even offline. Perfect for commutes or when you’re on the go.
Please note we cannot support devices running on iOS 13 and Android 7 or earlier. Learn more about using the app
Please note we cannot support devices running on iOS 13 and Android 7 or earlier. Learn more about using the app
Yes, you can access Sony A300/A350 by Shawn Barnett in PDF and/or ePUB format, as well as other popular books in Media & Performing Arts & Digital Media. We have over 1.5 million books available in our catalogue for you to explore.