- 288 pages
- English
- ePUB (mobile friendly)
- Available on iOS & Android
eBook - ePub
Digital Art Masters: Volume 2
About this book
Meet some of the finest digital 2D and 3D artists working in the industry today, from Patrick Beaulieu, Philip Straub, Benita Winckler, Alessandro Baldasseroni to Khalid Al Muharraqi, Marcel Baumann and Marek Denko and see how they work. More than just a gallery book - in Digital Arts Masters each artist has written a breakdown overview, with supporting imagery of how they made there piece of work.
With Digital Arts Masters you'll understand the artists' thought process and discover the tips, tricks and techniques which really work.
Trusted by 375,005 students
Access to over 1.5 million titles for a fair monthly price.
Study more efficiently using our study tools.
Information
HERITAGE
INTRODUCTION
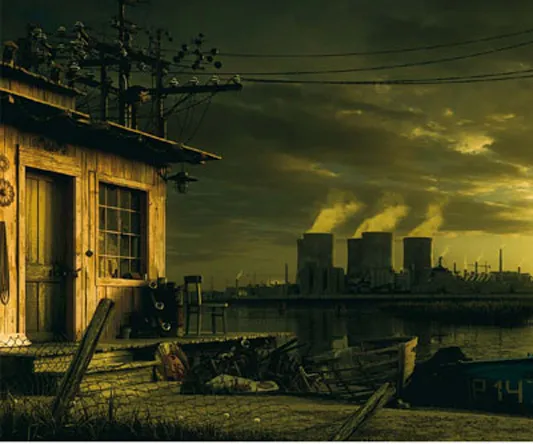
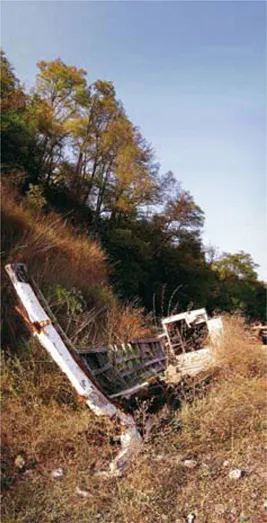
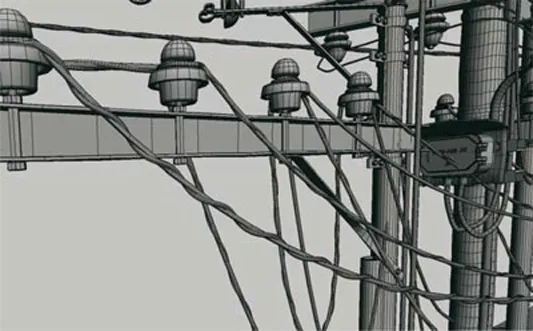
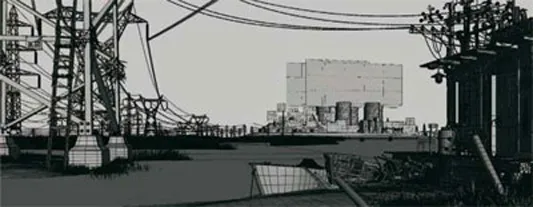
In the beginning there was an idea, which came to me whilst I was watching the movie, Stalker. It is a movie from 1979, directed by Andrej Tarkovskij, and I really enjoyed it. The movie is one of those films that is quite hard to understand. The environments in this movie are just awesome. At the end of the film there is a nice scene where the whole family is walking on the shore of a lake with a nuclear power plant in the background. The scene is a bit foggy and has dirty, old snow on the shores, and it is so gray and depressing, just as eastern Europe and Russia once was. This was my initial inspiration and the reason behind the creation of my work, Heritage. Although, in the end, my image was quite different to the picture painted by the film, Stalker, but it did remain as my starting point throughout. Another important element in the picture is the presence of the transmission towers, which are so romantic during the sunset, and I really like these kinds of structures. So my first inspiration was the nuclear power plant from Stalker, followed by the transmission towers.
I spent more or less two months of my free time on this piece, with gaps when I was traveling. I enjoyed all parts of the image, step by step, during the hot summer nights whilst I was working in Italy. So, over the following pages, I’d like to write about how I created Heritage in a step by step format, from searching for references through to modeling, texturing, shading, lighting, rendering and, finally, post-production.

REFERENCES
For me personally references are one of the most important parts when I’m creating my images. Usually I spend several hours searching the Internet and my photo library trying to find the best references. Very often I just go outside to take new pictures if need be. You should never underestimate this part of work. In your references you can find a lot of interesting things and details which are very hard to represent if you don’t see them directly. They are very helpful for modeling, texturing and shading (Fig.01a–f).

fig.01c Photographs Courtesy of the Artist


MODELING
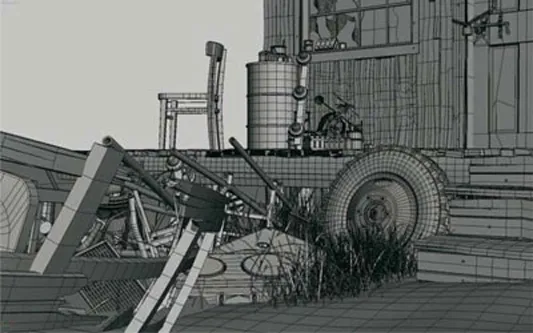
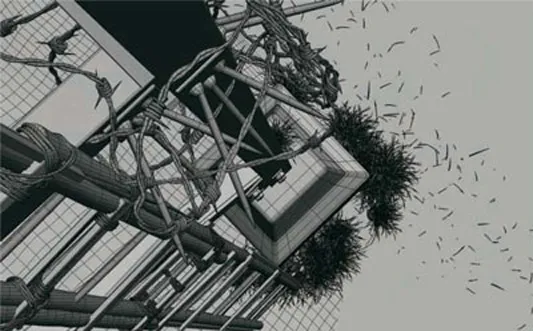
For me, modeling is really quite relaxing. I added so many more details in my models than I have done before, and really enjoyed the task. I agree that it was definitely not necessary to model all of these details, but in my personal works, where I’m not pressured by deadlines, I’m free to spend more time on these areas. All geometry was modeled in 3D Studio Max as editable polygons. In most cases I started from primitives, such as a plane, box, cylinder, sphere or line, and after few deformations I usually converted them to Editable polys. Then I applied extrusions, bevels, chamfers, cutting and all those modeling tools which are available in your 3D package (in this case 3D Studio Max). I usually use several types of modifiers to deform or change the geometry. For example Symmetry, Bend, Twist, Taper, Free Form Deformation, Noise, Displace, Turbosmooth, Wave, Ripple, Path Follow, and so on. If you are a beginner in 3D you should read the accompanying manual and try to understand how everything works but, trust me, the modeling of static objects is one of the easier parts of 3D. I essentially used an Editable poly with functions such as connect, slice, weld, cut, extrude, bevel, chamfer, and so on. Again, I’m sure that all of these functions are described in your user reference. If you want to be a swift and precise modeler you need to know your tools as best as you can, so take the time to study them and try them out. Don’t avoid solving things for yourself as opposed to posting questions in forums, as there is no substitute for learning through experience. I’d like to mention that, for the grass modeling, I used a script called Advanced Painter, by Herman Saksono, later upgraded by my friend Federico Ghirardini. This script allows you to do something similar to Maya’s PaintFX, but in 3D Studio Max. Another useful plug-in I used was Greeble, which allows you to create “Death Star” like surfaces with a few clicks. I used it to create certain parts of the power plant (Fig.02a-d).
UV MAPPING, TEXTURING & SHADING
If there is something I find boring in CG it is definitely making UV maps. For these I used basic planar, box and cylindrical mapping almost everywhere. I always unwrap only those parts which really require it. In this case it was only the concrete part of the transmission tower in the foreground. This is mainly because this part is displaced with a V-Ray displacement modifier, and to have a continuous displacement you need to have continuous UVs. There is a lot of displacement which is just great in V-Ray, but I was very careful about where to use it. It’s hungry for memory and slows down the render times, but the end result is much better. For texturing I used textures from my personal library, pictures I had taken, and also from www.environment-textures.com. This is the biggest reference library of environment textures that I know. I also used a lot of dirt textures from the 3DTotal Textures collection. These are some of the most used textures in my personal, as well as professional, work. I used a V-Ray material as a base shader for all geometry. Very often I use low intensity, fresnel, glossy reflections. In general, raytraced reflections also increase rendertimes but they help to create a more natural and believable looking image. For smoke on the power plant I used pre-rendered images. I made them with ParticleFlow and Afterburn and then I projected them onto planes (Fig.03).

LIGHTING AND REND ERING
For the lighting I used a V-Ray dome light as a skylight and one directional light for sunlight and didn’t use Global Illumination this time. I wanted a high contrast in the image and therefore the bounced light was not that necessary. The image was rendered to a 2000 pixel width resolution with the Mitchell-Netravali antialiasing filter to make it a bit sharper. It was quite a nightmare to render it too, and took something like sixty hours on my laptop (Centrino duo processor with 2 GB of Ram). Of course there are many options to optimize the render time; more than half of the image could be a matte painting. Despite this I still think that I spent the time wisely while working on it and finishing it in 3D. Computer graphics is my job but it is also my great passion and I really like to play with the details in my work. Actually I’d like to point out that I’ve already optimized this scene for animation reducing render times to about 10-15 minutes in HD resolutio...
Table of contents
- Cover
- Halftitle
- Title
- Copyright
- Contents
- Chapter 1. Heritage
- Chapter 2. Dark Alley
- Chapter 3. Victory Gal
- Chapter 4. Wings Up
- Chapter 5. Homage to Master Claesz
- Chapter 6. Fernando Alonso R25 Renault F1 Team
- Chapter 7. Sketch Lesson
- Chapter 8. Rio Grande
- Chapter 9. Sunbathing
- Chapter 10. Industrial
- Chapter 11. Furball
- Chapter 12. Music Institute
- Chapter 13. Off Roader
- Chapter 14. Floating Drydock 1943
- Chapter 15. Selfillumination 2: The Dark Side of Success
- Chapter 16. Hush
- Chapter 17. Mr Quixote
- Chapter 18. Ella
- Chapter 19. Sumo
- Chapter 20. Divine Protection
- Chapter 21. Jimi Hendrix: The Guitar Legend
- Chapter 22. Smoking Creature
- Chapter 23. Old Detective
- Chapter 24. Birdhouse
- Chapter 25. Rocketbox
- Chapter 26. The Faint Aroma
- Chapter 27. Memories Lost
- Chapter 28. An Exact and Final Moment
- Chapter 29. Obsolete
- Chapter 30. Bv-01
- Chapter 31. Sherbetcibot
- Chapter 32. Lost Trinity
- Chapter 33. Overlander
- Chapter 34. Taekwon V
- Chapter 35. Korlash, Heir to Blackblade
- Chapter 36. Atlantis
- Chapter 37. Monument
- Chapter 38. Of Sun and Steel
- Chapter 39. Myth of the Floating Islands
- Chapter 40. Sky of Kaluolo
- Chapter 41. City on the rocks
- Chapter 42. No Control
- Chapter 43. The Manga Christ
- Chapter 44. Journey Begins
- Chapter 45. Reckoning Day
- Chapter 46. Bang on Time
- Chapter 47. Aburod Terra
- Chapter 48. Save Our Souls
- Chapter 49. White Teeth
- Chapter 50. I Just Needed a New Body
- Chapter 51. Spacegirl
- Chapter 52. Superpig
- Chapter 53. Monstreusien – Cold Meat
- Chapter 54. Fern 1903–1996
- Chapter 55. Moon Girl
- Chapter 56. Ye Pirate Muncher
- Chapter 57. City Escape
- Chapter 58. Bad to the Bone
- The Digital Art Masters
- Chapter Index
Frequently asked questions
Yes, you can cancel anytime from the Subscription tab in your account settings on the Perlego website. Your subscription will stay active until the end of your current billing period. Learn how to cancel your subscription
No, books cannot be downloaded as external files, such as PDFs, for use outside of Perlego. However, you can download books within the Perlego app for offline reading on mobile or tablet. Learn how to download books offline
Perlego offers two plans: Essential and Complete
- Essential is ideal for learners and professionals who enjoy exploring a wide range of subjects. Access the Essential Library with 800,000+ trusted titles and best-sellers across business, personal growth, and the humanities. Includes unlimited reading time and Standard Read Aloud voice.
- Complete: Perfect for advanced learners and researchers needing full, unrestricted access. Unlock 1.5M+ books across hundreds of subjects, including academic and specialized titles. The Complete Plan also includes advanced features like Premium Read Aloud and Research Assistant.
We are an online textbook subscription service, where you can get access to an entire online library for less than the price of a single book per month. With over 1.5 million books across 990+ topics, we’ve got you covered! Learn about our mission
Look out for the read-aloud symbol on your next book to see if you can listen to it. The read-aloud tool reads text aloud for you, highlighting the text as it is being read. You can pause it, speed it up and slow it down. Learn more about Read Aloud
Yes! You can use the Perlego app on both iOS and Android devices to read anytime, anywhere — even offline. Perfect for commutes or when you’re on the go.
Please note we cannot support devices running on iOS 13 and Android 7 or earlier. Learn more about using the app
Please note we cannot support devices running on iOS 13 and Android 7 or earlier. Learn more about using the app
Yes, you can access Digital Art Masters: Volume 2 by 3dtotal.Com in PDF and/or ePUB format, as well as other popular books in Art & Art General. We have over 1.5 million books available in our catalogue for you to explore.