- 272 pages
- English
- ePUB (mobile friendly)
- Available on iOS & Android
eBook - ePub
The Filmmaker's Guide to Final Cut Pro Workflow
About this book
The Filmmaker's Guide to Final Cut Pro Workflow is the comprehensive roadmap to affordable postproduction workflow using Final Cut Pro, Cinema Tools, and Pro Tools. Illuminating workflow and the interrelationship of these software applications, it also focuses on cost saving and efficiency, aiding low-budget, independent moviemakers as well as students trying to take their skills to the professional level.
Author Dale Angell offers a practical guide to complete film postproduction workflow, describing low-cost workflow that can be used for 35mm film, High Definition digital video, or DV/Red Camera.
The Filmmaker's Guide to Final Cut Pro Workflow will help the independent filmmaker working on a tight budget:
. Understand capturing picture when shooting on film or digital video
. Finishing the project on either film or video
. Audio edit workflows for both film and video
. Comprehend NTSC and PAL video as well as modern digital video formats
. Understand timecode and the file architecture in Final Cut Pro, Cinema Tools, and Pro Tools
Trusted by 375,005 students
Access to over 1.5 million titles for a fair monthly price.
Study more efficiently using our study tools.
Information
1 When Shooting on Film
The Film Format
Film provides the highest quality image currently available in motion pictures. Even with high-definition (HD) digital formats and new digital cameras coming out every day, film still provides the highest definition, best colors, and broadest contrast range. While there will likely come a day when digital surpasses film, that day has not yet arrived. And film has “legs.” As video formats have come and gone, and digital formats will come and go, there has always been film. It is high quality, it can be scanned into any video or digital format, blown up to another film format, or adapted to whatever exotic format is created. It has always been and will always be marketable because of this universality. And with new scanning systems being created for film, it fits any workflow and keeps looking better. While digital cameras are becoming a real alternative to film, film will be around for quite a while.
Film is expensive. A ten-minute roll of 16 mm film can cost more than one hundred and fifty dollars. The same ten-minute roll of 35 mm film can cost almost eight hundred dollars. And the film still needs to be developed and transferred via telecine to digital video. High quality comes with a high price tag.
Telecine
In telecine, the film is transferred to digital video, usually to tape, but it can also be done directly to drive at some postproduction houses.
The film negative is threaded on a telecine machine, in Figure 1.1, a Quadra at Laser Pacific in Hollywood. Several different optics “heads” can be mounted on the device for transfer of different film formats and aspect ratios.
The telecine machine can also read “key code” numbers. These are a series of numbers and machine-readable bar codes visible on the edge of the film. Each key code is a unique number and can be used to identify any film frame in the project. (For more detailed information on key code, read Chapter 5 on film finish.)
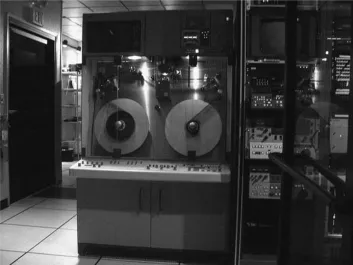
Figure 1.1 Quadra telecine machine
The telecine machine is controlled remotely from the “telecine bay.” Figure 1.2 shows this, which is a control room where the video image is displayed and color correction can be performed using very powerful, digital, color-correction systems. The system can be interlocked with time code sound recorders that can be locked to the picture so that the production sound can be synchronized with the picture or “sunc up” during telecine. The system can also export a “telecine log,” a record of everything that was done during telecine, including key code information from the negative as well as video and audio time codes. (For more information on syncing in telecine, see Chapter 3 on audio capture and syncing.)
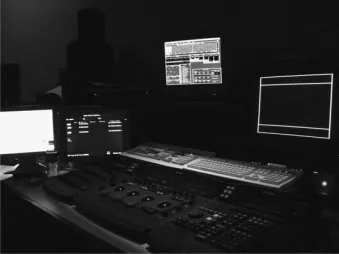
Figure 1.2 Telecine bay
The footage undergoes several changes during this process besides the obvious change from film to video. The colors are manipulated, sound can be added, the frame rate is changed and the playback speed is slowed down by .1 percent.
The Conversion of 24 FPS Film to 29.97 FPS Video with 3 : 2 Pull Down
The process whereby 24 FPS film is converted to 29.97 FPS digital video is telecine using 3 : 2 pull down. The 3 : 2 pull down and its related issues are a problem in the United States and Japan where video and digital systems are derived from the National Television Standards Committee (NTSC) standards. There is also the “advanced” pull down pattern of 2 : 3 : 3 : 2 that can be captured in real time that is used by some digital video cameras, This is not available in telecine.
For the most part, film is shot at 24 frames per second (FPS) in the United States. Film is also normally projected at 24 FPS. This is true of both 16 mm and 35 mm. While there are digital video formats that record and play at 24 and 23.98 FPS, often referred to as “24P” or 24-frame progressive, standard definition video normally records and plays at 29.97 FPS.
One part of the 3 : 2 pull down process involves adding extra frames. In NTSC, video frames actually consist of two interlaced “fields.” (For further explanation, see Appendix 1, on understanding video formats.) The 3 : 2 process, which really should be called the 2 : 3 process as the cadence starts with two fields, is shown in Figure 1.3. It takes the first frame of film, let’s call it the A frame, and copies it into the odd field and the even field on the first video frame. Let’s call this frame zero. The next film frame, B, is copied in the odd and even field in video frame one and into the odd field on video frame two. The next film frame, C, is copied into the even field in frame two and the odd field in frame three. The last film frame, D, is copied into the even field of frame three and both the odd and even fields of frame four. At this point the whole process repeats, starting with a new A frame being copied into the odd and even fields of frame five. In this way, 24 frames of film become 60 fields, which is to say 30 frames of video. But video plays at 29.97 FPS, not 30 FPS. In order to achieve the proper frame rate, the film is not run in the telecine machine at 24 FPS but rather at 23.976 FPS, or .1 percent slower (usually called 23.98). For anyone finishing on film or 24P, this whole process is very important to understand. For someone finishing on video, it’s enough to know that the film was slowed by the telecine .1 percent.
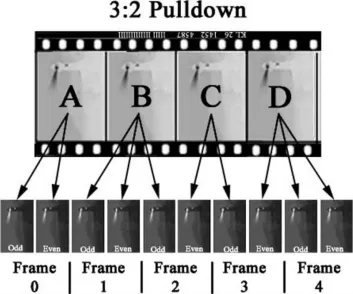
Figure 1.3 3 : 2 pull down pattern or “cadence”
Speed changes are not a big issue, per se. Films shot at 24 FPS are often projected at 25 FPS and no one is the wiser. However, if the sound and picture are being recorded and/or played separately, it is critical that they each play at the proper speed or the sound will go out of sync with the picture. Digital systems often record sound on the same tape as the picture (single system). But, in film production, the sound is always recorded on a separate recorder (double system).
So, slowing the film to 23.98 FPS will cause the sound to slowly move out of sync. It will be one full frame out of sync after thirty-three seconds. When syncing up film either in telecine or after it has been telecined, it is necessary to also slow the audio by the same .1 percent and this process must be exact.
For purposes of this discussion, film speed refers to any film or digital video or audio that plays at 24 FPS or 30 FPS. Video speed refers to film, video, or digital that plays at 29.97 FPS or 23.98 FPS. It is best to think of it in these terms, even if the film or digital was shot at 23.98, it’s still video speed. If you are changing from film speed to video speed, you are pulling down. If you are changing from video speed to film speed, you are pulling up.
Anamorphic Telecine
Film shot for 2.35, 1.85, or 16 × 9 can use an “anamorphic” process in telecine to pack the most resolution onto the digital video. (For more information on aspect ratios, see Appendix 6 on aspect ratios and letterboxing.) A 16 × 9 CCD head can be mounted on the telecine, and then, if necessary, masked later in Final Cut Pro to an even wider aspect ratio. Super 16 is shot in 1.66 : 1 and therefore loses a tiny amount of picture top and bottom as it is clipped to 16 × 9 (1.78 : 1). Masking to 1.85 shows a small amount of letterboxing; 2.35 shows a lot of letterboxing. However the squeezing to 16 × 9 is done in telecine, and no scan lines of picture will be lost.
Except for working copies, it is highly ill advised to letterbox to 4 × 3 when making a show in any widescreen aspect ratio. Letterboxing uses almost a third of the scan lines recording nothing but two black bars that can automatically be created in playback when needed. If the film is telecined letterboxed, these scan lines are forever lost. The best choice is to telecine to 16 × 9 anamorphic and add any other masks in final postproduction. Only 4 × 3 shows should be telecined at 4 × 3.
The telecined “anamorphic” digital video is no different than native 16 × 9 video shot on a 16 × 9 digital camera, however the digital camera “flags” this media telling Final Cut Pro that it is anamorphic. The telecined video is not flagged, so you will need to set that yourself. The anamorphic flag resizes the windows on the computer screen and flags of exported video to 16 × 9 for QuickTime or DVD. The flags do not make the video anamorphic, it already is. You are only flagging it so that Final Cut Pro recognizes it as 16 × 9. The image on the video monitor is not affected by the anamorphic flagging. If a 16 × 9 monitor is used in editing the image will be normal with the flags set or not.
Many people who are planning to only record back to tape and not export don’t set the anamorphic flags. The image will look stretched on the computer screen, but it will look normal on a 16 × 9 video monitor.
The flag (check) is set in the browser window in Final Cut Pro. Scroll over to a column labeled anamorphic and check all the anamorphic clips. It is important that the sequence settings match the flagging, so in this case you also need to set the anamorphic check in the sequence. There are anamorphic presets in the capture settings and the sequence settings; however, all this does is set these flags while capturing or creating a new sequence.
Telecine Logs and Databases
A database is necessary in order to cut and print the negative or even go back and retelecine at a higher definition or with better color correction. You need a map to find your way back to the exact film frame you are seeing on the computer in editing; see Figure 1.4 as an example.
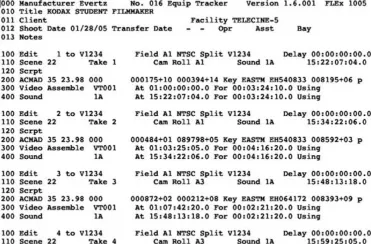
Figure 1.4 Telecine log
Information contained in the telecine log includes: camera roll number, lab roll number, sound roll number, the time code being read from the audio player (if syncing in telecine), the scene number, the take number, the format of the video recorder or recorders, the time code recorded onto the videotape(s), and the key code information from the film. Other information and comments can be added after the fact and can be used as a cutting log. It is indispensable for a film or 24P finish when shooting on film.
Telecine logs come in several formats, FLX, TLC flex, FTL and others. Final Cut Pro and Cinema Tools work with these three formats.
Take-by-Take
If film is telecined on a take-by-take basis, a telecine log can be created. The film can be transferred as whole rolls and a database can be still created after the fact from scratch, but it’s much easier when done in telecine. While slower and therefore more expensive, take-by-take telecine also allows for syncing time code-referenced sound as part of telecine. Even if you are not planning to go back to the film negative, if you create a database, then this option is still open. And the database can be used to batch capture and as a cutting log, saving time and work.
Another advantage of take-by-take transfer is color correction. Each scene is adjusted for color and exposure and the scene and take information entered into the telecine log. If the camera roll is transferred in one pass, there is no way to create a log or do anything other than finding the best light for the entire roll.
Window Burns
Any work copies on video should be recorded with one or more window burns. The window burn is a great way to check time codes against the original accuracy of the pull down and especially the reverse telecine. The most common format of window burn places the video time code in a window on the lower left, edge code in a window on the lower right, and audio time code, if any, in a window in the upper left or directly above the video time code. This is normally used only on work copies; you would never want these windows on the finished project.
If you pulled “selects,” in other words, the best takes, and had the lab print them for screening dailies, they cut the best takes out of the original camera rolls so there are splices in the rolls of negative you are telecining. It is critical that the telecine operator knows the negative has been cut and to look out for splices. Splices affect the key code information and can cause major problems later if they are not noticed in telecine. (See the following section on deconstructing several film workflows for the film Lost Hope and More.) Also, if you are using short ends and, for some reason your negative was rewound before exposure, the key codes will be on the wrong side of the negative and they will run in descending order. The bar code reader on the telecine machine cannot read the bar code backwards and you will get no key code information. To find out if the film was rewound, develop a short test strip. Rewinding the film again before exposure can solve this problem.
Creating and Working with the Cinema Tools Database
The telecine logs are usually de...
Table of contents
- Cover
- Half Title
- Title Page
- Copyright
- Contents
- A Letter from the Author
- Introduction
- The Kodak 35 mm Project
- 1. When Shooting on Film
- 2. When Shooting Digital Video
- 3. Initial Audio Workflow, Importing Production Audio, and Syncing
- 4. Editing Picture to Lock
- 5. Finishing on Film
- 6. Finishing on Digital Video, the Online Edit
- 7. Sound Edit Workflows
- 8. Titles for Digital Video and Film
- 9. Color Timing and Color Grading
- 10. After the Film Is Finished: Distribution
- Appendix 1: Understanding the NTSC Video Format and Digital Video
- Appendix 2: Understanding the PAL Video Format
- Appendix 3: Current Video Formats
- Appendix 4: Current Film Formats
- Appendix 5: Understanding Time Code
- Appendix 6: Aspect Ratios, Anamorphic Image, and Wide-screen
- Appendix 7: Understanding File Architecture
- Appendix 8: Conforming Negative
- Appendix 9: Deconstructing Several Films’ Workflows
- Appendix 10: Example Workflows
- Index
Frequently asked questions
Yes, you can cancel anytime from the Subscription tab in your account settings on the Perlego website. Your subscription will stay active until the end of your current billing period. Learn how to cancel your subscription
No, books cannot be downloaded as external files, such as PDFs, for use outside of Perlego. However, you can download books within the Perlego app for offline reading on mobile or tablet. Learn how to download books offline
Perlego offers two plans: Essential and Complete
- Essential is ideal for learners and professionals who enjoy exploring a wide range of subjects. Access the Essential Library with 800,000+ trusted titles and best-sellers across business, personal growth, and the humanities. Includes unlimited reading time and Standard Read Aloud voice.
- Complete: Perfect for advanced learners and researchers needing full, unrestricted access. Unlock 1.5M+ books across hundreds of subjects, including academic and specialized titles. The Complete Plan also includes advanced features like Premium Read Aloud and Research Assistant.
We are an online textbook subscription service, where you can get access to an entire online library for less than the price of a single book per month. With over 1.5 million books across 990+ topics, we’ve got you covered! Learn about our mission
Look out for the read-aloud symbol on your next book to see if you can listen to it. The read-aloud tool reads text aloud for you, highlighting the text as it is being read. You can pause it, speed it up and slow it down. Learn more about Read Aloud
Yes! You can use the Perlego app on both iOS and Android devices to read anytime, anywhere — even offline. Perfect for commutes or when you’re on the go.
Please note we cannot support devices running on iOS 13 and Android 7 or earlier. Learn more about using the app
Please note we cannot support devices running on iOS 13 and Android 7 or earlier. Learn more about using the app
Yes, you can access The Filmmaker's Guide to Final Cut Pro Workflow by Dale Angell in PDF and/or ePUB format, as well as other popular books in Media & Performing Arts & Film & Video. We have over 1.5 million books available in our catalogue for you to explore.