eBook - ePub
The Avid Handbook
Advanced Techniques, Strategies, and Survival Information for Avid Editing Systems
- 368 pages
- English
- ePUB (mobile friendly)
- Available on iOS & Android
eBook - ePub
The Avid Handbook
Advanced Techniques, Strategies, and Survival Information for Avid Editing Systems
About this book
Brimming with workflow efficiencies for the experienced editor, The Avid Handbook teaches you the hows and whys of operating the system in order to reach streamlined, creative end solutions. The book emphasizes time-saving techniques, shortcuts, and workflow procedures- the true keys to getting a job done.
The book has also been updated to include new information on HD formats and workflows, color-correction and grading capability enhancements, MXF media standardization, and much more.
Also new to this edition are an 8 page 4-color insert, adding depth to the color-correction lessons, as well as running sidebars throughout the book, calling out time-saving tips and techniques.
Trusted by 375,005 students
Access to over 1.5 million titles for a fair monthly price.
Study more efficiently using our study tools.
Information
Subtopic
Art GeneralIndex
Computer ScienceASSEMBLING THE TIMELINE 1
“Throw up in the morning. Clean up in the afternoon.”
—Ray Bradbury
Though there are many approaches to an edit, many years ago a friend showed me the quote above, which is perhaps the best explanation of the editorial process I’ve ever seen. In other words, get the elements you need into the timeline first. Once they’re there you can refine and fine-tune them until you get to the final result. These two phases of the edit are where the storytelling is done and where we’ll begin our exploration of Avid Media Composer®. In this chapter we’ll look at the techniques and approaches you would use in the rough-assembly phase. In Chapter 2 we’ll explore the fine-tuning phase.
Building the Story Framework
When it comes to adding material to a timeline, there are two different approaches you can take. The first is the classical source-to-record process where a clip is loaded into the source monitor, marks are made, a location for the edit is selected in the timeline, and then the desired material is added to the timeline. The second is by selecting a clip or clips in a bin, then dragging them to the desired location in the timeline. Both have their advantages and disadvantages. You could, if you wished, build your entire sequence using only one of these two techniques. But if you really want to master the tools that Avid provides you with, you should become comfortable with both.
Source-to-Record Editing
As this is the classic approach, long-time video editors will probably be most familiar with this method. But if you’re more familiar with the drag-and-drop approach to editing, you may find some of these techniques to be a revelation. Even in the rough-assembly stage, the precision available with this sourceto-record editing can be a real time-saver.
Rather than discuss the basic workfl ow for editing from source to record, let’s take a look at some techniques you can use to help with your speed and precision. One of the points to remember about Avid is that there are always multiple approaches that can be used to tackle any problem. For that reason I’ve presented the techniques below, organized into categories rather than by workflow stages.
Finding the Edit Point
Once you’ve loaded the desired shot into the Source monitor, the most common approach to finding the edit point is to push Play and then either place a mark or stop when you reach the desired location. You could also just grab the position indicator and drag it right or left, scrubbing the clip until you find the point you want. Finally, you can also use the frame step keys (mapped by default as numeral keys 1, 2, 3, and 4 on the main keyboard) to move forward or backward by either one or ten frames. All of these approaches work, but there are some additional tools available to you that can really help you find the right place for your mark or edit.
Digital Audio Scrub
One disadvantage to finding your point by dragging the position indicator is that you can see the picture, but you can’t hear the sound. Digital Audio Scrub is designed to address that limitation. When enabled, you hear individual frames of audio as the position indicator passes over them. To enable Digital Audio Scrub:
• Press the Caps Lock key to turn Digital Audio Scrub on. It remains on until you press the Caps Lock key again to turn it off.
• Hold the Shift key down while scrubbing. Using the Shift key will only activate Digital Audio Scrub while it is depressed.
Digital Audio Scrub is most useful when finding the beginning and ending of distinct sounds, such as the beginning and ending of a sound bite. It is, to be honest, fairly useless when trying to find a point in music or even dialog recorded on location in a noisy environment. Indeed, you’ll probably find it to be more annoying than useful in those situations!
Despite this, give it a try. You may find it to be one of the fastest techniques available to quickly hit the beginning and end of a sound bite. But please, for the sake of those nearby and perhaps for your own safety, turn it back off after you’ve used it to find your mark. There are few things more annoying to others within earshot than a continual blip, blip, blip every time you move to a new position in a source or in the timeline. There is a reason why some editors refer to the Caps Lock key as the “torture key”!
I strongly recommend that you use the Shift key instead of the Caps Lock key when using Digital Audio Scrub. That way it is only on for the brief moment of time that you need it on. Believe me, everyone around you will appreciate it. But there is one “gotcha” to using the Shift key: If you want to use it along with the single-frame step keys (mapped to the 3, 4, ←, and → keys by default), you can’t have anything else mapped to the “shifted” state of that key. It is for this very reason that the left and right arrow keys on the default keyboard have the single-frame step commands mapped to each key’s normal and shifted state.
J-K-L Scrub
This is quite possibly the most versatile feature in the system. If you aren’t already using it then it is time to start! J-K-L Scrub is very powerful because it gives you access to all of the following capabilities in just three keys:
Play forward or backward at sound speed (i.e., 29.97 frames per second [fps] for NTSC, and so on).
• Shuttle at high-speed forward or backward.
• Scrub at quarter-speed forward or backward.
• Scrub forward or backward by one frame while hearing audio.
Best of all, you can do all of these not only while looking through your footage or your sequence, but also while trimming it. Also, if your deck supports the full Sony command set, you can also use it while shuttling through a tape.
We call it “J-K-L” Scrub because those are the keys the Play Reverse, Pause, and Play Forward commands are mapped to by default. But you can map them to any keys. For example, on my system I have them mapped to D, F, and G on the left half of the keyboard. Regardless of where you map them, the functionality remains the same. Table 1.1 lists how to access the various play modes. (Note: If you have remapped these commands, press those keys instead.)
Table 1.1 J-K-L Scrub Operation
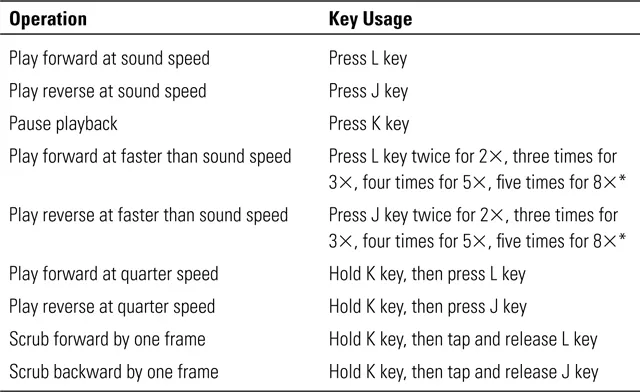
* The sound only plays at speeds up to 3×; once you hit 5×, the sound, thankfully, cuts out.
J-K-L shuttling is great because you can dynamically switch on-the-fly between all of the play modes listed in Table 1.1. This means you can roll forward at 2× speed, switch to 1× reverse speed when you roll past the point you want, then play forward and backward at either quarter speed or frame by frame until you find the exact frame you want. This technique is actually similar, and uses the same default keys, as a linear tape editor used on an edit controller to shuttle through a tape. But shuttling on a computer is far faster than it could ever be on tape, as decks just can’t respond as quickly as a digital system.
Soon you will find yourself cooking through the material at double or triple speed while following the script. Surprisingly, you’ll be able to understand what people are saying and can work consistently at the higher speed, flying faster through the material and more quickly finding what you’re looking for.
One distinct difference between J-K-L Scrub and Digital Audio Scrub is that J-K-L has a more “analog” sound, especially when scrubbing at quarter speed. Long-time editors (those who have been in the business long enough to edit on open-reel decks) often refer to J-K-L as “rocking reels,” as the sound really does match what you’d hear if you were manually scrubbing open-reel audiotape with your hands. As a result, J-K-L Scrub is especially useful for hearing inhales and exhales. When heard at quarter speed, a breath has that distinct “Darth Vader” sound that makes it so easy to hear when someone has finished exhaling or inhaling. Once you start using J-K-L you’ll wonder how you ever managed to cut without it.
Seeking a Specific Timecode
In some cases you may be working with a producer who has screened the footage and has noted a series of “great lines” or similar points and given them to you in an email. Media Composer allows you to easily seek, or jump to, any Society of Motion Picture and Television Engineers (SMPTE) timecode that exists in the loaded source clip. Of course, that means that the timecode has to exist in that clip; if you seek a point outside the timecode range of a loaded clip (e.g., if the clip has timecode from 06:25:05:01 to 06:27:06:25 and you ask it to seek to 06:27:15:00) the system will merely beep at you. To seek to a timecode:
• Load the desired clip into the Source monitor and ensure that the Source monitor is active. (If you aren’t sure, click on the Source monitor to activate it.)
Changing the Way J-K-L Scrub Changes Speed
By default, J-K-L Scrub instantly reverses direction if you switch between forward and reverse play, regardless of the speed you were working at. Many editors prefer this method as it allows them to instantly change direction when they roll past a section they were looking for. But some editors prefer to use J-K-L as much as they would a shuttle knob on a deck. In this case, for example, if you are rolling forward at 3× and turn the knob slightly counterclockwise, the deck slows down slightly, perhaps to 2×, but continues forward. In order to reverse direction, you must roll the knob further counterclockwise through pause and then into reverse.
This approach is known as speed ratcheting and you can configure J-K-L Scrub to ratchet if you wish. To use speed ratcheting with J-K-L:
• Hold the Alt/Option key down while pressing the J, K, and L keys. The following illustration shows how J-K-L ratcheting works.

If you prefer this scrubbing style simply map the Alt/Option modifier to the J, K, and L keys on your keyboard. Then the modifier will be applied automatically, and you don’t need to add it yourself.
Using the keyboard’s numeric keypad, type the desired timecode and press Enter to seek that timecode. (If you are working on a laptop you cannot use the number keys above the letters to enter timecode. Instead you must use the Fn key to enter the numbers using the alphanumeric keys. See your laptop’s manual for more information on using the Fn numeric keyboard.)
Save Keystrokes While Entering Timecode
You do not have to enter the colons (or semicolons if using drop-frame timecode); the system will add them for you automatically. In addition, you only have to enter the portion of the timecode that is unique from the timecode of the frame you parked on. This means that if you are parked on a frame ...
Table of contents
- Cover
- Title
- Copyright
- Contents
- Preface
- 1. Assembling the Timeline
- 2. Zen and the Art of Trim
- 3. Intermediate Techniques
- 4. Avid Administration
- 5. Standard-Definition Video Fundamentals
- 6. The Wild World of High Definition
- 7. Importing and Exporting
- 8. Introduction to Effects
- 9. Conforming and Finishing
- 10. Color Correction
- 11. Troubleshooting
- 12. Nonlinear Video Assistants
- Appendix: Preparing For Linear Online
- Index
- Color Plates
Frequently asked questions
Yes, you can cancel anytime from the Subscription tab in your account settings on the Perlego website. Your subscription will stay active until the end of your current billing period. Learn how to cancel your subscription
No, books cannot be downloaded as external files, such as PDFs, for use outside of Perlego. However, you can download books within the Perlego app for offline reading on mobile or tablet. Learn how to download books offline
Perlego offers two plans: Essential and Complete
- Essential is ideal for learners and professionals who enjoy exploring a wide range of subjects. Access the Essential Library with 800,000+ trusted titles and best-sellers across business, personal growth, and the humanities. Includes unlimited reading time and Standard Read Aloud voice.
- Complete: Perfect for advanced learners and researchers needing full, unrestricted access. Unlock 1.5M+ books across hundreds of subjects, including academic and specialized titles. The Complete Plan also includes advanced features like Premium Read Aloud and Research Assistant.
We are an online textbook subscription service, where you can get access to an entire online library for less than the price of a single book per month. With over 1.5 million books across 990+ topics, we’ve got you covered! Learn about our mission
Look out for the read-aloud symbol on your next book to see if you can listen to it. The read-aloud tool reads text aloud for you, highlighting the text as it is being read. You can pause it, speed it up and slow it down. Learn more about Read Aloud
Yes! You can use the Perlego app on both iOS and Android devices to read anytime, anywhere — even offline. Perfect for commutes or when you’re on the go.
Please note we cannot support devices running on iOS 13 and Android 7 or earlier. Learn more about using the app
Please note we cannot support devices running on iOS 13 and Android 7 or earlier. Learn more about using the app
Yes, you can access The Avid Handbook by Greg Staten,Steve Bayes in PDF and/or ePUB format, as well as other popular books in Computer Science & Art General. We have over 1.5 million books available in our catalogue for you to explore.