A compilation of key chapters from the top Focal game art books available today - in the areas of Max, Maya, Photoshop, and ZBrush. The chapters provide the CG Artist with an excellent sampling of essential techniques that every 3D artist needs to create stunning game art.
Game artists will be able to master the modeling, rendering, rigging, and texturing techniques they need - with advice from Focal's best and brightest authors. Artists can learn hundreds of tips, tricks and shortcuts in Max, Maya, Photoshop, ZBrush - all within the covers of one complete, inspiring reference.
Trusted by 375,005 students
Access to over 1.5 million titles for a fair monthly price.
This first tutorial is designed to get complete beginners up to speed on the basics of modeling using primitive objects and applying textures in the simplest way. In the games industry we lay out the textures in a slightly different way than in this tutorial. You’ll learn that technique in Chapter 2, which covers more complex mapping techniques, but to get any complete beginners through their first complete object build, I have explained the most straightforward method first. This chapter also introduces you to some of the preferences, settings and shortcuts that will speed up your modeling and give you better results.
Setting Up 3ds Max
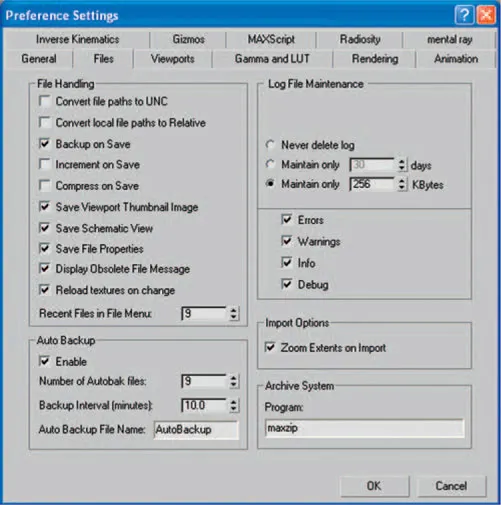
To begin with, we’ll start with some basic settings for 3ds Max. Go to Customize > Preferences > Files. Enable Auto Backup, set number ofAuto Backup files to 9, and set Backup Interval (minutes) to 10, then click OK.
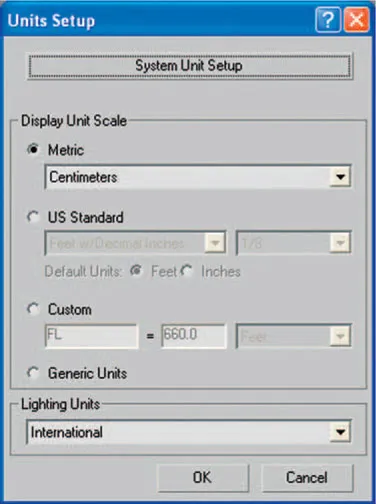
Next we’ll set up the units we’ll be modeling in; these vary from studio to studio, but in this tutorial, one unit equals 1 cm. Go to Customize, Units setup… and select Metric, then click OK.
We will now begin to model a simple object. First, we’ll create a primitive object and scale it to approximately the correct dimensions. We will then apply texture maps to the object, UVW map it and then do some quick renders of it using 3ds Max’s built in scan-line renderer.
If you don’t understand what I mean by “UVW map,” search for the term using the new InfoCenter, or press FI for help and search for the term “Unwrap UVW Modifier”—it explains everything you need to know about this. This goes for anything you don’t understand, or aren’t sure of—just search through the help feature, and it will all be explained to you. Feel free to browse the help, too. You’ll find lots of cool things that would otherwise take you many years to find out on your own.
Creating a Cardboard Box
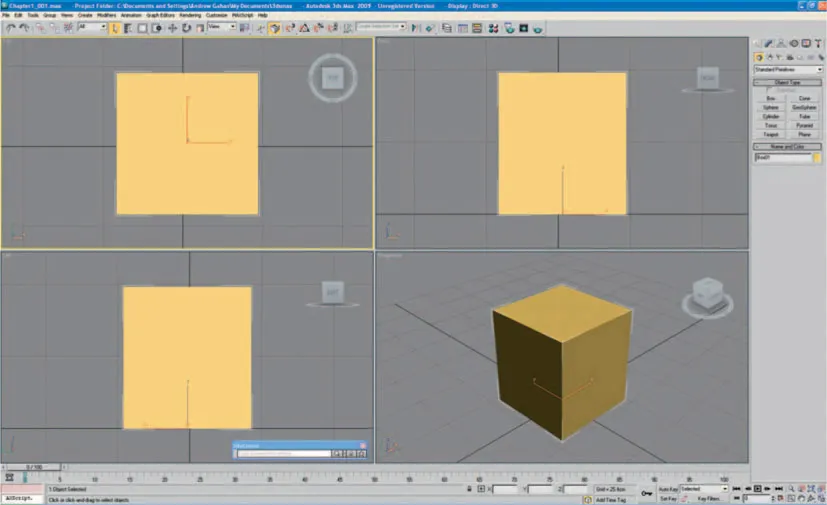
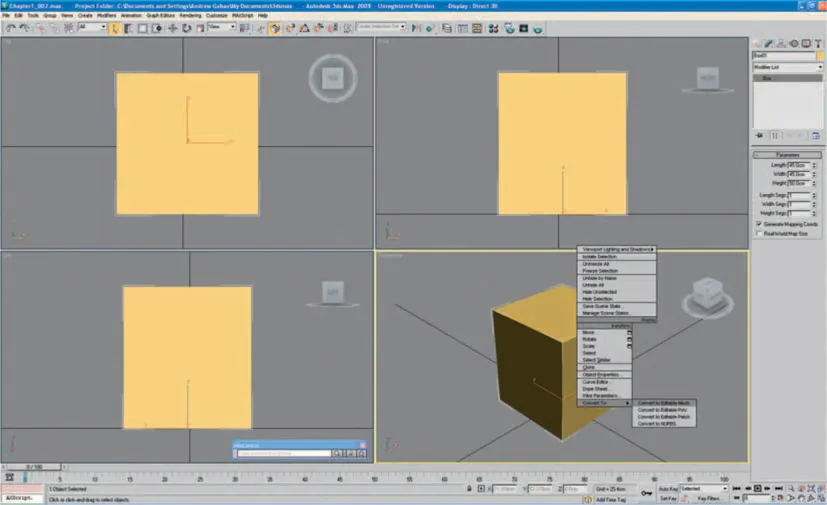
First, we’re going to create the box (Create > Standard Primitives > Box) and set the dimensions to 45 × 45 × 50. Ifyour box is being displayed in wireframe in any of your viewports, just right-click in the viewport and press the F3 key.
With the box selected, right-click it and select “Convert to editable mesh” from the Quad menu.
Now you need to save your progress. Always name your files with a relevant name to make it easier to find your assets later. As this is the first save file, we’ll create a few folders to store all the files that you’ll be working on while using this book. Go to save the file (File > Save as…), create a folder called Game Art Complete, and then create another folder inside the one you’ve just created, called Chapter 1. Now save your file as Cardboard boxl.max or Chapter1_001.max.
We have completed the modeling part of this tutorial. Now we have to apply the texture maps to the faces of the box and our first asset will be complete.
3ds Max Shortcuts
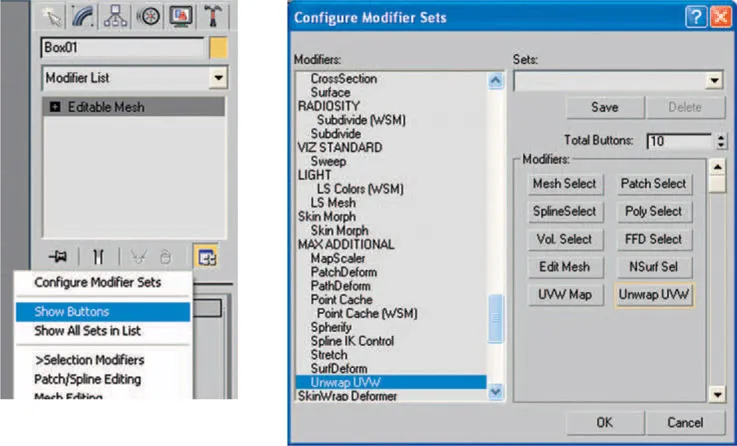
There are a few viewport configurations to help you to speed up the mapping of the box. Go to Modify, click the Configure Modifier Sets button, and select Show Buttons from the menu.
This action displays a set of buttons beneath the Modifier List rollout menu that can be configured to include all your most often used modifiers. Set the Total Buttons value to 10 and add Edit Mesh, UVW Map, and Unwrap UVW to the buttons, as we will use these modifiers the most in the first few chapters of the book. Do this by finding the modifier on the alphabetized list and drag it onto the button. To find a modifier on the list easily, just keep typing the first letter from it on the keyboard, and you will cycle through all the modifiers with that letter (for example, press E for Edit Mesh). Then click OK to close the Configure Modifier Sets window.
Texture Mapping Your Box
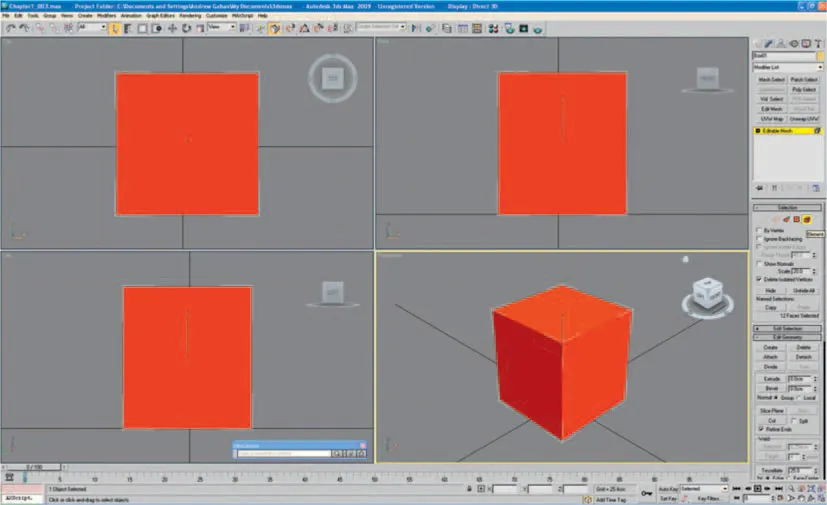
With your box still selected, go to Selection, click Element, and select the box. This should highlight all the faces (press F2 to toggle the highlighted selection).
Now click UVW Map from your newly created modifier set and check Box Mapping from the Parameters menu.
Next, right-click UVW Map in the Modifier stack and select Collapse All from the pop-up menu, then click Yes—you want to continue at the prompt, as we don’t need to preserve the stack in this instance.
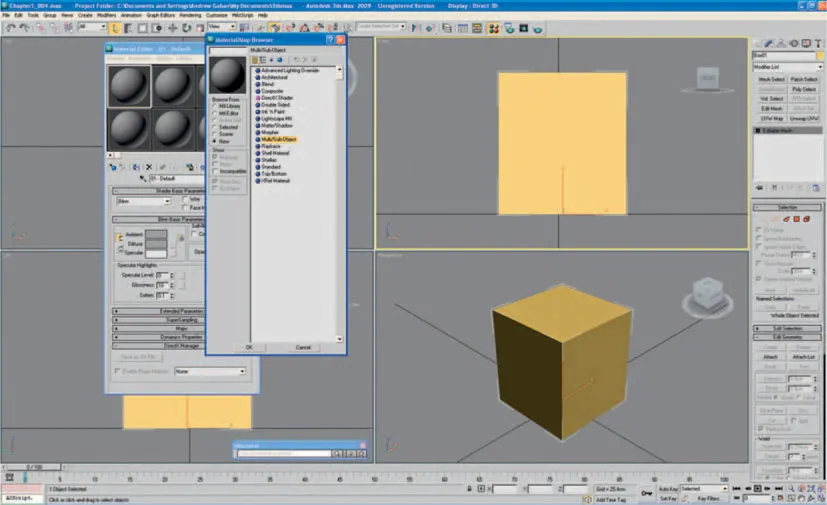
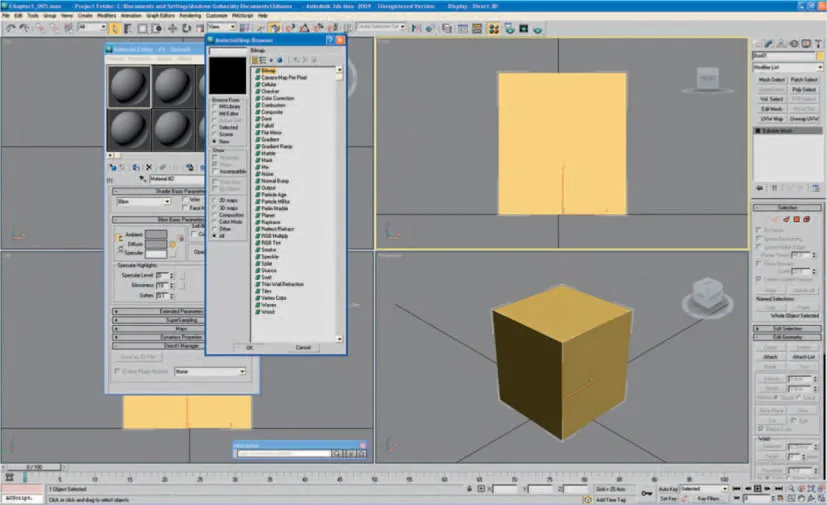
With your box still selected, click on the Material Editor (on the top tool bar) and change the standard material to a multi-sub object material as shown, clicking OK to discard the old material. If you keep the old material by accident, don’t worry—it doesn’t matter either way in this instance, as we are creating new ones.
To keep this first tutorial simple, I have already prepared the texture maps that you’ll be using from photographs. In Chapter 3, we will cover this process in a lot of detail, showing how to take photographs, how to modify them in Photoshop, and how to apply them to models.
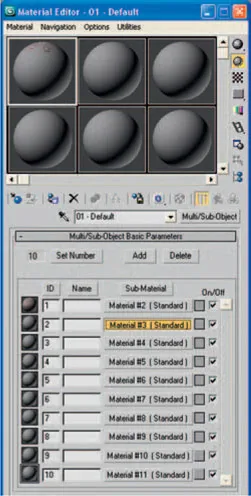
To add the textures into the material editor, select the material ID from the vertical list and load in the texture map for each side of the box. Although there are ten materials displayed in the editor, we’ll just use the first six listed Material #2 through to Material #7 in my case. Yours could have different names, depending on how you have used 3ds Max previously. Don’t worry if your names don’t match mine at this point, as they can be renamed.
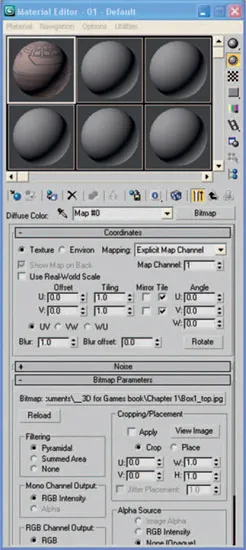
Click on the first material in the list, next to ID 1 (Material #2 in my case) and assign a Bitmap material to it. To do this, click the small square button on the right of“diffuse”in Blinn Basic Parameters, select Bitmap from the top of the pop-up menu, and click OK.
Now load Box1_top.webp from \Chapter 1\Textures\, which you should have downloaded from the Web site. If you haven’t downloaded the source files already, go to www.GameArtComplete.com and follow the instructions for downloading the files you’ll need.
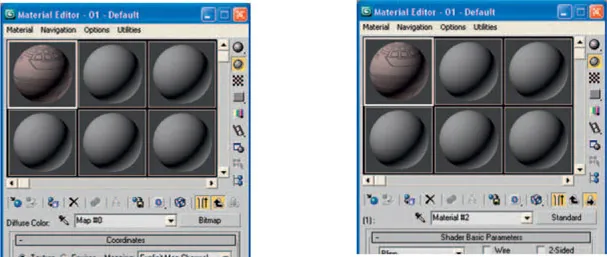
There are two ways to assign the next material to ID 2. The first way is to click on the Go To Parent button, then click the Go Forward To Sibling button (as shown here).
The second method is to click the Go To Parent button twice, then select the second material in the list (as shown in the figure).
Then repeat the process of clicking the small square button to the right of “diffuse”in Blinn Basic Parameters, selecting Bitmap from the top of the pop-up menu, and clicking OK.
As you assign each material a texture map, click the Show Standard Map in Viewport button,
so that when you Assign Material to Selection the textures are visible on the object.
Repeat this process for ID 2 through ID 6, loading the remaining five texture maps into the material editor and ending with Box1_base.webp being assigned to ID 6.
Here’s how they should be assigned:
ID 1—Material #2—Box1_top.webp
ID 2—Material #3—Box1_sid1.webp
ID 3—Material #4—Box1_ sid2.webp
ID 4—Material #5—Box1_ sid3.webp
ID 5—Material #6—Box1_ sid4.webp
ID 6—Material #7—Box1_base.webp
Remember that your Material number may differ from the numbers I have. As long as you match the ID (number)—for example, ID 1 goes with the corresponding texture map, in this case Box1_top.webp—then you’ll be okay. Also make sure that you remember to select Show Standard Map in Viewport
.
Now that we have assigned texture maps to all of the materials, we will ap...
Table of contents
Cover
Half Title
Title
Copyright
Contents
Introduction
Chapter 1 Creating a Box Using 3ds Max (Andrew Gahan)
Chapter 2 Creating an Oil Drum Using 3ds Max (Andrew Gahan)
Chapter 3 Creating Texture Maps from Photographs Using Photoshop (Andrew Gahan)
Chapter 4 Creating Normal Maps Using Photoshop and Crazy Bump (David Wilson)
Chapter 5 Concept Art (Jason Patnode)
Chapter 6 Anatomy (Jason Patnode)
Chapter 7 A Basic (Game) Art Education (Luke Ahearn)
Chapter 8 The Basic 3D Kit Using Maya (Jean-Marc Gauthier)
Chapter 9 Pipeline and Modeling Guidelines Using Maya (Jason Patnode)
Chapter 10 Overview of Maya (Jason Patnode)
Chapter 11 Introduction to ZBrush Modeling (Jason Patnode)
Chapter 12 Designing Your First Biped Character Using Photoshop and Maya (Cheryl Cabrera)
Chapter 13 Creating Your First Biped Character: Modeling Basics Using Maya (Cheryl Cabrera)
Chapter 14 Creating Your First Biped Character: Facial Expressions Using Maya (Cheryl Cabrera)
Chapter 15 Creating Your First Biped Character: Shading and Texturing Basics Using Maya (Cheryl Cabrera)
Chapter 16 High Poly and Low Poly Character Modeling Using 3ds Max and Photoshop (Tom Painter)
Index
Frequently asked questions
Yes, you can cancel anytime from the Subscription tab in your account settings on the Perlego website. Your subscription will stay active until the end of your current billing period. Learn how to cancel your subscription
No, books cannot be downloaded as external files, such as PDFs, for use outside of Perlego. However, you can download books within the Perlego app for offline reading on mobile or tablet. Learn how to download books offline
Perlego offers two plans: Essential and Complete
Essential is ideal for learners and professionals who enjoy exploring a wide range of subjects. Access the Essential Library with 800,000+ trusted titles and best-sellers across business, personal growth, and the humanities. Includes unlimited reading time and Standard Read Aloud voice.
Complete: Perfect for advanced learners and researchers needing full, unrestricted access. Unlock 1.5M+ books across hundreds of subjects, including academic and specialized titles. The Complete Plan also includes advanced features like Premium Read Aloud and Research Assistant.
Both plans are available with monthly, semester, or annual billing cycles.
We are an online textbook subscription service, where you can get access to an entire online library for less than the price of a single book per month. With over 1.5 million books across 990+ topics, we’ve got you covered! Learn about our mission
Look out for the read-aloud symbol on your next book to see if you can listen to it. The read-aloud tool reads text aloud for you, highlighting the text as it is being read. You can pause it, speed it up and slow it down. Learn more about Read Aloud
Yes! You can use the Perlego app on both iOS and Android devices to read anytime, anywhere — even offline. Perfect for commutes or when you’re on the go. Please note we cannot support devices running on iOS 13 and Android 7 or earlier. Learn more about using the app
Yes, you can access Game Art Complete by Andrew Gahan in PDF and/or ePUB format, as well as other popular books in Computer Science & Digital Media. We have over 1.5 million books available in our catalogue for you to explore.