In the previous chapter, we discussed the importance of the Official Unity Programmer exam and what benefits it can produce for any developer who is looking to reassure either themselves or others in understanding programming in Unity. We also discussed the building blocks of being a programmer in general and our game's design brief.
As we are programmers working on a game engine, it is likely you will be working for a range of industries. In many of these industries, you will be issued with a technical brief/documentation (well, you should be!) for building the application. With this project, we are making a game and the game design brief is effectively the blueprint for making this game. In this chapter, we will be applying the majority of our code, game objects, prefabs, and more, based on the guidance of the brief and the game framework. We will be reminding ourselves of the brief and game framework during this chapter and will transfer specific information across into our code.
With regard to our code, we will be covering the importance of interfaces and scriptable objects to help structure and uniform our code to help it from bloating unnecessarily, which we covered in Chapter 1, Setting Up and Structuring Our Project with SOLID principles. We will also be getting used to the Unity editor and becoming familiar with game objects, prefabs, and importing three-dimensional models to animate.
In this chapter, we'll be covering the following topics:
- Setting up our Unity project
- Introducing our interface (IActorTemplate)
- Introducing our ScriptableObject (SOActorModel)
- Setting up our Player, PlayerSpawner, and PlayerBullet scripts
- Planning and creating our enemy
- Setting up our EnemySpawner and enemy script
The next section will outline the exam objectives covered in this chapter.
Core exam skills covered in this chapter
Programming core interactions
- Implement and configure game object behavior and physics.
- Implement and configure inputs and controls.
- Implement and configure camera views and movement.
Working in the art pipeline
- Understand lighting, and write scripts that interact with Unity’s lighting API.
- Understand two- and three-dimensional animation, and write scripts that interact with Unity’s animation API.
Programming for scene and environment design
- Identify methods for implementing game object instantiation, destruction, and management.
Working in professional software development teams
- Recognize concepts associated with the uses and impact of version control, using technologies such as Unity Collaborate.
- Demonstrate knowledge of developer testing and its impact on the software development process, including Unity Profiler and traditional debugging and testing techniques.
- Recognize techniques for structuring scripts for modularity, readability, and re-usability.
Technical requirements
The project content for this chapter can be found at https://github.com/PacktPublishing/Unity-Certified-Programmer-Exam-Guide/tree/master/Chapter02.
You can download the entire chapter project files at https://github.com/PacktPublishing/Unity-Certified-Programmer-Exam-Guide/archive/master.zip.
All content for this chapter is held in the relevant unitypackage file, including a Complete folder that contains all of the work we'll carry out in the chapter, so if at any point you need some reference material or extra guidance, be sure to check it out.
Check out the following video to see the Code in Action: https://bit.ly/3i2OnW6.
Setting up our Unity project
Things can get messy quickly in a project if we don't manage our files correctly by placing them into the allocated folders. If you want to structure your folders your own way, or during the book you decide to stray away from how I'm doing it, that's also fine. Just try and be conscious of your future self or other people working on this project when it comes to finding and organizing files.
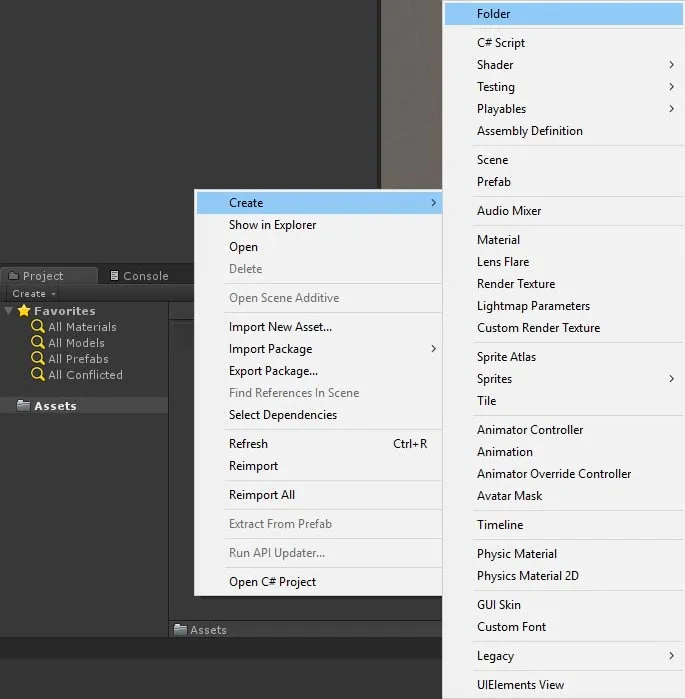
Open the project up if you haven't already and create the following folders:
- Model contains 3D models (player ship, enemies, bullets, and so on).
- Prefab holds instances of game objects (these are created within Unity).
- Scene stores our first-level scene as well as other levels.
- Script contains all of our code.
- Material stores our game object materials.
You should know what a prefab is, as it's one of the main parts of what makes Unity so quick and easy to use. However, if you don't: it's typically your game object with its settings and components stored in an instance. You can store your game objects in your Project window as prefabs by dragging the game object from the Hierarchy window. A blue box icon will be generated following the game object's name, and if you select the prefab in the Project window, its Inspector window details will show all its stored values. If you would like to know more about prefabs, you can check out the documentation at https://docs.unity3d.com/Manual/Prefabs.html.
The following screenshot shows you how to create these folders:
Follow the steps given below:
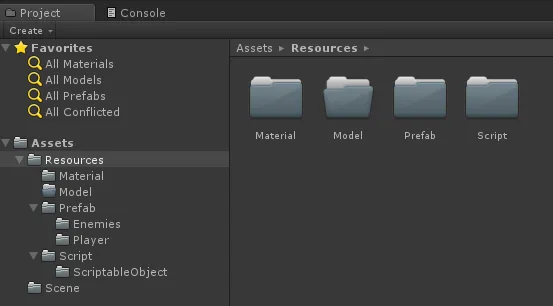
- Within our Prefab folder, create another two folders, Enemies and Player.
- Inside the Script folder, create a folder called ScriptableObject.
- Create a folder in the Assets folder called Resources, and move our Model, Prefab, Script, and Material folders into it. The following screenshot shows what our folder structure should look like now:
Resources is a special folder that Unity recognizes. It will allow us to load assets while the game is running. For more information about the Resources folder, check the documentation at https://docs.unity3d.com/Manual/BestPracticeUnderstandingPerformanceInUnity6.html.
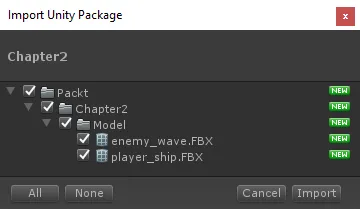
Provided in the Technical requirements section is the download link for the GitHub repository of this chapter. Once downloaded, double-click the Chapter2.unitypackage file and we will be given a list of assets to import into our Unity project:
- Player_ship.fbx
- enemy_wave.fbx
The following screenshot shows the import window of the assets we are about to bring into our project:
Make sure all assets are ticked and click the Import button in the bottom-right corner of the window. We can now move on ...