A step-by-step guide to two essential tools for textile and fashion designers. Designer and educator Robert Hume guides you from novice to expert through 20 carefully crafted projects. You'll start by mastering layers and custom brushes, learning about stripes and weaves, scanning and manipulation before moving on to repeats, colorways, and simple geometry. Next, transformations, filters and effects become tools for your personal creativity and you'll explore varied approaches to drawing garments. Finally, you'll learn about key layout and presentation techniques in both programs. There's also advice on sharing, communication and output, and help with diagnosing and correcting common problems. Files for many of the projects are available from: www.bloomsburyonlineresources.com/fashion-and-textile-design-with-photoshop-and-illustrator-2e Seven case studies showcase the work and creative thinking of innovative professional designers. These designers offer insight and inspiration to help you develop your own successful and inventive designs. This new edition incorporates updates to Photoshop and Illustrator CC and a new extended introduction outlines the layout of each program and good practice in working with their tools and windows. There are also two new projects, the first will help you draw a pair of jeans using closed path ways, incorporating distressing and treatments such as stone-washing and whiskering. The second new project shows how to create a paisley design using Illustrator brushes to add complexity in design work.
eBook - ePub
Fashion and Textile Design with Photoshop and Illustrator
Professional Creative Practice
- 312 pages
- English
- ePUB (mobile friendly)
- Available on iOS & Android
eBook - ePub
About this book
Trusted by 375,005 students
Access to over 1.5 million titles for a fair monthly price.
Study more efficiently using our study tools.
Information

LEVEL THREE
3
This section builds on core techniques set out in earlier projects to tackle a series of advanced tasks. You will learn sophisticated techniques and practise working in both Photoshop and Illustrator at the level of a professional designer.
PROJECT THIRTEEN—ILLUSTRATOR: THE BLOB AND ART BRUSHES
| 13 | The Blob Brush in Illustrator is a tool that lends itself to loose and expressive marks. It paints filled shapes, and these shapes can intersect and merge with other shapes of the same colour. While that may not seem very spectacular, what the Blob Brush actually offers is a very naturalistic and free-flowing pen tool in Illustrator. With a pressure sensitive pen and tablet the marks become very responsive. The Blob Brush has more of the look of a soft brush and ink than the actual Calligraphic Brush, which creates a varying stroked path with a ribbonlike quality. The Blob Brush can be set to calligraphic brush options and produce the same style of mark but as filled objects. The Blob Brush is an economical tool in that it creates marks with the minimum anchor points, even when there is a lot of variation in the tool. |
| Although the Blob Brush creates objects or shapes with a fill and no stroke, it actually takes the colour for the fill counterintuitively from the stroke setting in the Toolbar. When drawing with the Blob Brush tool, new paths merge with the topmost path of an object encountered of the same colour. If the new path touches more than one matching path on the same layer, then all of the intersecting paths are merged together. Blob Brush will also merge with paths created by other tools if those objects have no stroke and have the same fill as the Blob Brush. By double-clicking on the tool button you can access the options on the tool. Good results are often produced by a close fidelity setting for following your pen movements but a high variation in width setting based on pen pressure. Because Blob Brush can produce quite soft ink- and paint-like marks without adding any extra colours it is well suited to textiles and fashion design. | |
| With the Art Brush a graphic or an image takes the shape of the stroke, scaling, bending and stretching with the shape of the stroke gesture. By default the brush shape is stretched evenly along the length of the path and the excellent variant of the brush—the segmented Art Brush—enables a non-stretchable portion to be defined. This gives a lot of variation to the brush marks where you want it and without distortion in the elements where you don’t. | |
| Brushes that add colours or tones can make things more complicated for printing, requiring tonal separations or additional screens. So while the Bristle Brush can deliver interesting visual effects, a flat Art Brush with lots of fine, but single-tone, detail might be preferable. | |
| One of Adobe’s smaller apps, called Adobe Capture, enables you to capture objects, marks and textures with your phone or tablet camera and translate them smoothly into brushes. These brushes can be stored as assets in your Creative Cloud library where they become available in Illustrator, or you can send them as attachments so that you or others can import the brush that way. |

1
Two different ways of creating visually similar objects. On the right, a stroked path drawn with the Paintbrush tool and on the left, a filled object drawn by the Blob Brush tool.
ILLUSTRATOR: THE BLOB AND ART BRUSHES
In this project you will:
•Draw a section of a flower, creating some variations in your marks as you go.
•Use this to make an art brush to then draw the head of a flower.
•Add a stem to the flower, and in turn make this complete flower into an Art Brush.
•Be able to quickly create an allover print design using the new brush.
Outcome
You should have a flower brush that can be made to vary every time you draw with it. You should understand that this approach could be applied to every Art Brush to quickly create variations in your motifs and easily generate material for repeat patterns.
Aim
You should understand that brushes could be used to build further brushes. By controlling the variation to a segment of the brush, multiples of a motif can be drawn, all with slight differences. This approach can be applied to any Art Brush to quickly create variations in your motifs.

13.1
Create a new A4 document. Have print as the profile.

13.2
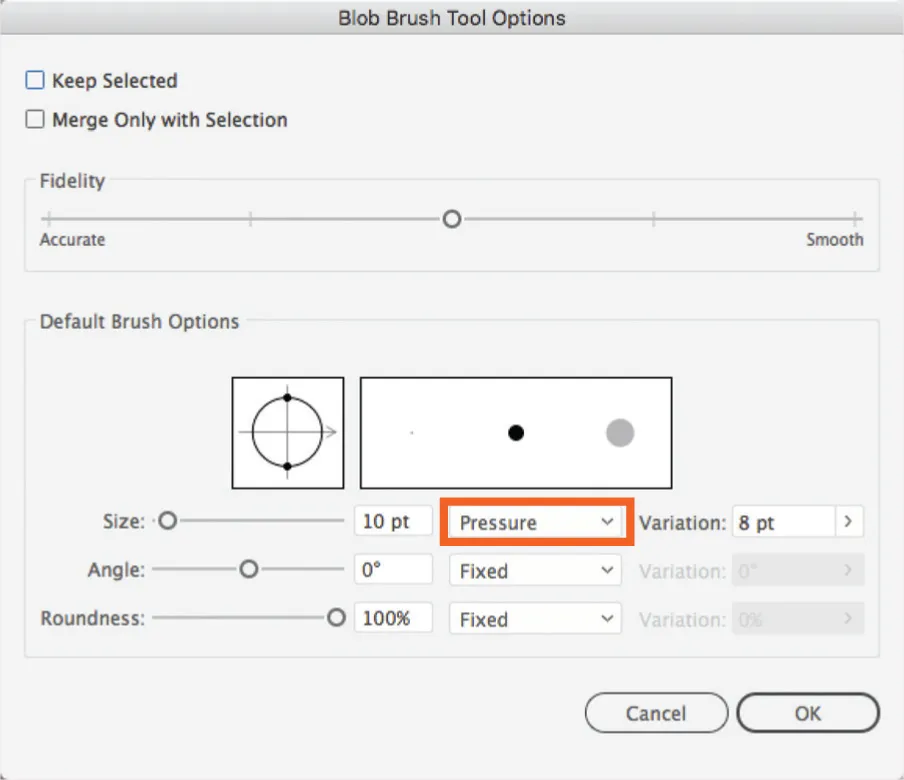
Use the shortcut shift + B to select the Blob brush. Now double-click on the Blob Brush icon in the Toolbar. This opens the options window. If you don’t have a pressure sensitive pen and tablet, such as a Wacom, then you will not have the advantage of the variation available in the Blob Brush. If you do have a pen and tablet, then from the first drop-down menu select Pressure so that the brush will react to pen pressure for greater expressiveness in your artwork. There are many ways to adjust the brush and replicate some of the natural variation of nondigital media. (fig. 3)
13.3
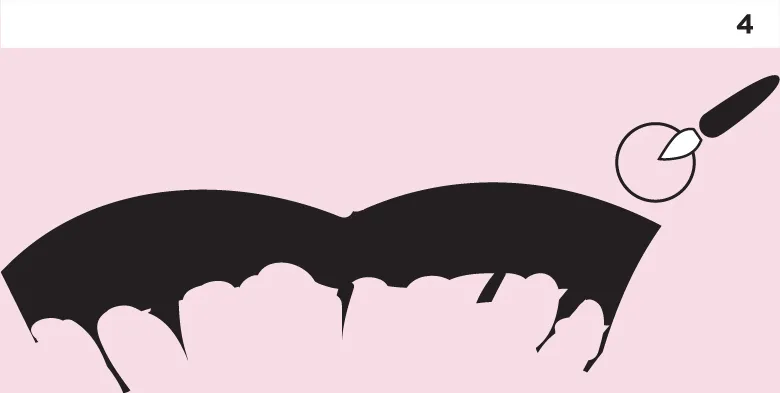
Use the Blob Brush to draw something like an edge of one or two carnation-type petals (see the accompanying illustration, fig. 10). Note that although you are creating filled shapes with the Blob Brush it takes its colour, because it is a Brush tool, from the current stroke colour. Make sure this is black. You can further refine your drawing with the eraser tool. Note that the top of the Wacom pen can be used to immediately access the eraser by turning the pen over and working with that end. (fig. 4)
13.4
Open the Brushes window if it is not already open. With the Selection tool drag the petal shape you have created into the brushes window. A New Brush window will open, asking you to select which type of brush you will be creating. Select Art Brush. With an Art Brush, when you draw a path, the motif by default is stretched evenly along...
Table of contents
- Cover
- Title Page
- CONTENTS
- INTRODUCTION
- LEVEL ONE
- LEVEL TWO
- LEVEL THREE
- SHARING, COMMUNICATION AND OUTPUT
- APPENDIX
- eCopyright
Frequently asked questions
Yes, you can cancel anytime from the Subscription tab in your account settings on the Perlego website. Your subscription will stay active until the end of your current billing period. Learn how to cancel your subscription
No, books cannot be downloaded as external files, such as PDFs, for use outside of Perlego. However, you can download books within the Perlego app for offline reading on mobile or tablet. Learn how to download books offline
Perlego offers two plans: Essential and Complete
- Essential is ideal for learners and professionals who enjoy exploring a wide range of subjects. Access the Essential Library with 800,000+ trusted titles and best-sellers across business, personal growth, and the humanities. Includes unlimited reading time and Standard Read Aloud voice.
- Complete: Perfect for advanced learners and researchers needing full, unrestricted access. Unlock 1.5M+ books across hundreds of subjects, including academic and specialized titles. The Complete Plan also includes advanced features like Premium Read Aloud and Research Assistant.
We are an online textbook subscription service, where you can get access to an entire online library for less than the price of a single book per month. With over 1.5 million books across 990+ topics, we’ve got you covered! Learn about our mission
Look out for the read-aloud symbol on your next book to see if you can listen to it. The read-aloud tool reads text aloud for you, highlighting the text as it is being read. You can pause it, speed it up and slow it down. Learn more about Read Aloud
Yes! You can use the Perlego app on both iOS and Android devices to read anytime, anywhere — even offline. Perfect for commutes or when you’re on the go.
Please note we cannot support devices running on iOS 13 and Android 7 or earlier. Learn more about using the app
Please note we cannot support devices running on iOS 13 and Android 7 or earlier. Learn more about using the app
Yes, you can access Fashion and Textile Design with Photoshop and Illustrator by Robert Hume in PDF and/or ePUB format, as well as other popular books in Design & Fashion Design. We have over 1.5 million books available in our catalogue for you to explore.