In this very first chapter, we will learn about the basics of Azure networking, including creating Azure virtual networks and designing address spaces and subnets. This will lay the foundation for all future recipes that will be covered in this chapter.
We will cover the following recipes in this chapter:
- Creating a virtual network in the Azure portal
- Creating a virtual network with PowerShell
- Adding a subnet in the Azure portal
- Adding a subnet with PowerShell
- Changing the address space size
- Changing the subnet size
Technical requirements
For this chapter, the following is required:
- An Azure subscription
- Azure PowerShell
The code samples can be found at https://github.com/PacktPublishing/Azure-Networking-Cookbook-Second-Edition/tree/master/Chapter01.
Creating a virtual network in the Azure portal
Azure Virtual Network represents your local network in the cloud. It enables other Azure resources to communicate over a secure private network without exposing endpoints over the internet.
Getting ready
Before you start, open a web browser and go to the Azure portal at https://portal.azure.com.
How to do it…
In order to create a new virtual network using the Azure portal, take the following steps:
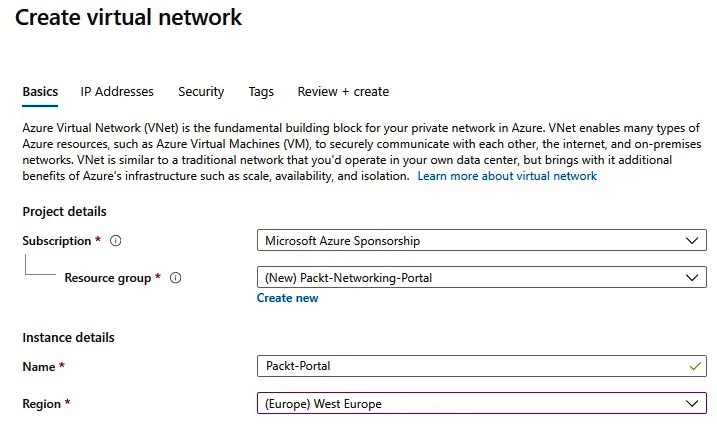
- In the Azure portal, select Create a resource and choose Virtual network under Networking (or search for virtual network in the search bar). A new pane will open, where we need to provide information for the virtual network. First, select the Subscription option we want to use and the Resource group option for where the virtual network will be deployed. Then, include a name and select a region (of the Azure datacenter) for where the virtual network will be deployed. An example is shown in Figure 1.1:
Figure 1.1: Creating an Azure virtual network
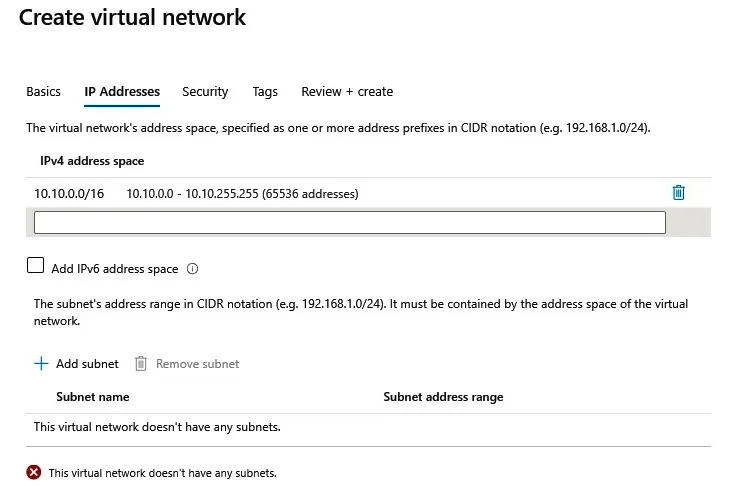
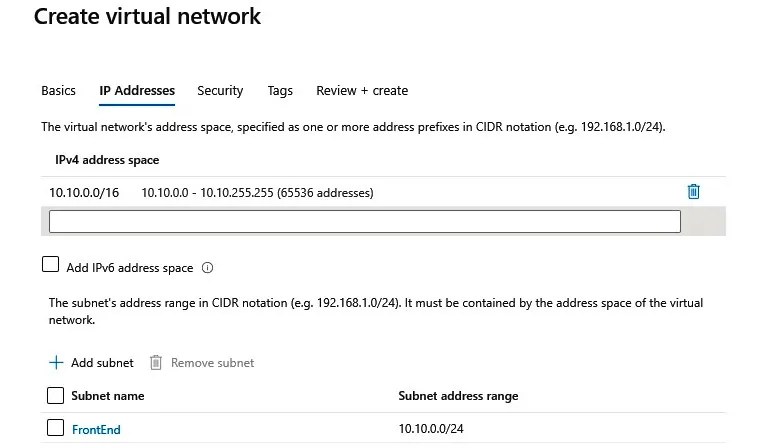
- In the next pane, we first need to define the address space and define the Subnet name and Subnet address range values for the first subnet. After the address space is defined, as shown in Figure 1.2, we will receive a message stating that This virtual network doesn't have any subnets. Therefore, we need to select the Add subnet option:
Figure 1.2: Configuring a virtual network address space and subnet
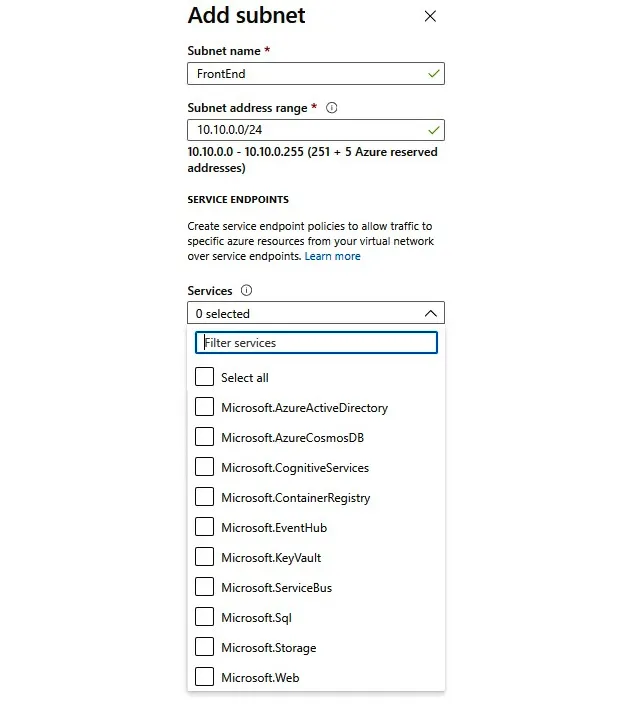
- In the Add subnet pane, we need to define Subnet name and Subnet address range. Optionally, we can add service endpoints we want to connect to the virtual network. Service endpoints allow us to connect to Azure services in a secure way, over Azure backbone infrastructure, without needing a public IP address. An example is shown in Figure 1.3:
Figure 1.3: Adding a subnet
- After we have added the first subnet, in our case, FrontEnd, we can add more subnets to the virtual network or proceed to the Security section, as shown in Figure 1.4:
Figure 1.4: Adding the FrontEnd subnet
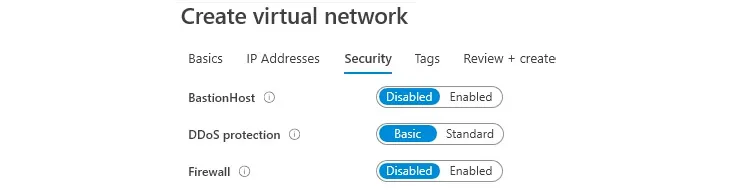
- In the Security section, we can choose whether we want to enable Bastion Host, DDoS protection, and Firewall. If any of these options are enabled, we need to provide additional information for that service. Afterward, we can optionally add tags, or skip that and create the service. An example is shown in Figure 1.5:
Figure 1.5: Toggling security options
- Creating a virtual network usually does not take much time and should be completed in under two minutes. Once the deployment is finished, we can start using the virtual network.
How it works…
We deploy virtual networks to Resource group under Subscription in the Azure datacenter that we choose. Region and Subscription are important parameters; we will only be able to attach Azure resources to this virtual network if they are in the same subscription and region as the Azure datacenter. The address space option defines the number of IP addresses that will be available for our network. It uses the Classless Inter-Domain Routing (CIDR) format and the largest range we can choose is /8. In the portal, we need to create an initial subnet and define the subnet address range. The smallest subnet allowed is /29 and the largest is /8 (however, this cannot be larger than the virtual network range). For reference, the range 10.0.0.0/8 (in CIDR format) will create an address range of 167772115 IP addresses (from 10.0.0.0 to 10.255.255.255) and 10.0.0.0/29 will create a range of 8 IP addresses (from 10.0.0.0 to 10.0.0.7).
Creating a virtual network with PowerShell
PowerShell is a command-line shell and scripting language based on .NET Framework. It's often used by system administrators to automate tasks and manage operating systems. Azure PowerShell Az is a PowerShell module that allows us to automate and manage Azure resources. Az is also very often used to automate deployment tasks and can also be used to deploy a new Azure virtual network.
Getting ready
Before we start, we need to make sure that we have the latest Az modules installed. To install Az modules, we need to run this command in the PowerShell console:
Install-Module -Name Az -AllowClobber -Scope CurrentUser
For more information, you can visit https://docs.microsoft.com/powershell/azure/install-az-ps?view=azps-4.5.0.
Before we start, we need to connect to the Azure subscription from a PowerShell console. Here's the command to do this:
Connect-AzAccountAzAccount
This will open a pop-up window where we need to input the credentials for the Azure subscription.
Afterward, we need to create a resource group where our virtual network will be deployed:
New-AzResourceGroup -name 'Packt-Networking-Script' -Location 'westeurope'
The output should be similar to that shown in Figure 1.6:
Figure 1.6: Connecting to an Azure subscription from PowerShell
How to do it…
D...