Pro photographer Boyd Norton provides expert advice and hard-won secrets on digital wildlife, landscape, and nature photography. Guiding you from the field to the computer, he reveals how to create superb nature and landscape photographs with your digital camera. Lenses, lighting, and much more are discussed for the professional and amateur alike. Filled with helpful tips and tricks, this comprehensive volume will hone your technique while expanding your creativity. The ultimate guide for outdoor photographers making the leap to digital!
- 208 pages
- English
- ePUB (mobile friendly)
- Available on iOS & Android
eBook - ePub
About this book
Trusted by 375,005 students
Access to over 1.5 million titles for a fair monthly price.
Study more efficiently using our study tools.
Information
Subtopic
Digital MediaCHAPTER 1
DIGITAL BASICS
Image sensors. Megapixels. Image storage. RAW versus JPEG. Flash memory cards. Portable hard drives. Sensor size and multiplier effect.
Without getting deep into the world of electronics and quantum physics, it is useful to have a basic understanding about how digital technology works. If you are an experienced film shooter and have used some of the newest film cameras, you won’t find a significant difference in the basics of the cameras themselves. The digital photographer uses sophisticated metering systems and sets functions, such as aperture priority or shutter priority or fully automatic mode, just as on the newer film cameras. Shutter speeds and f-stops still function in the same way as on film cameras, controlling the amount of light that reaches the recording medium. If you are an advanced photographer, you undoubtedly use a single lens reflex (SLR) film camera; in switching to digital, you’ll use a digital single lens reflex (DSLR) camera.
The big difference is NO FILM. Instead, your digital SLR has an electronic image sensor. Rather than producing a physical piece of film, negative, or slide as a final product, you will create a digital file stored on magnetic or optical media. For longtime film shooters (like me), it’s a bit scary knowing that your precious image is an ephemeral collection of 0s and 1s represented as binary data instead of something you can hold in your hand like a slide or negative.
But relax. You’ll soon discover that you can handle it and enjoy the many advantages of digital photography.
HOW MANY MEGAPIXELS?
There are two basic types of image sensors: CCD (charged couple device) and CMOS (complementary metal oxide semiconductor). The latter is the most common. There may very well be some newer devices lurking in the wings. (And that’s what makes digital photography pretty exciting nowadays. It just keeps getting better and better.) But for now these are the major devices used to record images. In their simplest forms, a CCD sensor and a CMOS sensor both do the same thing: convert photons of light into electrical pulses. If you were to look at a sensor under a microscope, you’d see that the surface consists of a rectangular grid pattern of thousands of separate, tiny elements, and each element in that pattern is, basically, a pixel.
Pixels are roughly analogous to the light-sensitive grains in film emulsion. In film, a photon of light hitting the light-sensitive grain causes an invisible chemical reaction to take place, later to be made visible by developing the film with proper chemicals. In a digital sensor, the light causes an electrical impulse, a charge that is directly proportionate to the intensity of the light striking it. Moreover, each pixel has its own color filter, and each one captures only red or green or blue light. So the overall sensor is composed of a mosaic of microscopic pixels that record the red, green, or blue information from a full-color image formed by a lens.
But that’s not enough. The electrical charges on each pixel have to be processed to be usable, and an internal device in the camera converts it from an analog to a digital impulse in numerical binary form (that’s those 0s and 1s) to be further processed and stored. In essence, each digital camera contains its own microprocessor (computer). It’s a powerful processor that has to perform numerous tasks:

In doing all this, the processor (also known as a converter) creates what are known as RAW image files. These files contain all the basic data about the image and allow for great adjustments to be made later in imaging programs like Photoshop. In addition, the processor may also create JPEG files in which it interprets, to a large degree, what the image should look like and then compresses it. Compared to RAW files, JPEG files have limited editing capability, but they are convenient in not having to be processed further to be usable. As you’ll see, if you save your images as RAW files, you have enormous control over how the images are interpreted and rendered later.
The sensor is one factor that helps to create images of good resolution. Say the rectangular sensor grid consists of 4,000 pixels by 2,000 pixels; multiplied out, that gives 8 million pixels, or 8 megapixels. The higher the megapixel count, the better the image—right? Is bigger always better? Sometimes, but not necessarily. There are other factors that enter into the resolution of the final image, including the following:
So the pixel count is only a rough measure, and in fact, the quality of the sensor itself varies from manufacturer to manufacturer.
Returning to my film analogy, even the finest-grain film will do you no good if you hang a lens of mediocre quality on the camera. And, further, the image quality may suffer if you choose el cheapo drugstore processing for your film over good-quality photo lab processing.
Complicating the digital image situation even more is that there are now programs for processing images, called interpolation programs, that can allow you to take a smaller-sized digital image and blow it up to a very large print size with amazing quality. I’ll deal with this in chapter 12.

A traffic jam outside the Kremlin in Moscow. Note the arrow pointing to the car’s license plate.

Here is the car’s plate blown up 1,600 percent. Note the pixels that make up the image.
IMAGE STORAGE
Perhaps the number one factor in making digital photography a portable replacement for film photography was the development of flash memory storage devices. In your computer, data is stored on hard drives—mechanical devices that write those 0s and 1s to a magnetic disk spinning at very high speeds. Even with miniaturization, such storage devices would make a camera excessively big and bulky. In addition, the moving parts—spinning magnetic disks—make these devices vulnerable to shock and possible failure and loss of data. Not good.
Flash memory cards are static devices; that is, they have no moving parts. This makes them more rugged and allows them to be used in environments where hard drives would be too delicate. These media storage cards come in several varieties, depending on the camera system: CompactFlash (CF), Secure Digital (SD), xD, and Memory Stick. More types may well emerge in the future.
In the early years of use, flash memory cards were of rather low capacity—perhaps 256 megabytes (MB). As image sensors increased in megapixel capability, such small storage capacity resulted in photographers sacrificing either quantity or quality. It was necessary either to purchase a lot of cards or to store image files as compressed JPEGs (more on this below) to maximize the space available. After all, if each picture you took was 10MB, you could only store twenty-five pictures per card. In recent years, the flash storage capacity has increased enormously: 4-gigabyte (GB) cards are common, and capacities up to 64GB are available, with possible higher capacities in the offing.
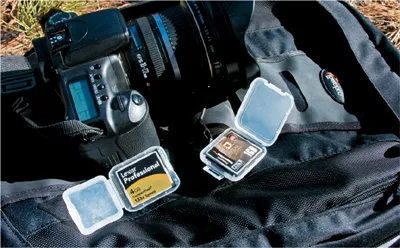
Compact flash memory cards keep coming in larger and larger capacities that allow more pictures to be stored.
I should mention one other type of storage card: micro drives. These are miniaturized hard drives made almost as small and portable as some of the flash memory cards mentioned above. These can achieve storage capacities equivalent to the flash memory cards, and some (but not all) DSLRs can accept them. There is debate in the digital photography community about the reliability of these micro drive cards. They are mechanical, with moving parts, and may not be as rugged and reliable as flash memory cards.
So how many pictures can you store on a flash card? The answer depends on three factors: the camera’s sensor, the camera’s internal processor, and how you choose to store the images (RAW, JPEG, or RAW+JPEG). For example, on one of my camera bodies, a Canon Digital Rebel xTi (a 10-megapixel camera), saving the images as a RAW plus medium JPEG simultaneously allows me to store about two hundred images on a 4GB card. If I were to choose to store the images as high-resolution, low-compression JPEGs, I could get almost two thousand pictures on that 4GB card. So why wouldn’t I always store my images as JPEGs? As you’ll see later, there is a good reason that I store my images in RAW format.
As good and as reliable as they are, flash memory cards are not 100 percent reliable yet. If you peruse internet photo forums, you will discover lots of discussion of card problems and failures, some of which are due to user mistakes, some of which are not. Here are some tips for avoiding user mistakes.
Don’t try to work the card when it doesn’t have battery power. Letting the batteries die in the middle of taking pictures may corrupt not only the picture you are currently taking but all of the pictures on the card. Always carry spare, fully charged batteries, and change them well before the battery in the camera becomes fully discharged.
Don’t overwork the card. Never remove the card from the camera while it is being written to (right after you have taken a picture), or you risk losing all of your photos. Turn the camera off before you remove the card. And if you shoot in continuous shooting mode to follow fast action, let the internal processor finish its task before taking another set of pictures. Otherwise your camera may freeze up and, again, you could lose all of your pictures. Most DSLRs have an indicator, usually a red light, that tells you it’s processing.
Beware of physical harm to your card. Store the card in the protective case it came in. Along the same lines, keep your card protected from excessive heat, cold, and moisture. This is just common sense. Flash storage cards have held up well in all sorts of conditions, but why push your luc...
Table of contents
- Cover
- Title Page
- Dedication
- Acknowledgments
- Contents
- Introduction
- Chapter 1: Digital Basics
- Chapter 2: It’S All About Light
- Chapter 3: Dynamics of Pictures
- Chapter 4: In-The-Field Workflow
- Chapter 5: Creative Use of Lenses
- Chapter 6: Expanding Your Creativity
- Chapter 7: Into the Boondocks
- Chapter 8: Landscape And Scenic Photography
- Chapter 9: After the Shoot
- Chapter 10: Helpful Tips And Tricks
- Chapter 11: Dealing With Mixed Media
- Chapter 12: the Final Image
- Resources
- Index
- About the Author
- Copyright Page
Frequently asked questions
Yes, you can cancel anytime from the Subscription tab in your account settings on the Perlego website. Your subscription will stay active until the end of your current billing period. Learn how to cancel your subscription
No, books cannot be downloaded as external files, such as PDFs, for use outside of Perlego. However, you can download books within the Perlego app for offline reading on mobile or tablet. Learn how to download books offline
Perlego offers two plans: Essential and Complete
- Essential is ideal for learners and professionals who enjoy exploring a wide range of subjects. Access the Essential Library with 800,000+ trusted titles and best-sellers across business, personal growth, and the humanities. Includes unlimited reading time and Standard Read Aloud voice.
- Complete: Perfect for advanced learners and researchers needing full, unrestricted access. Unlock 1.5M+ books across hundreds of subjects, including academic and specialized titles. The Complete Plan also includes advanced features like Premium Read Aloud and Research Assistant.
We are an online textbook subscription service, where you can get access to an entire online library for less than the price of a single book per month. With over 1.5 million books across 990+ topics, we’ve got you covered! Learn about our mission
Look out for the read-aloud symbol on your next book to see if you can listen to it. The read-aloud tool reads text aloud for you, highlighting the text as it is being read. You can pause it, speed it up and slow it down. Learn more about Read Aloud
Yes! You can use the Perlego app on both iOS and Android devices to read anytime, anywhere — even offline. Perfect for commutes or when you’re on the go.
Please note we cannot support devices running on iOS 13 and Android 7 or earlier. Learn more about using the app
Please note we cannot support devices running on iOS 13 and Android 7 or earlier. Learn more about using the app
Yes, you can access Boyd Norton's Outdoor Digital Photography Handbook by Boyd Norton in PDF and/or ePUB format, as well as other popular books in Media & Performing Arts & Digital Media. We have over 1.5 million books available in our catalogue for you to explore.