
eBook - ePub
Foundry Practice - A Treatise On Moulding And Casting In Their Various Details
- 242 pages
- English
- ePUB (mobile friendly)
- Available on iOS & Android
eBook - ePub
Foundry Practice - A Treatise On Moulding And Casting In Their Various Details
About this book
Many of the earliest books, particularly those dating back to the 1900s and before, are now extremely scarce and increasingly expensive. We are republishing these classic works in affordable, high quality, modern editions, using the original text and artwork.
Trusted by 375,005 students
Access to over 1.5 million titles for a fair monthly price.
Study more efficiently using our study tools.
Information
CHAPTER I
GREEN SAND MOLDING
THE method of proceeding in making a mold for a plain casting may be demonstrated by consideration of the pattern shown in Fig. 1. After having the sand properly tempered, the turn-over board is placed on a sand bed so as to have bearing all over to avoid rocking or unevenness of the top. The pattern is then placed on the board as shown in Fig. 2. The drag may now be placed over the pattern and facing sand riddled onto the pattern. Cover the pattern with sand to a depth of approximately 6 inches, as shown in Fig. 3. The sand is rammed around the edge of the flask with the pein rammer by directing it as shown at A, Fig. 3. It is next rammed around the pattern with the rammer directed as shown at B, Fig. 3. The sand falling between these two rammings is then rammed to an even hardness sufficient to form a firm body and allow the free escape of the gases.
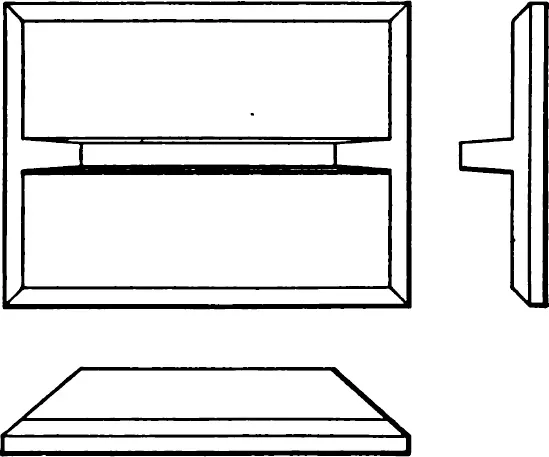
FIG. 1.

FIG. 2.
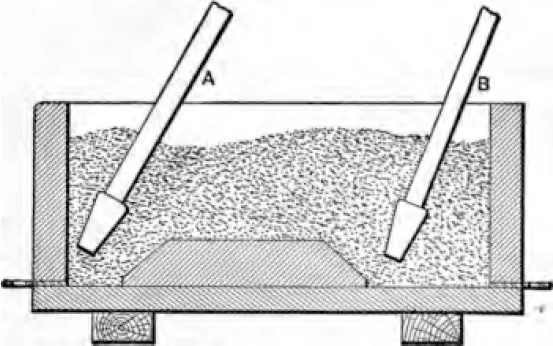
FIG. 3.
Care should be taken in ramming to avoid striking the rammer nearer to the pattern than one inch. Wherever the pein strikes the pattern, a hard spot is left in the sand which will cause a scab on the casting. The flask is now filled full of heap sand and rammed with the butt rammer, as shown in Fig. 4. The drag may now be struck off with a straight edge even with its top. A thin layer of loose sand is then scattered over the surface to ensure a good bearing on the entire surface of the bottom board. The drag should now be vented with one-eighth inch wire all around and over the pattern, using care not to strike the pattern so as to allow the metal to flow into the vent. The bottom board is placed onto the drag, with care that it bears on the sand at all points. The two boards are clamped to the drag with short clamps, as shown in Fig. 5. The flask is then turned over onto a bed of loose sand, so as to have an even bearing at both ends. The clamps are then removed and the board taken off, leaving the pattern at the top of the drag. The surface of the joint is made by tucking sand into any soft places that there may be, then riddle a little loose sand on the surface, and slick with a trowel so as to make it a little harder than the main body of the sand. Parting sand is dusted over the surface of the joint until the entire surface is covered. That falling onto the pattern is brushed off. Since the flask is small and the cope has no bars, it may now be placed on and the gate stick set even with the centre of the pattern and midway between the flask and pattern, as shown in Fig. 6. This pattern having a rib running lengthwise, the inflowing metal should enter the rib from an end and not over an edge. This will reduce the liability of the metal cutting away the sand, causing a bunch on the casting. A little facing sand is riddled over the pattern, then the heap sand is riddled through a No. 4 riddle to a depth of about one inch. Heap sand is filled in and rammed next to the flask with the pein, then the remainder is rammed to an even hardness. The cope is filled and rammed with the butt rammer and struck off similarly to the drag. It is vented over the pattern and around the gate stick with one-eighth inch vent wire. The gate stick is loosened by rapping sidewise and withdrawn. The hole is reamed out, leaving a large opening to pour the iron into, as shown in Fig. 7. The cope is ready to be lifted off and placed on any convenient rest where it may be finished. The cope should always be finished before the drag is touched, for, if anything happened to necessitate shaking it out, the drag is ready to have the cope replaced for another ramming. The portion of the cope that covers the pattern should be slicked lightly with the trowel, then covered with plumbago with a soft camel’s hair brush, or by dusting from a sack and then slicking with a trowel. The gate should be reamed slightly to take off the loose edge and pressed to firmness with the fingers. The drag should be brushed off to remove the parting sand; then wet the sand around the pattern slightly with the swab. If the sand is too wet at any point the metal will blow when poured, therefore care must be exercised in putting on only as much water as is necessary to make the sand stick together well. The pattern may now be drawn by driving the draw spike into the centre of the pattern, then rapping it until the sand is free from the edges of the pattern; then lift the pattern out by slowly raising it, as shown in Fig. 8. The mold is slicked over lightly and patched in case the pattern tears the sand at any place. The pouring gate is now connected to the mold by cutting a runner from the mold to the gate of a size that will admit the iron freely, but it must be smaller than the portion of the casting where it connects so that the runner may be broken off easily without damage to the casting. The runner should be smoothed with the fingers or a slicking tool to ensure against loose sand being washed into the mold. The mold may now be dusted with plumbago and slicked, at which time the flask is ready to close. The flask should be clamped to provide against the cope being lifted by the metal and the metal flowing out at the joint when the mold is poured. In clamping a flask it must not be moved or jarred, as the sand hanging at the top is liable to drop. Nor should the cope and drag be drawn together with a great pressure, as the flask is liable to give, causing the sand to crush the mold at the joint. The best method of putting on the clamps is to have them stand nearly vertical and resting on a wedge at the top. The clamp may be tightened with a clamping iron by catching the point under the clamp and on the wedge, then moving the upper end toward the clamp, as indicated by the arrow in Fig 9. The mold is now ready to cast.
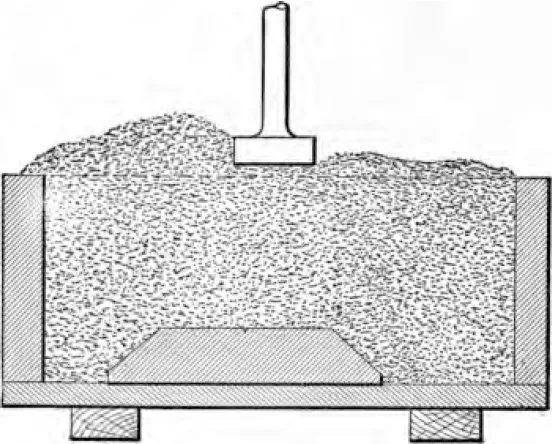
FIG. 4.
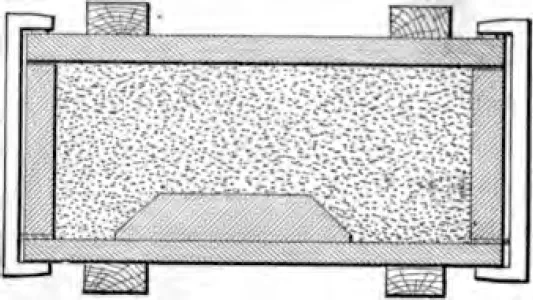
FIG. 5.
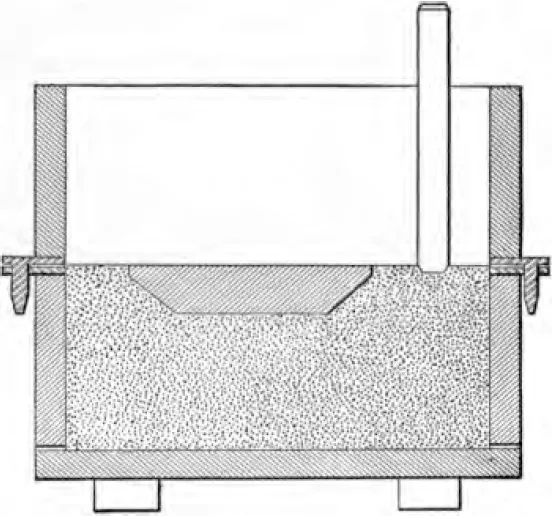
FIG. 6.
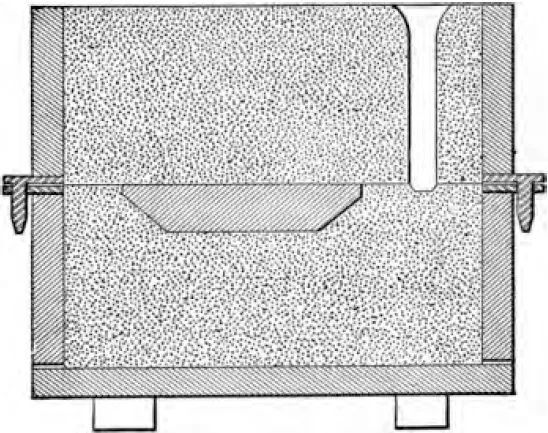
FIG. 7.

FIG. 8.
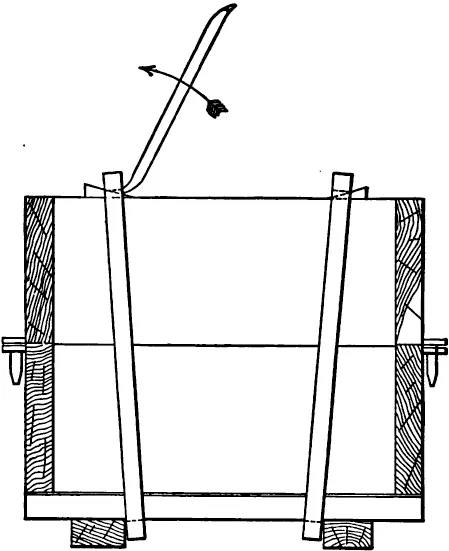
FIG. 9.
The process of making a mold with a split, or divided pattern is shown by the small pulley in Fig. 10. The half of the pattern without the dowel-pins is placed on the turn-over board and the drag placed on it as in the previous case. The facing sand is put on until the arms are covered, then heap sand is riddled through a No. 4 riddle until the centre is filled to the top of the rim. Since the hub is deeper than the rim, there is liability of the sand crushing out when the mold is poured, as the hub fills to the height of the arms before the rim receives any iron. To prevent the sand from breaking and to hold it together more firmly, wooden soldiers are put into the sand between the rim and the hub. The soldiers are made of any small pieces of wood, only large enough to be stiff and of a length to reach beyond the pattern about the same distance as it is inserted into the pattern. They are wet with clay wash, or flour paste, to hold the sand to the soldier. They are placed to a depth of the arms about midway between the rim and hub, and between the arms, as shown in Fig. 11.
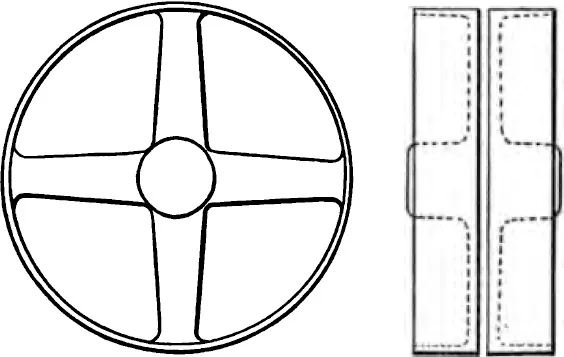
FIG. 10.
The pattern is now completely covered with riddled sand and the outside rammed as before. The sand within the pattern is rammed with any small tool or iron rod that can be gotten in between the soldiers and the pattern. The remainder of the drag is filled in, rammed and vented. The flask may now be turned over and the joint slicked as before. The other half of the pattern is put on as shown in Fig. 12. Parting sand is put over the joint, then the cope is placed in position. Pulleys and sheaves are generally poured from the hub, in which case the gate stick must be placed above the hub. The facing sand is put on the arms and hub, and riddled sand filled in over the pattern. Soldiers may now be placed in the same manner as in the drag, but their office in this place is more to hold the sand from falling away when the cope is lifted off or closed after removing the pattern. The first ramming is the same as the drag, then the gate stick may be put in place and the ramming finished. The cope is vented, the pouring basin cut and the gate stick removed, giving the flask in form as shown in Fig. 13. The cope is lifted off and placed on any convenient blocking, as shown in Fig. 14. The pattern in the cope is brushed off and lightly swabbed with water.
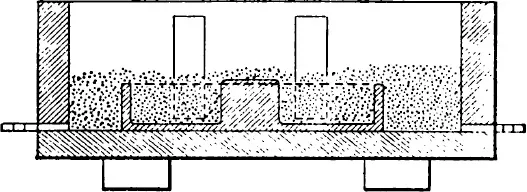
FIG. 11.
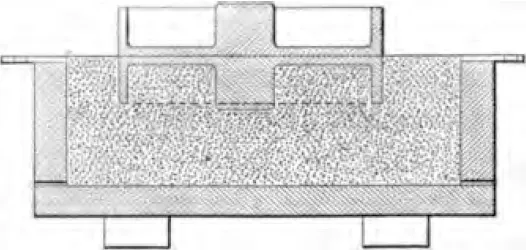
FIG. 12.
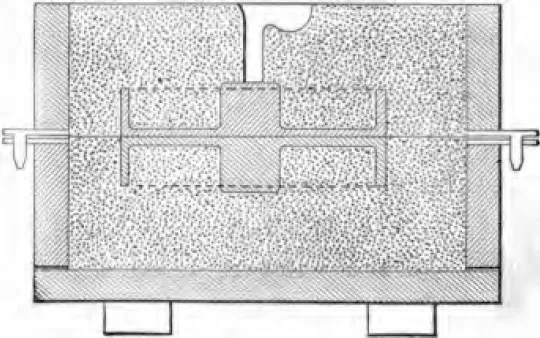
FIG. 13.
The pattern is rapped and removed by lightly jarring as it is drawn. The gate is reamed a little at the hub to remove loose sand, then the hub and arms are slicked and blackened with plumbago. The drag is prepared in the same manner, then the flask is ready to close and clamp for casting.
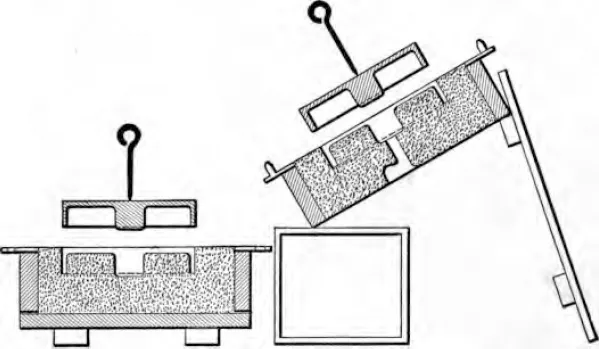
FIG. 14.
Many patterns have rounded edges or have the point of parting located at different levels in various parts of the pattern. In these cases the parting on the drag must be shaped to allow the pattern to be withdrawn without destroying the shape or tearing up the sand. The upper portion of the pattern must be formed in the cope. This causes a portion of the sand to be hung in the cope below the level of the flask, or the sand is coped out to the pattern. In cases of coping out, a portion of the sand is lifted from the pattern when the cope is lifted off. This does not admit of rapping the pattern or otherwise loosening the sand, therefore the sand must be well anchored so as to hold its form well and not require too much patching.
The pattern of the half of an eccentric strap, shown in Fig. 15, may be taken as an example where coping out is necessary. The pattern can not be drawn sidewise, as the inner circle has a flange on each side.
To cas...
Table of contents
- Cover
- Title
- Copyright
- Introduction
- Contents
- Half title
- Chapter I Green Sand Molding
- Chapter II Dry Sand Molding
- Chapter III Molding Sand, Molder’s Tools, Molding Machines, and Equipment
- Chapter IV Cores, Core Boxes, Core Machines, and Drying Ovens
- Chapter V Cupolas, Blowers, and Melting Furnaces for Iron
- Chapter VI Chilled Castings
- Chapter VII Malleable Castings
- Chapter VIII Cleaning Castings
- Chapter IX Compressed Air for Foundry Purposes
- Chapter X Steel Castings
- Chapter XI Brass Founding
- Chapter XII Cast-iron Alloys
- Chapter XIII Glossary of Foundry Terms
- Index
Frequently asked questions
Yes, you can cancel anytime from the Subscription tab in your account settings on the Perlego website. Your subscription will stay active until the end of your current billing period. Learn how to cancel your subscription
No, books cannot be downloaded as external files, such as PDFs, for use outside of Perlego. However, you can download books within the Perlego app for offline reading on mobile or tablet. Learn how to download books offline
Perlego offers two plans: Essential and Complete
- Essential is ideal for learners and professionals who enjoy exploring a wide range of subjects. Access the Essential Library with 800,000+ trusted titles and best-sellers across business, personal growth, and the humanities. Includes unlimited reading time and Standard Read Aloud voice.
- Complete: Perfect for advanced learners and researchers needing full, unrestricted access. Unlock 1.5M+ books across hundreds of subjects, including academic and specialized titles. The Complete Plan also includes advanced features like Premium Read Aloud and Research Assistant.
We are an online textbook subscription service, where you can get access to an entire online library for less than the price of a single book per month. With over 1.5 million books across 990+ topics, we’ve got you covered! Learn about our mission
Look out for the read-aloud symbol on your next book to see if you can listen to it. The read-aloud tool reads text aloud for you, highlighting the text as it is being read. You can pause it, speed it up and slow it down. Learn more about Read Aloud
Yes! You can use the Perlego app on both iOS and Android devices to read anytime, anywhere — even offline. Perfect for commutes or when you’re on the go.
Please note we cannot support devices running on iOS 13 and Android 7 or earlier. Learn more about using the app
Please note we cannot support devices running on iOS 13 and Android 7 or earlier. Learn more about using the app
Yes, you can access Foundry Practice - A Treatise On Moulding And Casting In Their Various Details by James M. Tate,Melvin O. Stone in PDF and/or ePUB format, as well as other popular books in Technology & Engineering & Materials Science. We have over 1.5 million books available in our catalogue for you to explore.