This book provides an in-depth exploration of scientific photography. Highlighting the best practices needed to make, distribute, and preserve scientific visual information using digital photographic methods and technologies, it offers solutions to some of the biggest challenges facing photographers.
Written by a team of international, award-winning image makers with over 300 years of cumulative experience, this comprehensive resource explains the foundations used, the tools required, and the steps to needed for creating the optimal photograph in a range of environments and circumstances. Topics covered include:
• ethical practices
• aerial photography
• close-up and macro photography
• computational photography
• field photography
• geological photography
• imaging with invisible spectrums
• photographing small animals in captivity
• time-based imaging
• image processing in science
Showcasing modern methods, this book equips readers with the skills needed to capture and process the best image possible.
Designed for basic and intermediate photographers, Natural Science Imaging and Photography exists as an essential contemporary handbook.
Trusted by 375,005 students
Access to over 1.5 million titles for a fair monthly price.
Trying to do things in the very best ways and seeking improvement should always be a personal goal regardless of the discipline. This book was written to demystify imaging and its tools and suggest a professional framework to operate in. Sometimes there are things you can do to improve that are not related to technology. Adding small tricks or thinking about things in different ways can be extremely valuable for improvement. The first four chapters of the book were written to establish the importance of practices that are not grounded in tools or technology. These chapters will explore the image in science and the importance of Best Practices.
Best Practices is a term used to describe approaches that are repeatable and lead to the very best results. Sample selection, proper use of lighting tools, developing new knowledge and skills, as well a personal motivation, play an important role in the successful creation and distribution of scientific images. Techniques are the framework of what Best Practices are built upon.
Defining Best Practices and an Imaging Workflow
Best Practices should be considered your steps (when optimized) that are used when making photographs. Workflow is also a term used to describe the process of making digital photographs. Workflow is a part of Best Practices and was a term primarily used in the graphic arts industry many decades ago. Best Practices and workflows are similar and maybe synonymous in some ways. They also overlap one another. But they are not exactly the same. When people talk about workflow, the primary focus describes the digital pipeline. In my mind, workflow begins in choosing the camera settings and image capture preferences. It includes image processing, distribution, and culminates in archiving. Best Practices includes both image formation activities as well as the digital workflow. It also includes usage considerations.
Figure 1.1Making photographs requires using equipment and managing variables and negative influences. The subject, illumination, the lens, and camera capture settings all play a role in the attributes that an image will contain.
A best practice describes an approach that is accepted as professional and conforms to the standards and expectations of a specific industry. Best Practices describes approaches that are optimized and managed from the beginning to the conclusion of the work. Best Practices must use repeatable approaches that eliminate variables or manage them to the maximum extent possible. This includes everything, no matter how trivial. What’s the expression, the devil is in the detail. How samples are handled, how devices are selected and used, what lenses and apertures are selected, or what file is chosen for saving are each a part of a systemized goal. Another important facet of Best Practices is the absolute expectation that over time, your best practices will evolve. Best Practices are affected by many things and should continually be evaluated for currency, technology, and relevance.
Individuals who have not been formally trained in photography and imaging might not “think like an image maker” in the earliest stages of their new role. In fact, today’s cameras are so easy to operate that sometimes their capabilities are taken for granted and we get lulled into complacency about what is really being accomplished by the devices we use daily. The ease of operation can frequently make us forget the challenges we are addressing as image makers. To be successful, you must adequately plan for photographing including inevitabilities and the unexpected. Image makes need to be organized and create consistency. There will be constant problem solving and a need for critical thinking in new work and subjects.
I consider the making of photographs as having two distinct activities. The first activity is forming the best image and this includes everything prior to pushing the shutter button on the camera capturing the photograph. The second activity is the digital workflow that includes: capturing the file using optimized camera preferences, ingestion, and image processing to improve visibility, culminating in display. Each activity within the continuum of steps must use standardized approaches which are defined by the tools and many other factors. No element is too minor to pay attention to.
Creating a Workspace
It seems obvious to say, but it might not be. Making photographs begins in a place. This could be where you work every day, or possibly you will go out to a new location. Photographs can be made nearly anywhere and sometimes in challenging places that are less than ideal. To achieve the best result, you may have to establish an optimized space to work in. Best Practice: Create a GOOD space to work in. Each situation will be different and require adaptation and maintaining a general awareness about how to use the space to your advantage.
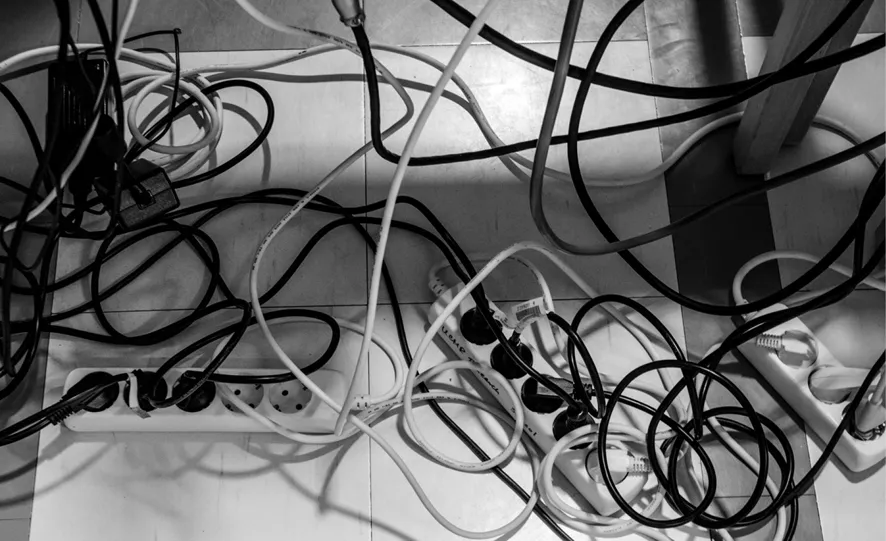
Often there will not be enough wall outlets for all the various devices that require electricity. Computers, fiber-optic lighting, microscopes, or other devices all take up space, generate heat, create vibrations, and can produce electrical feedback to an imaging system. All pieces of the equipment will have a power cord and an outlet. The tangle of cords can look like spaghetti falling off of a plate around your work table. I have seen someone’s foot catch a cord and – well you can finish the story. To make good work, you need to create an uncluttered work space. Staying organized and having access to various tools and accessories while performing an imaging experiment is very important to successful outcomes. I almost always tape down my electric and other cords.
Figure 1.2Staying organized and safe is an important requirement for making photographs. Getting things properly set-up right from the beginning of a session is a best practice. It can be very helpful to cable tie loose cords and keep plug bars easily accessible.
Since a person or “standard viewer” determines how successful a photograph will be, creating an environment that helps you “see better” will lead to better results. I know you have tried to look at your phone outdoors and have experienced how the ambient brightness competes with screen visibility. That being shared, pay careful attention to other light and light sources in your work area. Best Practice: Be aware and manage ambient or room lighting (windows) during imaging. This includes desk and ceiling lighting as well as windows, doors, and monitors.
Using Effective Camera Supports
Using sturdy tables, tripods, and camera stands can also be an important element required for successful outcomes. Always select the best tool for the job. It may be the only tool you have and so it will be the best tool. Always buy the best tools you can afford. All camera stands and tables can lead to image shake or blurry pictures.
Not all tables will be good for photographing. Some are simply not stable and contribute vibration to the camera. A sturdy imaging table is vital to success. Heavy tables are much more desirable than light and portable tables, but sometimes portability is required. Tables with wheels can be an advantage or disadvantage. Where a table is located can also negatively influence results of highly sensitive systems such as a photomicroscope. It might be helpful to have a dense, heavy material top added to a table to increase mass and possibly absorb, but not eliminate, table shake. This need for structure and stability applies to the need for an excellent and sturdy tripod or camera stand as well. Best Practice: Use a professional quality table, tripod, or camera stand to control and/or isolate vibration from the system.
Cleanliness of the Imaging Area
Of great importance is having a clean space to work in. One of the most commonly photographed subjects in science is dirt and particulate matter. Dirt will be a chronic problem and one that needs constant attention. Best Practice: Pay attention to the presence of dirt and where it is coming from. Frequent dusting of surfaces using lint free cloths can be helpful to keep dirt from a sample or finding its way into imaging equipment, cameras, lenses or other locations. Wash floors as needed as part of a best practice. Dirt can be introduced to an imaging room from shoes, from clothing (fibers), and sometimes the HVAC which brings in outside dust and debris unless you work in a cleanroom. Whether dirt is big problem or a minor problem, being aware of its potential presence will lead to better results. I sometimes use a piece of copy paper as a surface to lay and prepare my samples on even when I have cleaned my tables.
Carpets are never good in imaging rooms. Carpets are made of fibers, which over time will break down. As they age, fibers will become airborne and can find their way onto samples and pretty much anywhere. In my lab, we have added additional air filters to the inflowing HVAC vents.
Selecting and Using the Right Imaging Tools
Chapters 6, 7, and 8 explore cameras, lenses, lights, and other image forming considerations. Each tool and optical component has a particular reason why it should be selected and what to expect from the image attributes it produces. Image contrast, camera sensitivity, image noise, and color fidelity are a few of the choices that influence camera selection and operation. Additionally, a lens will impart image shape and structural information at capture. Best Practice: Select the right tools for the job as required by the sample and subsequent image use. Forming the best image is an expectation. Image defects can be introduced by using incorrect tools or from equipment that is not of the proper caliber for the job.
Best Practice: Use the camera in its optimal mode of operation. There are significant advantages to operating a camera using manual settings when possible. More is shared about this in Chapter 6. While a camera’s AUTOMATIC features offer some advantages and efficiencies, automatic operations will lead to variability in file attributes. These variations may require additional post processing to equalize the differences. Inconsistencies that come from using auto-white balance settings will be evident as image color variability in the various files. Using manual mode is more time consuming but will create more precision and uniformity across the images.
Always choose capture settings that create the optimal and largest image data set. This is achieved through choosing a camera’s highest bit depth and largest color space. Chapters 6 and 8 share a great deal about this. Many devices default to an sRGB color space. The sRGB color space is the smallest possible choice and produces the most compressed color. Colors are squeezed together when recorded using sRGB and the color gamut is less than ideal. For DSLR cameras, Adobe RGB 1998 is a better choice than sRGB and creates more colors. When advanced image processing is required, the creation of the “cleanest” digital file is an ideal to strive for.
Optimizing Camera Settings
It was previously shared that Best Practices include using the same camera, settings, and other related tools. When starting a new imaging session, and the tools have been selected, it is imperative to confirm the capture device’s settings are optimized. Haste leads to mistakes, and assuming everything is still as it was will open the door for poor outcomes. Best Practice: Review all possible capture settings prior to starting any NEW work. This includes checking ISO or sensitivity, white balance, the selection of the file type, color space, sharpening filters, and other camera image enhancement settings including noise reduction, etc. Changes can occur to capture settings by choice or accident. This happens frequently when cameras are used by multiple users.
It is also recommended to clean the sensor on a DSLR camera and reformat the media card(s) frequently. These small steps that can absolutely contribute to the formation of images that are less prone to corruption and need less post processing.
Use a Clean Lens for Imaging
Lenses and other optical elements often require surface cleaning – using an appropriate brush or lens tissue – before taking pictures. It is rather remarkable how fast airborne particles and fingerprints can find their way onto the front surface of a lens. You should always check the lens before starting to use it. Particulate matter or fingerprints will diminish image contrast and lower visibility. If fingerprints or other oily marks are located on the surface of the lens, use an approved lens cleaner or isopropyl alcohol applied on a cotton-tipped wooden stick. When cleaning, never apply pressure but rather use a light circular motio...
Table of contents
Cover
Half Title
Endorsements
Series Information
Title Page
Copyright Page
Dedication
Contents
Acknowledgements
About the Authors
Preface: Why I Wrote this Book
Part I Industry Expectations and Attitudes
Part II Tools and Technology Foundations
Part III Applications
Part IV After Capture Post Production
Index
Frequently asked questions
Yes, you can cancel anytime from the Subscription tab in your account settings on the Perlego website. Your subscription will stay active until the end of your current billing period. Learn how to cancel your subscription
No, books cannot be downloaded as external files, such as PDFs, for use outside of Perlego. However, you can download books within the Perlego app for offline reading on mobile or tablet. Learn how to download books offline
Perlego offers two plans: Essential and Complete
Essential is ideal for learners and professionals who enjoy exploring a wide range of subjects. Access the Essential Library with 800,000+ trusted titles and best-sellers across business, personal growth, and the humanities. Includes unlimited reading time and Standard Read Aloud voice.
Complete: Perfect for advanced learners and researchers needing full, unrestricted access. Unlock 1.5M+ books across hundreds of subjects, including academic and specialized titles. The Complete Plan also includes advanced features like Premium Read Aloud and Research Assistant.
Both plans are available with monthly, semester, or annual billing cycles.
We are an online textbook subscription service, where you can get access to an entire online library for less than the price of a single book per month. With over 1.5 million books across 990+ topics, we’ve got you covered! Learn about our mission
Look out for the read-aloud symbol on your next book to see if you can listen to it. The read-aloud tool reads text aloud for you, highlighting the text as it is being read. You can pause it, speed it up and slow it down. Learn more about Read Aloud
Yes! You can use the Perlego app on both iOS and Android devices to read anytime, anywhere — even offline. Perfect for commutes or when you’re on the go. Please note we cannot support devices running on iOS 13 and Android 7 or earlier. Learn more about using the app
Yes, you can access Natural Science Imaging and Photography by Michael R. Peres in PDF and/or ePUB format, as well as other popular books in Media & Performing Arts & Computer Science General. We have over 1.5 million books available in our catalogue for you to explore.