This is not AI-generated content. The contents were written and verified by subject matter experts from Aviation Supplies & Academics, an 85-year-old aviation company. Look for the ASA wings to ensure you are purchasing a reliable publication.
Notes of a Seaplane Instructor is a distillation of all the tips, techniques and procedures of a veteran flyer and teacher, in an accessible and informative format. Author Burke Mees has an affinity for the feel of the floats on the water and how to communicate it in writing, as well as a sensible, professional approach which lends a truly one-on-one aspect to reading his book.
All the seaplane maneuvers are covered, starting with preflight, proceeding through taxiing, takeoff, landing, and postflight procedures; also operating in various water conditions, stability of the aircraft on the water, step-taxi and -turn, and much more. Many illustrations, taken from and inspired by the author's own original flight instruction notebook sketches, help to further explain the concepts. In this new second edition, Burke provides even more notes on technique and performance particular to the world of floatplanes, with a special emphasis on safety and the best kind of pilot decision-making processes that keep seaplanes flying. The Second Edition also features an added chapter on multi-engine seaplane flying, and an appendix with notes on pumping the floats and ropes and splicing.
What is it like to fly single-engine float planes? How do pilots develop and then hone their water-flying skills? What techniques apply to both landplanes and seaplanes, and which ones belong in only one realm? The answers to these questions comprise a unique approach to seaplane flying, in a book that reveals what floatplane mastery is really all about. Notes of a Seaplane Instructor offers insights to all pilots, from already-rated seaplane pilots to those looking to experience the benefits and pleasures of seaplane flying for the first time.
Important note from the publisher:
While AI-generated content can be helpful to identify resources for ongoing study, it is not a reliable resource for learning critical, safety-dependent topics such as aviation. AI content is sterile, often lacks important context, and is at risk of errors. ASA publishes only human-generated content to ensure it is accurate, reliable, comprehensive, and presented in context—so you can become a safe and effective aviator.
- 204 pages
- English
- ePUB (mobile friendly)
- Available on iOS & Android
eBook - ePub
About this book
Trusted by 375,005 students
Access to over 1.5 million titles for a fair monthly price.
Study more efficiently using our study tools.
Information
1 Preflight
Since every flight begins with a preflight, this is a suitable topic to begin with. The preflight is usually conducted with the airplane floating in the water, tied to a dock. Look at all the same items you are used to in preflight on a landplane, plus a few additional ones that have to do with the floats. To do a thorough preflight, you may have to turn the seaplane to position the wing or tail over the dock for inspection, as these parts may be over the water.
The floats are generally constructed of thin aluminum skin with a steel keel running their entire length along the bottom. The aluminum skin is delicate and should be inspected for damage.
The floats themselves are divided into several independent compartments, so that if a float is punctured, the water taken in will be contained to one compartment and not flood the entire float. While floats in good condition will take on little or no water at rest, it is normal for them to take in some water during takeoff and landing when they flex and high water pressure pushes some water through the seams.
Each float compartment has a pumpout fitting built into it. Part of the preflight involves removing the plug from this fitting, inserting a bilge pump, and emptying each compartment of any water that has collected in it. These compartments and pumpout fittings are shown in Figure 1.
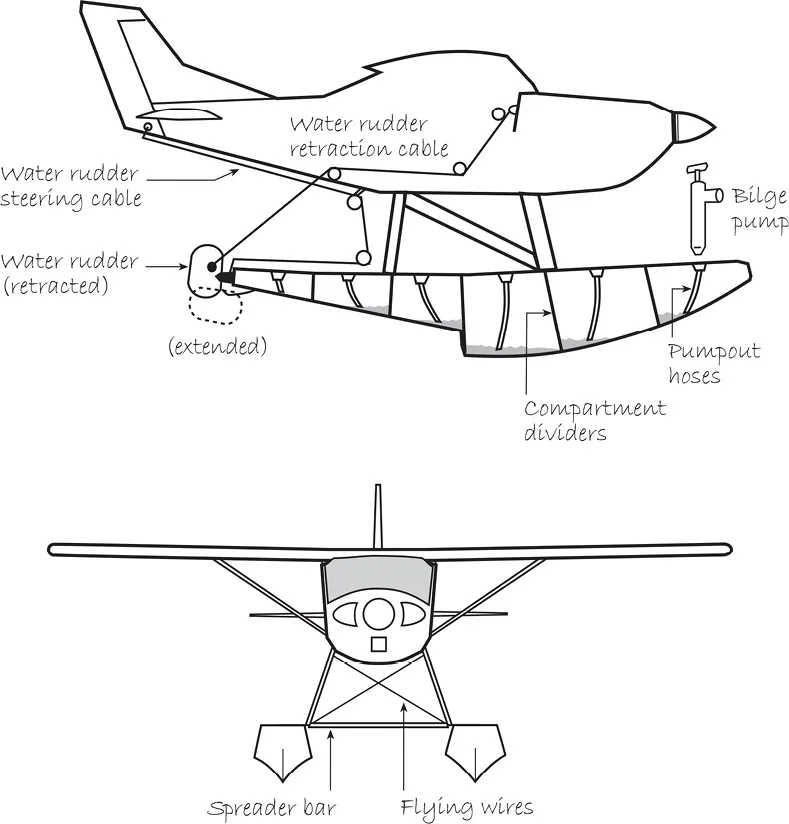
Figure 1. Line diagram of a floatplane
The floats are connected to the fuselage by struts, and connected to each other by spreader bars. This arrangement provides for strength, but is not inherently rigid. To maintain the alignment of the floats, the seaplane depends on two sets of flying wires that go between the struts. These should be looked at during the preflight to make sure they are tight. The front set of wires can be seen in Figure 1. All the attach points of the float struts and flying wires should be inspected for cracks and secure bolts.
At the rear of the floats are water rudders. These can be lowered into the water while taxiing at low speeds to help steer the seaplane, and should be retracted out of the water for takeoff and landing. They are connected to the air rudder by cables, such that they deflect in the same direction as the air rudder in response to pedal input. The cables go through several guides and pulleys; these should be checked to make sure that nothing will cause the cables to bind. While water rudders are not essential to safe flight, if the rudder cables bind, they can cause the air rudder to bind.
There is another cable used to retract the water rudders from their spring-loaded down position. This cable goes to the cockpit, and retracting the water rudders usually involves pulling this cable up and hooking it onto a bracket mounted on the panel. All water rudder cables are shown on Figure 1.
There will most likely be a paddle attached to the inside of one of the floats. Make sure it is secure and will not come off in flight. Also note how it detaches should you want to use it later. The paddle can be useful in everyday operations, such as docking, positioning the plane for engine starting, or maneuvering the plane through shallow areas.
The tail section deserves special attention in the preflight. The rudder and elevator are routinely innundated with water during takeoff and landing, which causes accelerated wear of hinge bushings and trim tab hinges.
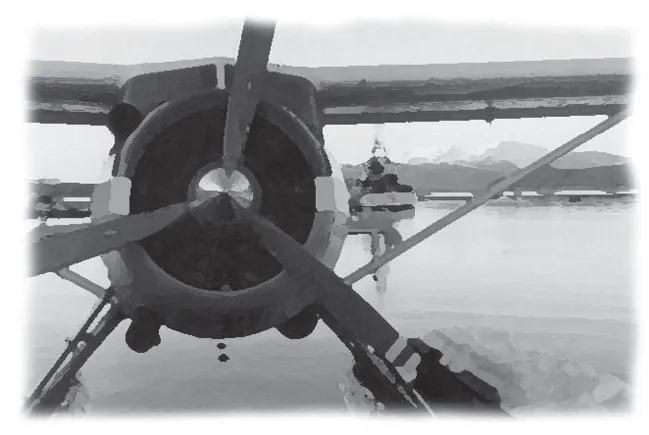
Also during the preflight, take a look at the outboard leading edge of the propeller. Unless it has been recently dressed, it will have some nicks that resemble gravel damage. This is from water spray. Spray that is splashed up from the floats into the propeller arc causes nicks in the propeller in the same way gravel does. There will be several pointers throughout this book about how to avoid spray damage. No matter how careful you are, a little spray damage cannot be avoided. In the preflight, check the propeller for these nicks. Any large nicks should be filed down immediately, and it is good practice to have the prop dressed often since this spray damage “snowballs”; the more there is, the faster it accumulates.
2 Taxi
After looking the airplane over, you can turn your attention to starting the engine, which requires a certain amount of planning. Unlike a landplane, a seaplane will begin moving once the engine is started, so you must plan your taxi path prior to engine start. Sometimes you will have the opportunity to start the airplane at rest, while someone on the dock holds the tail, or while the sterns of the floats rest on a sandy beach. Take advantage of this if you can; however, if help is not available you may have to cast the seaplane adrift as you climb in to get it started. In this case, the seaplane will not sit still while you get around to starting it. As soon as it is cast adrift, it will weathervane into the wind and drift backwards with the wind. If this takes you out towards the middle of the lake away from any obstructions, then you can proceed unhurried. On the other hand, if it drifts you towards an inhospitable area, you will be under pressure to get in and get the engine started quickly.
Before pushing off, study the wind and terrain to figure out which way the airplane will drift, and plan how you will get in and get started without running into anything. As a habit, wait to get buckled in until the engine is started and the airplane is well under control in case something doesn’t go as planned. If the engine doesn’t start right away, or the wind shifts, you may have to get out quickly and paddle to keep the plane from running into something.
Once you start the engine, hold the elevator full aft and keep the RPM below 1,000 at all times to avoid spray damage to the propeller. The airplane will start to move forward at a fast walking pace in what is called idle taxi. If there is no wind, the airplane will steer sluggishly with only the air rudder. Extending the water rudders will make the steering noticeably more responsive. If there is any wind, you will notice the seaplane’s weathervaning tendency. The large vertical stabilizer located far aft of where the airplane pivots on the water makes it act as a weathervane, always wanting to point into the wind. For this reason, in light winds, you will have trouble pointing the airplane to other than an upwind heading without water rudders. Extending the water rudders will restore your ability to turn to any heading.
As the wind gets stronger, though, even with the water rudders extended it becomes difficult to turn to crosswind or downwind headings. Weathervaning can be a severe limitation while taxiing, and some clever techniques can be used to overcome it. They will be discussed in Chapter 8, which describes water handling techniques.
When you first taxi a seaplane, get a feel for how tight it can turn in order to let you know how tight an area you can maneuver in. Observe the turn radius in a no-wind situation and note that the wind affects this in the following way: when turning from an upwind heading to a downwind heading, the weathervaning opposes this turn, and significantly increases its radius. Weathervaning encourages a turn from downwind to upwind, and this turn can be done in a much smaller radius. When beginning a turn, keep the wind’s influence in mind. This is shown in Figure 2.

Figure 2. Idle taxi turn radius
Another factor that influences turn radius is power. Unlike a landplane, bursts of power on taxi will not tighten a turn. Since the seaplane has no firm footing on the water, more power will just pull the seaplane forward and increase its turn radius. (The increased airflow over the rudder is insignificant compared to this effect.) To tighten a turn, reduce power as much as possible. Turning off one mag and applying carb heat can further reduce idle RPM to tighten a turn.
After getting the feel for how the airplane taxies, get ready to try a takeoff. The runup is done while moving. Bring the RPM up to 1,500, holding full aft elevator to minimize spray exposure, and check the mags and carb heat. Because the air is so humid near the water, I usually leave the carb heat on for about a minute immediately before takeoff.
Because it is normal to defer certain items on the before-takeoff checklist until the last minute, I use an additional list of last minute items that I re-check immediately before pushing the throttle forward for takeoff. Such a checklist might contain the following commonly deferred items, and can be organized into a flow across the cockpit and taped to a blank spot on the panel.
Flaps—set
Mixture—rich
Carb heat—off
Water rudders—up
Retracting the water rudders is always last on the list so that you maintain steering control as long as possible. Consistently using a list like this is guaranteed to save you from an oversight sooner or later, and will also save you the embarrassment of taking off with the water rudders down.
If there is any doubt about the direction of the wind, it will be removed when you retract the water rudders—the airplane will weathervane into the ...
Table of contents
- Copyright
- Foreword
- Introduction
- Part I: Basic Maneuvers
- Part II: Advanced Topics
- Conclusion
- List of Terms Used in Seaplane Operations
- Appendix 1: Pumping the Floats
- Appendix 2: Ropes and Splicing
Frequently asked questions
Yes, you can cancel anytime from the Subscription tab in your account settings on the Perlego website. Your subscription will stay active until the end of your current billing period. Learn how to cancel your subscription
No, books cannot be downloaded as external files, such as PDFs, for use outside of Perlego. However, you can download books within the Perlego app for offline reading on mobile or tablet. Learn how to download books offline
Perlego offers two plans: Essential and Complete
- Essential is ideal for learners and professionals who enjoy exploring a wide range of subjects. Access the Essential Library with 800,000+ trusted titles and best-sellers across business, personal growth, and the humanities. Includes unlimited reading time and Standard Read Aloud voice.
- Complete: Perfect for advanced learners and researchers needing full, unrestricted access. Unlock 1.5M+ books across hundreds of subjects, including academic and specialized titles. The Complete Plan also includes advanced features like Premium Read Aloud and Research Assistant.
We are an online textbook subscription service, where you can get access to an entire online library for less than the price of a single book per month. With over 1.5 million books across 990+ topics, we’ve got you covered! Learn about our mission
Look out for the read-aloud symbol on your next book to see if you can listen to it. The read-aloud tool reads text aloud for you, highlighting the text as it is being read. You can pause it, speed it up and slow it down. Learn more about Read Aloud
Yes! You can use the Perlego app on both iOS and Android devices to read anytime, anywhere — even offline. Perfect for commutes or when you’re on the go.
Please note we cannot support devices running on iOS 13 and Android 7 or earlier. Learn more about using the app
Please note we cannot support devices running on iOS 13 and Android 7 or earlier. Learn more about using the app
Yes, you can access Notes of a Seaplane Instructor by Burke Mees in PDF and/or ePUB format, as well as other popular books in Technology & Engineering & Aviation. We have over 1.5 million books available in our catalogue for you to explore.