The historic background and present-day battleground of a great—but often overlooked—battle fought by the British Expeditionary Force in World War I.
Walking Arras marks the final volume in a trilogy of walking books about the British sector of the Western Front, following
Walking the Somme and
Walking the Salient. Paul Reed once more takes us over paths trodden by men who were asked to make a huge and, for all too many, the ultimate sacrifice.
The Battle of Arras falls between the Somme and Third Ypres; it marked the first British attempt to storm the Hindenburg Line defenses, and the first use of lessons learned from the events of 1916. But it remains a forgotten part of the Western Front. It also remains one of the great killing battles of the Great War, with such a high fatal casualty rate that a soldier's chances of surviving Arras were much slimmer than even the Somme or Passchendaele. Most soldiers who served in the Great War served at Arras at some point; it was a name very much in the consciousness of the survivors of the Great War. Ninety years later, while there has been development at Arras, it is still an impressive battlefield and one worthy of the attention of any Great War enthusiast.
This book will give a lead in seeing the ground connected with the fighting in 1917. Making a slight departure from the style of the previous two walking books, the chapters look at the historical background of an area and then separately describe a walk; with supplementary notes about the associated cemeteries in that region.
eBook - ePub
Walking Arras
About this book
Trusted by 375,005 students
Access to over 1.5 million titles for a fair monthly price.
Study more efficiently using our study tools.
Information
Chapter 1
CANADIAN CORPS: VIMY RIDGE 9TH/14TH APRIL 1917
The Battle
Any study of a battlefield soon highlights that high ground is all important; whichever side commands that high ground, often dominates the battlefield from a military point of view. At Arras there were two areas of such high ground; the Notre Dame de Lorette spur to the north, and Vimy Ridge to the north-east. The German I and VI Army Corps captured this area in September 1914, facing the X and XXI French Army Corps during the so-called ‘Race to the Sea’. The Germans then sat in occupation of these two ridges, and the French spent much of 1915 trying to reclaim them. First there was an attack on Notre Dame de Lorette on 9th May 1915, just as the British Army was assaulting the Aubers Ridge further to the north. The French X Army Corps, spear-headed by General Barbot’s 77th Division, attacked the Lorette spur, taking much of the ground, but at high cost – Barbot himself was killed at the head of his troops in Souchez. Meanwhile the 39th Division had taken Neuville St Vaast and on their left flank the Moroccan Division had fought their way onto the lower slopes of Hill 145 - the highest point on Vimy Ridge. Successive German counter-attacks threw the French back, and while Notre Dame de Lorette remained in their hands, Vimy eluded them in this operation. A further attack on 25th September also failed, fought as a joint operation with the British at Loos. By the close of the year the French had lost nearly a quarter of a million men in Artois in 1915, with the Germans still dominating the Arras battlefield from Vimy Ridge.
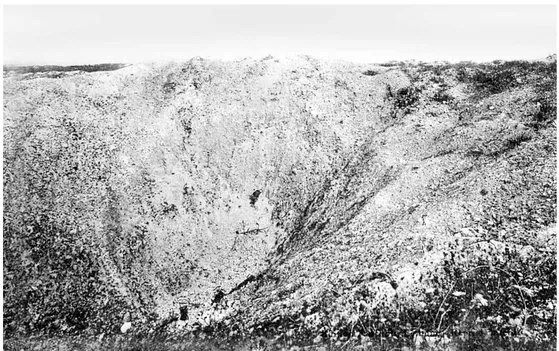
Mine crater on The Pimple – evidence of the fighting here in 1915/16.
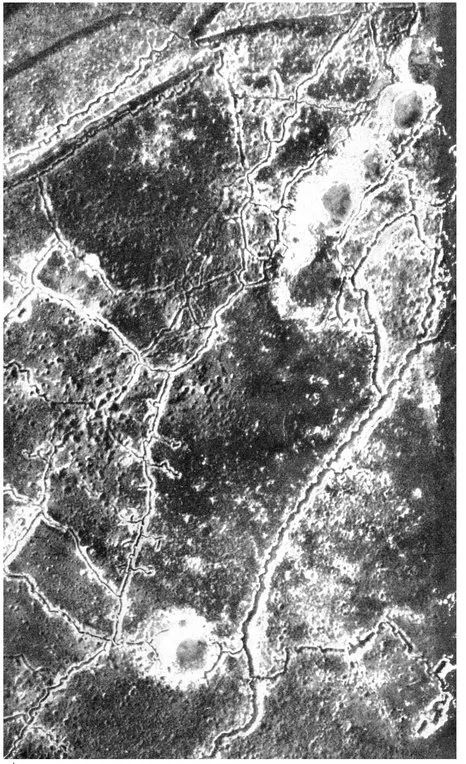
Aerial photo of The Pimple in May 1916.
In the early months of 1916 British troops began to take over the sector around Arras, as the line was extended south from Loos. The Vimy Ridge area was now divided into a number of sectors. To the north was The Pimple, in the centre was the ground below Hill 145, then the trenches opposite La Folie Farm, with the lines extending down to the Arras-Lens road close to Thelus. The 46th (North Midland) Division took over the area at Vimy Ridge from the positions at Hill 145 to La Folie Farm, with the 47th (London) Division occupying the line to the north at The Pimple. Other British divisions were then rotated through these sectors, and men from the Tunnelling Companies of the Royal Engineers came down to the ridge and found the ground here particularly suitable for their type of warfare. Mines were blown by both sides on almost a daily basis in early 1916, as evidence on the crest of Vimy Ridge shows to this day. A typical experience of this is described by the London Division in April 1916.
The first German mine went up on April 26th. The 140th Brigade were about to relieve the 141st Brigade at the time, but the danger had been anticipated, and a supporting company of the 6th Battalion [London Regiment] was sent up in advance. Our front line was broken by the explosion, but the crater was immediately seized, and the near lip consolidated. Rifle-fire from the 17th and 19th Battalions protected the consolidation, and prevented any counter-attack. The crater was called New Cut Crater. On the 29th our miners blew a camouflet some hundred yards north of this, which detonated a Boche mine, and formed Broadridge Crater. By way of retaliation the enemy sprang a third mine between the two. This destroyed part of the front line, and the 6th Battalion suffered over eighty casualties.1
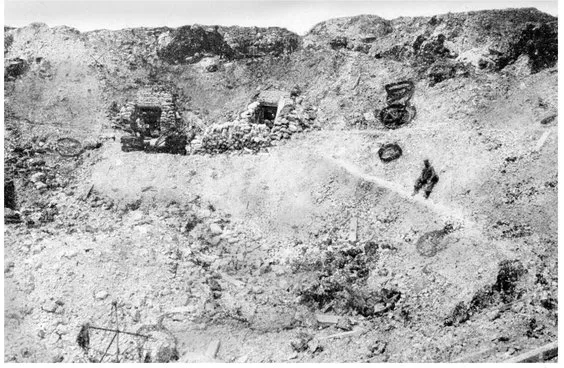
After the capture of the mine craters in May 1916, German troops fortified them.
However, on the whole this was considered a ‘quiet’ sector. There were daily bombardments, patrol work, mines going off, exchanges of fire from both sides and trench raids, but no major operations. The only event of note prior to the fighting in 1917 was the German attack on positions along the northern sector of Vimy Ridge in May 1916. On 21st May German units attacked the positions below Hill 145 between Broadmarsh and Momber Craters and against the positions of the 47th (London) Division at The Pimple.
At 3.40pm the bombardment became intense… They came over in great force, and the weight of the attack fell upon the 7th and 8th Battalions, who had lain for four hours in unprotected trenches, under a bombardment far heavier than any we had ever known before. These battalions, together with the troops on their right [from the 25th Division] were driven out of the front line trench, across two supports, into a line half-way down the slope.2
Counter-attacks began that evening, and further battalions came up to assist in the early hours of 22nd May. Casualties amongst the 8th Battalion London Regiment (Post Office Rifles) were particularly heavy, their battalion commander being among the wounded. While further counter-attacks regained some ground, the Division was finally relieved on 25th May by 2nd Division. By this time it had suffered more than 2,100 casualties in the fighting at Vimy Ridge.
But the Battle of the Somme was now looming close, and mine warfare on the ridge gradually reduced as men and resources were sent south. British troops continued to occupy the trenches, with the 60th (London) Division now holding the main sector at Vimy. One of the last British units to serve in the Vimy sector before the Canadians arrived were the 2nd Leinsters of the 24th Division. Captain Francis Hitchcock of this battalion describes life here in late September 1916.
My company front lay in a very interesting sector. The trenches were very dry, and well built, and on the right of my front were five large mine craters, called from left to right, ‘Gunner’, ‘Love’, ‘Momber’, ‘The Twins’. We held the near lips of these craters by T head saps… running out from the front line. There was sufficient accommodation for the men in numbers of small, but deep, dug-outs, and a few disused mine shafts… A regiment of the Saxon Corps was opposite to us. They seemed very tame... It was all very weird; here we were on the lip of a large mine crater, the enemy holding the opposite lip, with... a few yards of air between their rifles’ muzzles and our own.3
In October 1916 soldiers from the Canadian Corps, commanded by Lieutenant General Sir Julian Byng, began to arrive in the Vimy Ridge sector, fresh from their experiences at Courcelette and Regina Trench on the Somme; a battle which had cost the Canadians more than 24,000 casualties. The 4th (Canadian) Division was the last to arrive in late November, and preparations were made to hold the line here during the forthcoming winter, which would prove the coldest of the war.
At the same time plans were being made for an offensive in the Arras area, to take place in the early months of 1917. A conference at First Army headquarters had drawn up a plan for a two Corps attack, with Byng’s Canadians being assigned the task of taking Vimy Ridge. Before him lay a formidable objective, which had so far eluded all earlier attacks.
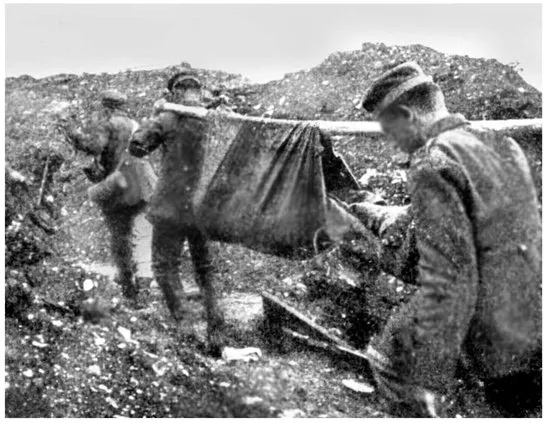
German stretcher party evacuates wounded from Vimy Ridge, May 1916.

The Canadians take over – CEF soldiers newly arrived on the Vimy front late 1916.
Along the whole German front line it would have been difficult to find terrain better suited to defence, combining the advantages of observation and concealment. The crest of the ridge was formed by two heights, Hill 135, immediately north of the village of Thélus, and Hill 145, two miles farther north-west. The western slopes facing the Allied lines rose gradually over open ground which afforded excellent fields of fire for small arms and artillery. The reverse slope dropped sharply into the Douai plain, its thick woods providing adequate cover for the enemy’s guns… At its other extremity the Ridge extended beyond Hill 145 to The Pimple, west of Givenchy, whence the ground fell quickly to the valley of the Souchez.4
On a front of more than 7,000 yards, Byng’s four Canadian divisions would advance on their objectives. The centre position lay opposite Vimy village, on the east side of the ridge, with the north at The Pimple opposite Givenchy-en-Gohelle, and to the south opposite Thélus and Farbus. Further east was the German second line, anchored around the Zwischen-Stellung between Vimy and Thélus, and the Vimy-Riegel protecting Lens. Byng planned to attack these positions in four stages, dictated by the German zones of defence and their timing affected by the progress of XVII Corps on the left flank (see chapter 2). The Black Line, the initial objective, was on average 750 yards from the existing Canadian front line and covered the forward defence zone established by the Germans. The second objective, the Red Line, ran north along the Zwischen-Stellung and went north-east to take in La Folie Farm and Hill 145. For the left flank attack of the Canadian Corps (3rd and 4th Divisions) this would mark the final objective, but on the right were two more: the Blue Line and the Brown Line. The Blue Line included Thélus, Hill 135 and the wooded area of Bois du Goulot, and the Brown followed the German second line at Farbus Wood, Bois de la Ville and the southern part of Bois de Bonval.
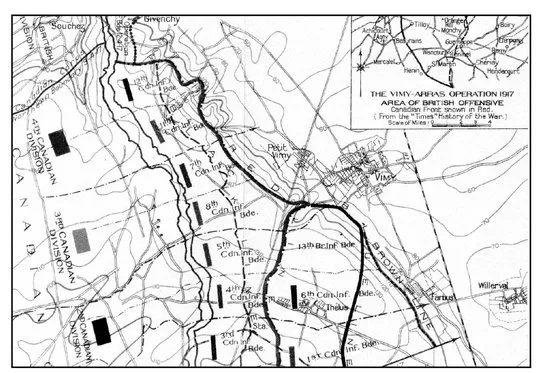
The plan: Canadian attack on Vimy Ridge 9th April 1917.
Timings would be crucial, and Byng’s staff had set up a strict timetable for the operation, with zero hour at 5.30am. The Black Line must be taken in the first 35 minutes, followed by a 40 minute pause to allow the objective to be secured. The Red Line would then be reached 20 minutes later; thus, following further consolidation, it was planned that by 7.05am the 3rd and 4th Divisions would be in control of the northern part of the Ridge. Meanwhile 1st and 2nd Divisions on the right would continue, following a two and a half hour pause on the Red Line to allow reserves to come up, and leap forward 1,200 yards to the Blue Line. After a further 96 minute pause, to allow the bombardment to continue and guns to get up, these same units would move in on the final objective on the Brown Line. If all went to plan Vimy Ridge would be in the Canadians’ hands by 1.18pm, following an advance of more than 4,000 yards.
The key to success was the bombardment, just as it had been on the Somme in 1916. But the lesson which senior commanders like Byng had learnt from the Somme battle had been that an attack could only succeed if enough guns were assembled, and were of sufficient calibre; the British Army had lacked heavy guns the year before, which had seriously hampered operations in the early phase of the Somme. By early 1917 this was not as much of a problem, and for the assault on Vimy Byng not only had his divisional artillery, dedicated Canadian Siege Batteries (heavy guns), but also a large number of British Heavy Artillery Groups (HAGs) which consisted of guns from 6-inch to 15-inch. In total, Byng had 245 heavy guns and howitzers at his disposal, along with 480 18-pounders, and 138 4.5-inch howitzers. An additional 132 heavy guns and ...
Table of contents
- Battleground series:
- Title Page
- Dedication
- Copyright Page
- Table of Contents
- INTRODUCTION BY SERIES EDITOR
- INTRODUCTION
- Acknowledgements
- USERS GUIDE
- Chapter 1 - CANADIAN CORPS: VIMY RIDGE 9TH/14TH APRIL 1917
- Chapter 2 - XVII CORPS: 34TH AND 51ST (HIGHLAND) DIVISIONS 9th/10th APRIL 1917
- Chapter 3 - XVII CORPS: 4TH AND 9TH (SCOTTISH) DIVISIONS 9th/10th APRIL 1917
- Chapter 4 - VI CORPS: 3RD, 12TH (EASTERN) AND 15TH (SCOTTISH) DIVISIONS 9th/10th APRIL 1917
- Chapter 5 - VII CORPS: ADVANCE OF 14TH (LIGHT) & 56TH (LONDON) DIVISIONS 9th /12th APRIL 1917
- Chapter 6 - VII CORPS: ADVANCE OF 21ST & 30TH DIVISIONS 9th /10th APRIL 1917
- Chapter 7 - MONCHY LE PREUX 9th – 14th APRIL 1917
- Chapter 8 - WANCOURT – FONTAINE 33RD AND 50TH (NORTHUMBRIAN) DIVISIONS APRIL-MAY 1917
- Chapter 9 - ROEUX APRIL-MAY 1917
- Chapter 10 - BULLECOURT APRIL-MAY 1917
- APPENDIX 1 - ARRAS CEMETERIES
- INDEX
Frequently asked questions
Yes, you can cancel anytime from the Subscription tab in your account settings on the Perlego website. Your subscription will stay active until the end of your current billing period. Learn how to cancel your subscription
No, books cannot be downloaded as external files, such as PDFs, for use outside of Perlego. However, you can download books within the Perlego app for offline reading on mobile or tablet. Learn how to download books offline
Perlego offers two plans: Essential and Complete
- Essential is ideal for learners and professionals who enjoy exploring a wide range of subjects. Access the Essential Library with 800,000+ trusted titles and best-sellers across business, personal growth, and the humanities. Includes unlimited reading time and Standard Read Aloud voice.
- Complete: Perfect for advanced learners and researchers needing full, unrestricted access. Unlock 1.5M+ books across hundreds of subjects, including academic and specialized titles. The Complete Plan also includes advanced features like Premium Read Aloud and Research Assistant.
We are an online textbook subscription service, where you can get access to an entire online library for less than the price of a single book per month. With over 1.5 million books across 990+ topics, we’ve got you covered! Learn about our mission
Look out for the read-aloud symbol on your next book to see if you can listen to it. The read-aloud tool reads text aloud for you, highlighting the text as it is being read. You can pause it, speed it up and slow it down. Learn more about Read Aloud
Yes! You can use the Perlego app on both iOS and Android devices to read anytime, anywhere — even offline. Perfect for commutes or when you’re on the go.
Please note we cannot support devices running on iOS 13 and Android 7 or earlier. Learn more about using the app
Please note we cannot support devices running on iOS 13 and Android 7 or earlier. Learn more about using the app
Yes, you can access Walking Arras by Paul Reed in PDF and/or ePUB format, as well as other popular books in History & World War I. We have over 1.5 million books available in our catalogue for you to explore.