Chapter 1: Getting Started with Azure and SSIS 2019
In this cookbook, we are going to cover Extract, Transform, Load (ETL) development with Microsoft Azure. We will start with Microsoft SQL Server 2019 Integration Services (SSIS) and then gradually move on to data management capabilities in Azure. Throughout this cookbook we will use hands-on examples, which will not only provide you with genuine first-hand experience in SSIS development but also demonstrate how to design a working ETL solution or a module that could be built into an ETL solution.
Let's start by establishing your development environment. We are going to guide you through the installation of a new SQL Server instance, including all the components needed for on-premises as well as cloud-based SSIS solution development. You are also going to install the tools used in administering and maintaining SQL Server instances – either on-premises or in the cloud. You are also going to install the tools used in developing, testing, and deploying your SSIS solutions. You will finish this chapter by creating an Azure subscription, which will allow your on-premises development environment to extend into the cloud.
This chapter covers the following recipes that will help you get started with SSIS development on-premises as well as in the cloud:
- Installing Microsoft SQL Server 2019 Integration Services
- Installing SQL Server Management Studio
- Installing SQL Server Data Tools
- Installing Azure Data Studio
- Creating an Azure subscription
Technical requirements
In order to install the necessary components, you will need a workstation – either a physical personal computer or a virtual one – running a compatible Microsoft Windows operating system. SQL Server 2019 can be installed on any edition of the Microsoft Windows Server operating system, starting with Windows Server 2016, or even on its desktop edition, Windows 10, starting with version TH1, build 1507.
Depending on the features installed, SQL Server is going to require between 6 and roughly 8 GB of free space on the hard drive, and at least 1 GB of available system memory, though around 4 GB is the recommended minimum. Practically any 64-bit CPU is supported.
Important note
You can find more detailed information about SQL Server 2019 hardware and software requirements in the online vendor documentation (SQL docs) article entitled SQL Server 2019: Hardware and software requirements, at https://docs.microsoft.com/en-us/sql/sql-server/install/hardware-and-software-requirements-for-installing-sql-server-ver15.
Speaking of online documentation, your workstation is going to need internet access – even to perform the installations.
Installing Microsoft SQL Server 2019 Integration Services
You are going to install a new instance of SQL Server on your workstation; if you prefer, you can also upgrade an existing SQL Server instance, as noted in the recipe. The installation will include all the features necessary to design SSIS solutions generally, not just to perform the work presented in this book.
The Client Tools Software Development Kit (SDK), an otherwise optional SQL Server component, must be installed on the workstation used in SSIS development. It contains the .NET managed assemblies with design-time access to the SSIS runtime, without which SSIS development simply cannot take place.
The installation of the SQL Client Connectivity SDK, another optional component, is recommended, though not necessary. It contains SQL Server Native Client connectivity resources that you might need in database application development.
Important note
None of the SDKs mentioned would ever need to be installed on a server used for hosting data, as such a server would normally not be used for SSIS development.
Getting ready
You need access to the SQL Server 2019 installation media. Since this is going to be a typical development workstation installation, you can use the free, specialized SQL Server 2019 Developer Edition, available for download at https://www.microsoft.com/en-us/sql-server/sql-server-downloads. Alternatively, you can also use a free trial edition of SQL Server 2019 Standard, or the Data Center editions, but please note that their use is limited to 180 days.
Important note
The Developer edition of SQL Server 2019 is a full-featured free edition, licensed for use as a development and test database in a non-production environment.
Either download the installation media from the website or use the installation media provided by the administrator in your organization. If you decide to use the Developer edition of SQL Server 2019, download the executable from the website, and save it to the local drive on the workstation that you will be using for the recipes in this book. If you prefer to use the Evaluation edition of SQL Server 2019, you will have to sign up on the website by providing some of your personal information before being able to access the installation media.
How to do it…
Start your workstation and log in with an account with administrative operating system privileges. Make sure the workstation has access to the SQL Server 2019 installation media – for instance, make sure that the Developer edition executable file is available on the local drive:
- Locate the installation media, and double-click the installation executable (for instance, SQL2019-SSEI-Dev.exe for SQL Server 2019 Developer Edition) to start the installation.
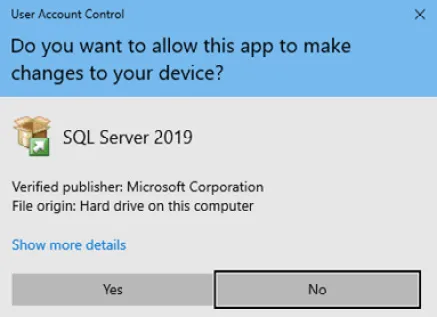
When prompted by the operating system, which will ask whether you want to allow the application to make changes to your device, as shown in the following screenshot, click Yes to continue:
Figure 1.1 – The SQL Server installation User Account Control dialog
- At the beginning of the installation, you are asked whether you would like to use the basic settings, customize them, or simply download the rest of the installation media.
Tip
Generally, you will only download the installation media if you plan to install SQL Server on additional devices. On the other hand, a very good reason for having the media available locally would be in case you need to repair the installation later.
Select Custom to continue.
- You now have to select the location of the installation files. Use the Default folder unless you prefer to use an alternative location.
When ready, click Install to continue. Depending on your internet connection, it should take just a few minutes to download and extract the files.
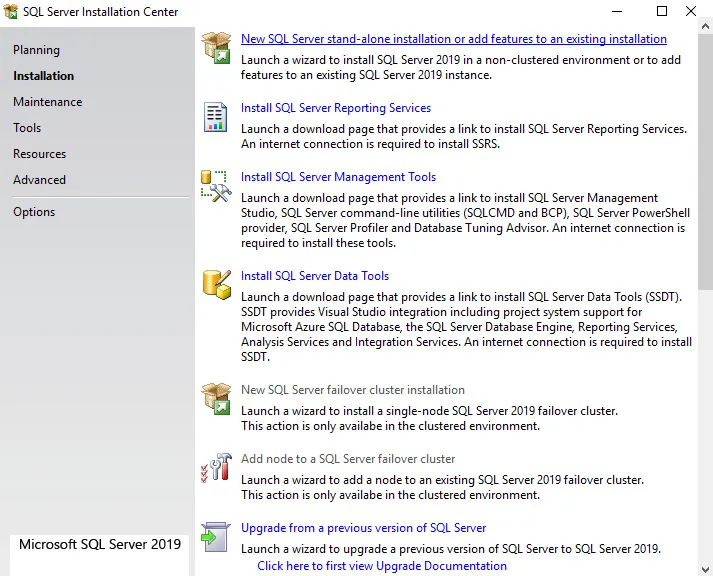
- After the installation files have been prepared, the SQL Server Installation Center window will open, as shown in the following screenshot:
Figure 1.2 – SQL Server Installation Center
On the Install...