Chapter 1: Creating Your First Web Application in Angular
Angular is a popular and modern JavaScript framework that can run on different platforms additional to the web, such as desktop and mobile. Angular applications are written in TypeScript, a superset of JavaScript that provides syntactic sugar such as strong typing and object-oriented techniques.
Angular applications are created and developed using a command-line tool made by the Angular team called the Angular CLI. It automates many development tasks, such as scaffolding, testing, and deploying an Angular application, which would take a lot of time to configure manually.
The popularity of the Angular framework is considerably reflected in its broad support of tooling. The Visual Studio Code (VSCode) editor contains various extensions that enhance the development experience when working with Angular.
In this chapter, we will cover the following topics:
- Introduction to Angular
- Introduction to the Angular CLI
- Exploring the rich ecosystem of Angular tooling in VSCode
- How to create our first Angular application
- How to use Nx Console for automating Angular CLI commands
Essential background theory and context
The Angular framework is a cross-platform JavaScript framework that can run on a wide range of environments, including the web, servers, mobile, and desktop. It consists of a collection of JavaScript libraries that we can use for building highly performant and scalable web applications. The architecture of an Angular application is based on a hierarchical representation of components. Components are the fundamental building blocks of an Angular application. They represent and control a particular portion of a web page called the view. Some examples of components are as follows:
- A list of blog posts
- An issue reporting form
- A weather display widget
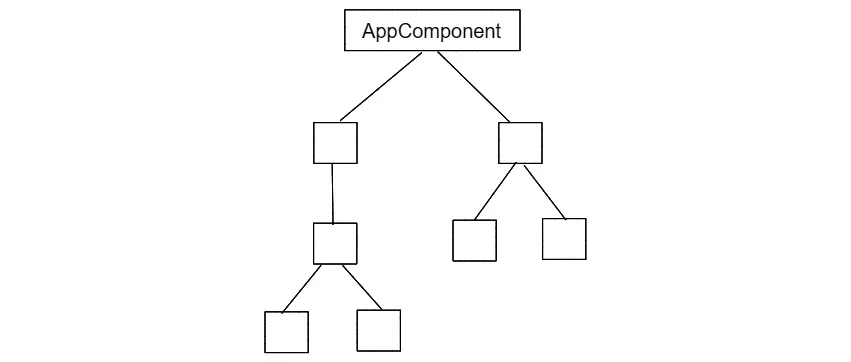
Components of an Angular application can be logically organized as a tree:
Figure 1.1 – Component tree
An Angular application typically has one main component, called AppComponent, by convention. Each component in the tree can communicate and interact with its siblings using an application programming interface defined by each one.
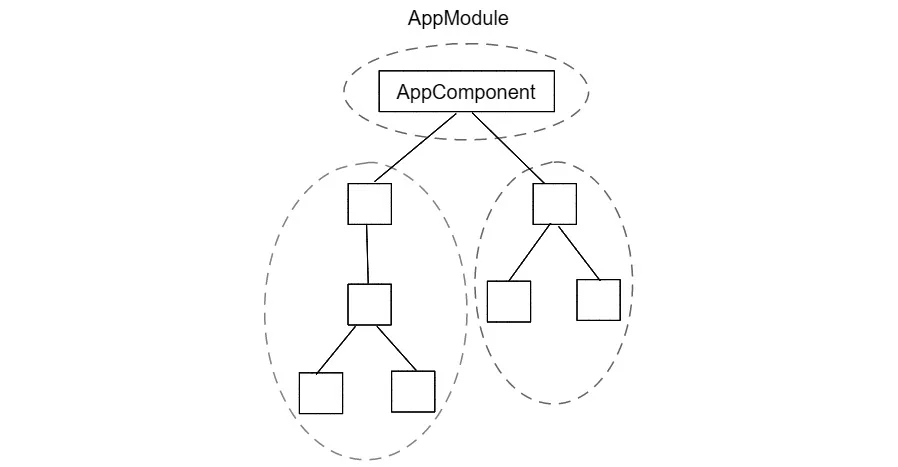
An Angular application can have many features that are called modules. Each module serves a block of single functionality that corresponds to a particular application domain or workflow. Angular modules are used to group Angular components that share similar functionality:
Figure 1.2 – Module hierarchy
In the previous diagram, the dashed line circles represent Angular modules. An Angular application typically has one main module, called AppModule, by convention. Each module can import other modules in an Angular application if they wish to use part of their functionality.
The functionality of a module can be further analyzed in the presentational and business logic of a feature. Angular components should only be responsible for handling the presentational logic and delegating business logic tasks to services. The Angular framework provides Angular services to components using a built-in dependency injection (DI) mechanism.
The Angular DI framework uses special-purpose objects, called injectors, to hide much of the complexity of providing dependencies to an Angular application. Components are not required to know any of the actual implementation of an Angular service. They only need to ask for it from an injector.
An Angular service should follow the single responsibility principle, and it should not cross boundaries between different Angular modules. Some examples of services are as follows:
- Access data from a backend API using the HTTP protocol.
- Interact with the local storage of the browser.
- Error logging.
- Data transformations.
An Angular developer does not need to remember how to create components, modules, and services off by heart while building an Angular application. Luckily, the Angular CLI can assist us by providing a command-line interface to accomplish these tasks.
Introduction to the Angular CLI
The Angular CLI is a tool created by the Angular team that improves the developer experience while building Angular applications. It hides much of the complexity of scaffolding and configuring an Angular application while allowing the developer to concentrate on what they do best – coding! Before we can start using the Angular CLI, we need to set up the following prerequisites in our system:
- Node.js: A JavaScript runtime that is built on the v8 engine of Chrome. You can download any Long-Term Support (LTS) version from https://nodejs.org/en.
- npm: A package manager for the Node.js runtime.
We can then install the Angular CLI using npm from the command line:
npm install -g @angular/cli
We can use the -g option to install the Angular CLI globally since we want to create Angular applications from any path of our operating system.
...