![]()
PART 1: Master Data
Master data is the foundation on which all SAP transactions are executed. This data is accessed when you create a sales order or a delivery, pick transfer orders and execute shipment documents, or when you process billing. Because of the dynamic nature of master data, it’s very important that it’s accurate and up-to-date. In order to ensure this, you need to invest time up front when the master data is created and use maintenance transactions to keep it clean. In the following tips, we’ll share a few little-known transactions to consider for your day-to-day data maintenance operation, making it easier and more efficient.
![]()
1 Customizing the Fields in Customer Master Screens
You can ensure the most relevant fields are always available and irrelevant fields are removed from the screens in the customer master.
The customer master is the foundation on which your SD configuration rests. When master data records are created, many times users don’t enter values in fields that are needed to obtain the results you expect. Other times, they enter data in fields that needed to remain blank so that they don’t interfere with the configured functionality.
This tip shows you how to customize the customer master to suit your specific needs, allowing you to hide unnecessary fields, make entries that are mandatory in critical fields by changing the field status settings, and allow users to either enter information or not in fields that don’t affect the resulting functionality.
And Here’s How ...
To make changes to the field status settings, use Transaction OVT0 or follow the IMG menu path:
Logistics General • Business Partner • Customers • Control • Define Account Groups and Field Selection for Customers
In the resulting screen, select which fields are mandatory or required entries, optional, or suppressed for each customer’s account group. To do this, select the account group you want to change. It’s a good practice not to change the standard-delivered account groups; if you want to do that, make a copy of that account group so you can make changes to it.
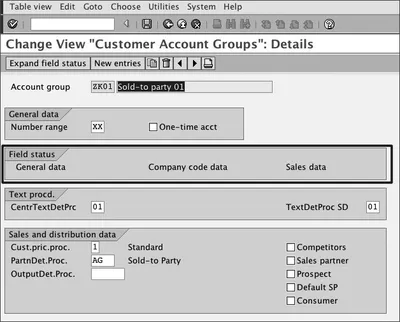
When you double-click on the selected account group, you’ll see a screen with the general settings for the account group. In the middle part of this screen, you have a section labeled Field Status. Figure 1 shows these field statuses; they group the different views you have in the customer master and within them the fields you want to customize.
Figure 1 > Account Group Details Screen
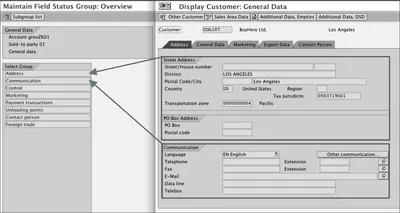
To start customizing the field statuses, double-click on the Status Group name; from there, you’ll be taken to the Field Status Groups screen. Now you see a more familiar description for the groups. The field status groups are organized in the same way as the field groups in the customer master screens. Each section of the different views of the customer master corresponds to this classification (see Figure 2).
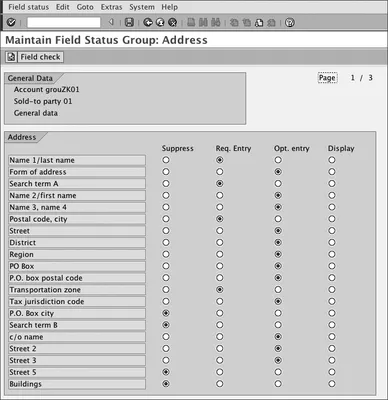
Double-click again on the groups in the list and that will take you to the settings for each of the fields in the group (see Figure 3). This screen allows you to make a field invisible, mandatory, or display only. Note that some fields carry through several screens; for example, Transportation Zone in the Street Address section of the Address tab.
Figure 2 > Organization of the Field Status Groups
Figure 3 > Selecting a Status for Every Field
In these cases, you’ll find that the settings you make may work differently in different tabs. In this case, Transportation Zone is a mandatory field in the Address tab, and display only in the Control Data tab. Let’s look at the different statuses you can have in Table 1.
| Field Status | Description |
| Suppress | When you select this setting for a field, it will disappear from the screen. |
| Required Entry | These fields are mandatory and appear with a check mark when empty, indicating that data must be entered in them. |
| Optional Entry | These fields appear blank when they have no data. |
| Display | These fields appear “grayed out” and won’t allow data to be entered or changed. |
Table 1 > Field Status Meanings
After you make changes to these settings, you’ll see how fields in the customer master appear, di...