"This is an absolutely first-rate book for beginners in wood sculpture, well thought out and well executed. It is exceptional in the quality of its illustrations, and contains many original and unusual conceptions and designs." — E. J. Tangerman. In answer to complaints from students that there was no concise, simple text on wood carving, Charles Marshall Sayers, a nationally famous teacher and craftsman, wrote this book. It is still the finest book for the beginning student in wood sculpture. In clear, straightforward language, Sayers carefully guides the reader through the fundamentals — what tools and materials to use, how to use them. There are lessons and designs for incised carving, relief carving, and other cutting methods. Sayers discusses woods suitable for carving, stains and finishes, preliminary and advanced methods of preparing woods for finishing, even how to make a workbench. 
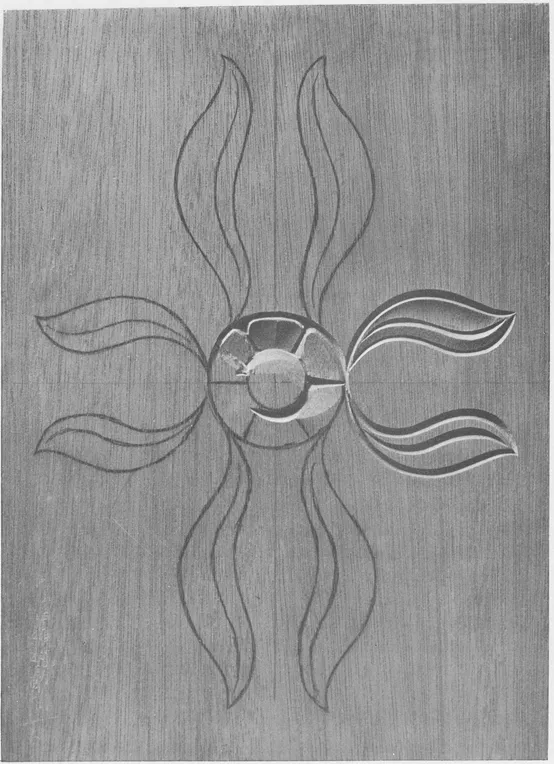
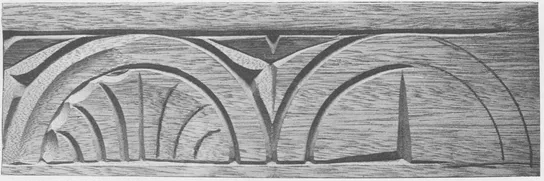
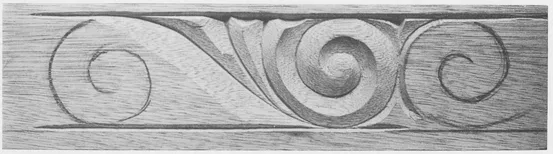
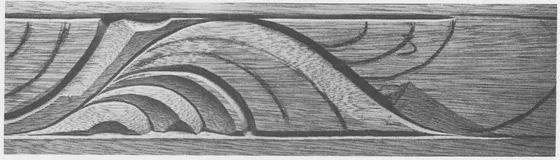
The 34 illustrated designs for over 34 projects encourage the student to build slowly and methodically a sound, practical technique while creating objects of beauty and utility. All of the projects employ only four tools (one straight parting tool, three different sizes of straight gouges). With this book you can make panels for cabinets, chests, and doors; borders; table aprons; chair and bench rails; circular mirror frame; wall bracket with shelf; bookends; rectangular mirror frame; footstools; guest-book covers; mirror frame with half-circle top; holy water font; and doors. Though The Book of Wood Carving is meant for the beginner, experienced carvers will find that Sayers' original conceptions and designs will increase their own pleasure and skill. "Stimulating both by spicy text and large photographs showing every point in processes described . . . [Illustrated with] designs of actual work by the author — a famous teacher and craftsman — and his students and apprentices." — Books, New York Herald Tribune.
Frequently asked questions
Yes, you can cancel anytime from the Subscription tab in your account settings on the Perlego website. Your subscription will stay active until the end of your current billing period. Learn how to cancel your subscription.
At the moment all of our mobile-responsive ePub books are available to download via the app. Most of our PDFs are also available to download and we're working on making the final remaining ones downloadable now. Learn more here.
Perlego offers two plans: Essential and Complete
Essential is ideal for learners and professionals who enjoy exploring a wide range of subjects. Access the Essential Library with 800,000+ trusted titles and best-sellers across business, personal growth, and the humanities. Includes unlimited reading time and Standard Read Aloud voice.
Complete: Perfect for advanced learners and researchers needing full, unrestricted access. Unlock 1.4M+ books across hundreds of subjects, including academic and specialized titles. The Complete Plan also includes advanced features like Premium Read Aloud and Research Assistant.
Both plans are available with monthly, semester, or annual billing cycles.
We are an online textbook subscription service, where you can get access to an entire online library for less than the price of a single book per month. With over 1 million books across 1000+ topics, we’ve got you covered! Learn more here.
Look out for the read-aloud symbol on your next book to see if you can listen to it. The read-aloud tool reads text aloud for you, highlighting the text as it is being read. You can pause it, speed it up and slow it down. Learn more here.
Yes! You can use the Perlego app on both iOS or Android devices to read anytime, anywhere — even offline. Perfect for commutes or when you’re on the go. Please note we cannot support devices running on iOS 13 and Android 7 or earlier. Learn more about using the app.
Yes, you can access The Book of Wood Carving by Charles Marshall Sayers in PDF and/or ePUB format, as well as other popular books in Technology & Engineering & Technical & Manufacturing Trades. We have over one million books available in our catalogue for you to explore.
FOR the first lesson, work on a panel 1” x 10” x 14” is recommended. This may be one of several woods, but Philippine Mahogany is very suitable, being comparatively soft, and yet having enough decided grain to compel careful cutting in the correct directions, and to teach control. Draw design shown in accompanying sketch, on board, and fix same to work bench. The bench height should be about thirty-eight inches. Fix board down with cleats nailed around the four sides. This enables one to reverse the panel, and facilitates cutting. Hold parting tool as shown in photograph, at an angle of about thirty-five degrees, and proceed to cut around outlines to a depth of about 3/16 inches. Take care not to tilt tool sideways, but to keep it even all the way through, on an even keel, as a sailor would say. Next cut center lines in leaves, starting shallow and quickly reaching a depth of about ¼ inch, then coming to the surface before quite reaching the opposite end of leaf. This line is close to one side of the leaf. Take the
” gouge No. 5, and proceed to hollow the wider side, cutting from the outer edge to almost the bottom of the center parting tool cut. It will be necessary to change the direction of the cut to suit the grain of the wood. Only practice will accustom the carver to know when to change direction. When cutting with gouges across the grain of the wood, the higher point should be kept slightly ahead of the lower. This will leave a cleaner surface.
FIRST LESSON
When the gouge cutting is complete, take the large gouge, hollow side up, and slope the opposite side, cutting from the high center down to almost the bottom of the outer V. Cut around the center circle with parting tool, about ¼ inch deep, and slope away from outer to inner circle, using a large gouge. Then starting shallow from the outside circle, cut each straight line to form petals with parting tool, in three directions, thus making rounded corners. Later this can be done with the
” gouge hollow side down, but for a beginning, practice with the parting tool is important. Take
” gouge No. 5, and hollow petals as shown, leaving a ridge between cuts. In starting gouge cut, hold tool almost perpendicular and flatten out as you proceed with the cutting. This will give what is termed “dish” to the petals.
Now round over the center ball. The flat gouge is used for rounded surfaces, hollow side up, until one is proficient. Then frequently it will be advantageous to use it the other way. Should the beginner not feel sufficiently confident to go ahead with the next lesson, it is wise to practice carving similar leaves and flowers until sufficient accuracy is obtained, but avoid fussy, too exact cutting. The desired effect is that of bold, easy cuts, rather than mechanical perfection.
The rosette formed in this first panel is the beginning of conventional flower forms such as the Tudor rose, and has great value in wood-carving design. The leaf form in this same panel is a base for many types of leaves and scrolls.
This is known as incised carving, where the outline is followed and the background not removed. This particular style can be used successfully on panels where shallow and primitive designs are required.
This first panel, if fairly successful, can be used for the top of a small footstool, or if reduced in thickness to 9/16 of an inch, can make the front or back of a guest-book cover.
The simpler type of book cover is made by boring two holes through the front and back covers, about 3 inches from either end and ½ inch from the edge, the holes being made to take easily strips of rawhide.
The paper filler is made by folding sheets somewhat smaller than the covers, and punching holes in line with the holes in the covers. So-called butcher paper, generally known in the trade as “screenings,” is very suitable. The edges of the paper should be torn over a sharp edge of wood or metal, instead of being cut. This gives a better effect.
For the purposes of study, Designs Nos. 1-6 should measure no less than 2½” to 3” vertically, excluding borders.
Design No. 1
SECOND LESSON
The second lesson is in the main a repetition of the methods in the first, but with a different application.
This design is suitable for borders, aprons of tables, and chair and bench rails.
First cut the border lines with the parting tool, taking care to cut to the inner side of the line, leaving borders intact. Next, cut around the arcs, cutting outside and inside lines to leave the border intact. The reason for this will be obvious, as the line remains, whereas if the cut were made down the line itself, one could be at either side and have no check. A parting tool cut should then be made down the straight center line, starting shallow at the top, and to the full depth of the tool at the bottom. Next, slope both sides down almost to the bottom of the parting tool cut, as shown in the accompanying plate on the page opposite, using the large flat gouge. For the curved lines shown, use the parting tool. Start shallow and cut deeply toward the finish. Take the
” gouge and cut as shown around the arc, pushing home with one cut of the tool, then using the edge of the tool to cut off chips. This method should be studied closely as it is used all through this type of carving.
DESIGN NO. 1
DESIGN NO. 2
DESIGN NO. 3
Make three intersecting cuts with the parting tool in triangles between arcs, starting shallow, and deepening to the intersection, then slope away all three sides. Make a cut at center of all three sides with the parting tool, then round as in the petals on the first panel. To finish, use the
” gouge on the inside of the arc, sloping down to bottom of cut, then round over outside edge with flat gouge.
Design No. 2
THIRD LESSON
Design No. 2 introduces the use of scrolls, and it is very necessary to exert the utmost care in good curves and graceful, swinging lines. This design can be used for borders, rails, frames, barge boards, door and window facings, and is equally good on a small or fairly large scale.
Cut straight parting tool lines, taking care not to encroach on borders, then cut around scrolls and along connecting line between. Next slope both sides of connecting line, almost to bottom of cut. Follow concave side of scrolls with the
” gouge, sloping from fully halfway on surface, almost to the bottom of the parting tool cut. Round other side over with flat gouge. Draw lines diverging from center of main line, then cut with the parting tool, deepening toward the border. On approaching end of cut, deepen, thus lessening the chances of slipping, also giving a better effect.
With the
” gouge then hollow concave sides of cuts, and round the convex, as shown in the accompanying plate. When cutting off the chip formed by the gouge against a straight line, cut off with the flat gouge. The triangle between scrolls is cut with a parting tool, and smoothed off with a flat gouge. The method all through is similar to the first panel, but the different application gives an effect of richness. It will be seen that contrasting light and shade is the whole problem, and clean-cut work, with definite bold cuttin...
Table of contents
DOVER BOOKS ON WOODWORKING AND CARVING
Title Page
Copyright Page
Table of Contents
Preface to the Dover Edition
Dedication
Preface to the First Edition
Foreword
Introduction
Position of Hands in Holding Tools
Tools
Incised Carving
Relief Carving
Method for Cutting Design No. 10
Method for Cutting Designs Nos. 11, 12, 13, and 14
Design No. 15
Design No. 16
Design No. 17
Design No. 18
Design No. 19
Design No. 20
Design No. 21
Design No. 22
Design No. 23
Design No. 24
Design No. 25
Design No. 26
Design No. 27
Design No. 28A
Design No. 28B
Design No. 29
Design No. 30
Design No. 31
Design No. 32
Design No. 33
Design No. 34
Doors and Their Treatment
To Make Work Bench
Woods Suitable for Wood Carving
Preliminary Method of Preparing Woods for Finishing