![Create Stunning Renders Using V-Ray in 3ds Max](https://img.perlego.com/book-covers/2880126/9781000470277_300_450.webp)
Create Stunning Renders Using V-Ray in 3ds Max
Guiding the Next Generation of 3D Renderers
Margarita Nikita
- 210 pages
- English
- ePUB (mobile friendly)
- Available on iOS & Android
Create Stunning Renders Using V-Ray in 3ds Max
Guiding the Next Generation of 3D Renderers
Margarita Nikita
About This Book
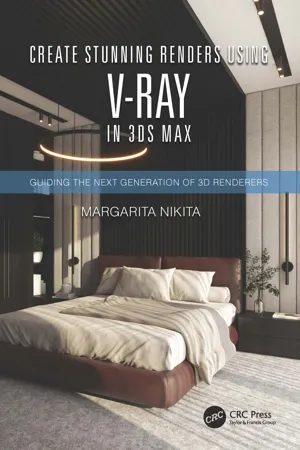
Create Stunning Renders using V-Ray in 3ds Max: Guiding the Next Generation of 3D Renderers is a step-by-step guide on how to create realistic renderings using V-Ray in 3ds Max. The potentials of V-Ray are detailed using a bedroom scene as an example. The book introduces the 3ds Max interface and the basic commands, allowing readers to familiarize themselves with the work environment from the very beginning.
This book is intended for architects, interior designers, and anyone else wanting to create photorealistic renderings using V-Ray in 3ds Max. The reader does not need experience to follow this book, but any prior knowledge of working in 3ds Max will help the reader jump right in.
Margarita Nikita is the co-founder of High Q Renders LLC, an award-winning creative company based in San Francisco, CA, with offices in Greece. Nikita has published several design books on 2D and 3D graphic design, some of which are used in university courses, actively contributing to the formation of the new generation of 3D modelers in her native country, Greece. She shares her knowledge, advice, and tips and tricks on her YouTube channel, Margarita Nikita. More of her work is available at her Instagram account, @ margarita.nikita.
Frequently asked questions
Information
1
Getting Started
1.1 3ds Max Interface Overview
![Figure 1.1](https://book-extracts.perlego.com/2880126/images/fig1_1-plgo-compressed.webp)
Welcome Screen.
- Title bar: Shows the name of the project and the version of the 3ds Max. Every new project is named by default Untitled and you need to Save the project to rename it (see Section 1.6).
- Menu bar (File, Edit, Tools, âŚ): Contains drop-down menus with commands. The name of each menu indicates the purpose of the commands.
- Main Toolbar: Provides quick access to some of the most commonly used commands in 3ds Max, like the commands Undo, Redo, Move, Rotate, or Scale.
- Command Panel: Consists of six sub-panels: Create, Modify, Hierarchy, Motion, Display, and Utilities. They include controls for creating objects, editing them, animation and display options, and miscellaneous utilities. You use this panel mainly to create and edit the cameras and the lights in a scene.
- V-Ray Toolbar: Contains shortcuts for some of the most commonly used V-Ray commands.
- Status Bar: On the left side there is a two-line interface, where you can create scripts and execute commands. On its right, there is the Status line, which displays the number and type of object(s) selected, and below the Status line, there is the Prompt line, giving instructions on what your next step should be. On the right of the Status line, there is the Coordinate Display area with the X, Y, and Z fields indicating the coordinates of the selected object and allowing you to control its position (see Section 1.5).
- Viewport Navigation Controls: Includes buttons that control the display and navigation of the viewports. Some of the buttons change depending on which viewport is active. See more details in Chapter 3.
- Animation and Time Controls: Contains the main controls for animation. However, this book will not cover any animation techniques.
- Time Slider: Allows you to move through any frame of the animation.
- Viewports: Everything in 3ds Max is located in a three-dimensional world that is viewed through one or more (up to 4) viewports. By using multiple viewports, you can have the best possible visualization of objects in a scene (see Sections 1.2 and 1.5).
![Figure 1.2](https://book-extracts.perlego.com/2880126/images/fig1_2-plgo-compressed.webp)
3ds Max interface.
![Figure 1.3](https://book-extracts.perlego.com/2880126/images/fig1_3-plgo-compressed.webp)
Repositioning the V-Ray Toolbar.
![Figure 1.4](https://book-extracts.perlego.com/2880126/images/fig1_4-plgo-compressed.webp)
Ways to hide/unhide a toolbar.