
- English
- ePUB (mobile friendly)
- Available on iOS & Android
eBook - ePub
The Fundamentals of Synthesizer Programming
Trusted by 375,005 students
Access to over 1.5 million titles for a fair monthly price.
Study more efficiently using our study tools.
Information
Subtopic
MusicFOUR
Controllers
This chapter is divided into nine sections:
1.Introduction
2.The Filter
3.Filter Types
4.Filter Cutoff & Center Frequencies
5.Filter Slope
6.Filter Resonance
7.The Amplifier
8.Summary
9.Questions for Chapter Three
Introduction
The third type of module, the controller, was introduced in chapter one. You learned how controllers are used to affect parameters of source and modifier modules via control signals. Controllers are the key to more closely imitating acoustic instruments, adding expression to your sounds, making sound effects, and simply making patches more interesting.
Again, the primary purpose for a controller is to take control of another module via a control signal. The output of the controller is routed to the control input of one (or more) source or modifier modules.
You will see a range of terms used to describe controllers. For example, some synthesizers refer to a controller and modifier as a “source” and “destination,” where the former is not really a “source” as defined in this book, but rather is the source of the control signal. Keep in mind that while the terminology may vary, the basic principles are the same.
Using a controller to affect a source or modifier is called modulation. A controller can modulate pitch, timbre or loudness depending on its destination (oscillator, filter or amplifier).
There are many types of controllers on a synthesizer. In this chapter, we will introduce the three most common controllers: the envelope generator, the low frequency oscillator, and the keyboard. Just like the last two chapters, you will learn the most common physical controls (knobs, sliders, switches, etc.) found on the front panel. However, it is also necessary to discuss routing since you will sometimes need to select a destination.
The Envelope Generator
In synthesis, an envelope refers to a control signal with a simple curve or shape that changes over time, based on values set by the programmer. Unlike oscillator waveforms, which change very quickly and are repetitive, envelopes can change over a period of many seconds — or even minutes — and do not repeat. The envelope generator (EG) is used to produce envelopes as control signals on a synthesizer.
Every musical instrument has both amplitude and timbral envelopes that are peculiar to that instrument. For example, when you play a note on a piano, you hear a very rapid rise in loudness that gradually decays as you hold down the key (or the sustain pedal). In contrast, when you play a note on an organ, you hear an instantaneous rise in loudness that sustains as long as you hold down the key.
With an envelope generator, you can recreate the envelopes of the piano, organ, or other conventional instruments. You can even create envelopes that don’t resemble any known instruments.
When setting the envelopes for a new patch, you’ll often start with the amplifier envelope to shape loudness. Typically, the amplifier will have a dedicated EG hardwired to its control input. Figure 4.1 shows a block diagram of this. Note that the signal from the EG to the amplifier is a control signal. Each time you press a key you will cause the EG to start.
Figure 4.1 – An EG routed to the amplifier with a control signal

Every EG has multiple “stages” that determine how the envelope changes over time. By setting the controls for the various stages you can determine how quickly a sound starts, called “attack,” how quickly a sound starts to die away, called “decay,” whether or not a sound sustains while a key remains depressed, called “sustain,” and whether the sound dies away gradually or stops after a key is released, called “release.”
For convenience, the four EG stages are often abbreviated “ADSR” for Attack, Decay, Sustain, Release. It is helpful to think of the four stages as time, time, level, and time. The ADSR-type EG is the most common, but you will sometimes see synths that have more or fewer envelope stages. Let’s discuss each of the ADSR stages for the amplifier in detail (we’ll discuss the filter EG later in the chapter).
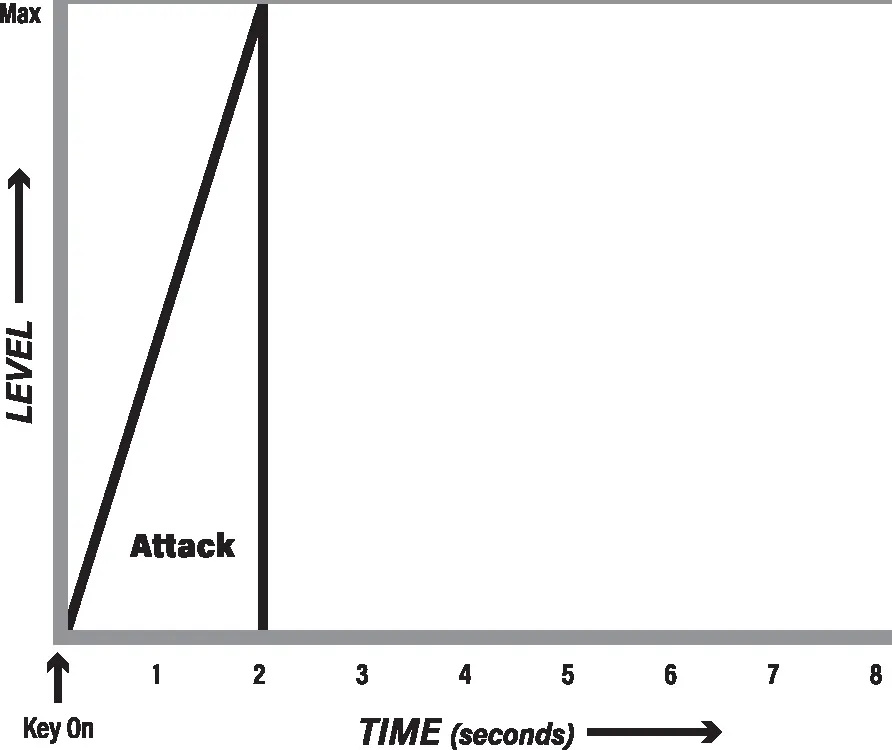
The attack stage determines the amount of time it takes for loudness to go from silence to maximum level. In other words, it determines the amount of time it takes for the sound to “build up” when you press a key. For example, you might set the attack time to zero for an organ sound, to a slightly slower rate for a guitar sound, or to a much slower rate for a string/pad sound. Attack times can range from a few milliseconds (a thousandth of a second) to many seconds, and different synths provide different minimum and maximum attack times. We will discuss the keyboard in more detail later, but this is a good time to point out that each time you press a key on a synthesizer’s keyboard, the envelope generator is triggered to start. On an analog synthesizer, this is done with a gate signal (and possibly a trigger too) generated by the keyboard, but with a software synthesizer, this is accomplished with a MIDI Note-On message.
For example, with the attack stage set for two seconds, loudness will take this much time to gradually rise from silence to maximum each time a key is played (see figure 4.2). With all other subsequent stages (decay, sustain and release) set to zero, loudness will abruptly return to silence at two seconds.
Figure 4.2 – The attack stage from key on to maximum
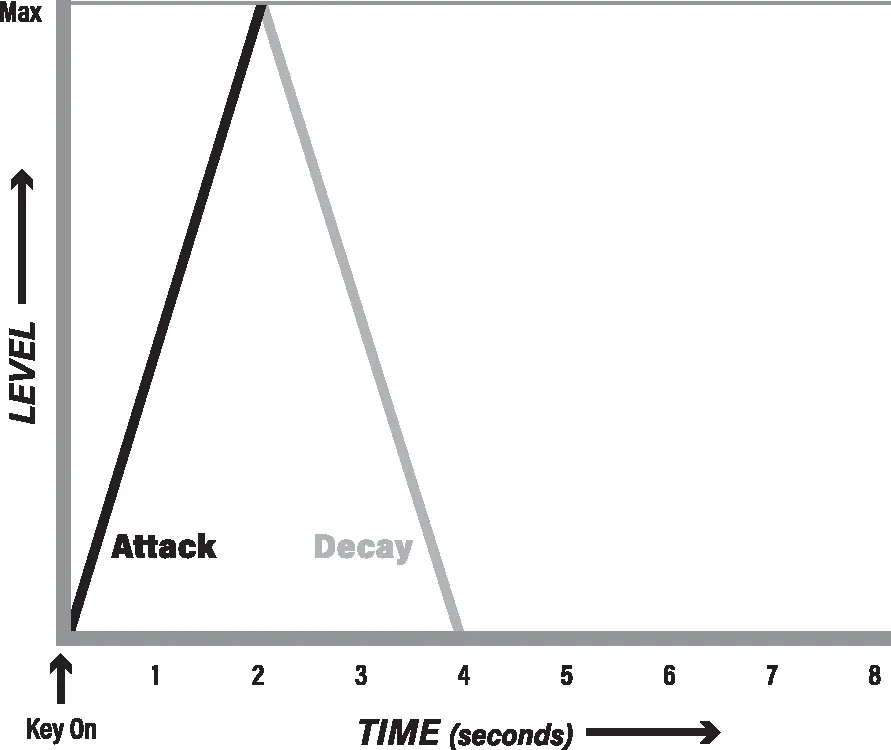
The decay stage determines how quickly the sound begins to die away after the attack stage is completed. Setting the decay value is somewhat more complicated, though, because the decay stage interacts with the sustain stage that follows it. A very important point to note is that the sustain setting reflects an amplitude level, not a time period. This is probably most easily explained by example.
In figure 4.3, the attack time is set for two seconds and the decay time is set for two seconds, as well; sustain is set to minimum level or zero. When you press a key and hold it, the sound will build up for two seconds, die away for two seconds, then become silent.
Figure 4.3 – Following the attack stage, loudness decays to a sustain level of 0
In figure 4.4, in contrast, the attack and decay times are still set for two seconds, but sustain is increased to 50%. Now, when you press a key and hold it, the sound will build up for two seconds, die away for two seconds, then continue to play at 50% amplitude until the key is released.
Figure 4.4 – Sound will remain at the sustain level until key off
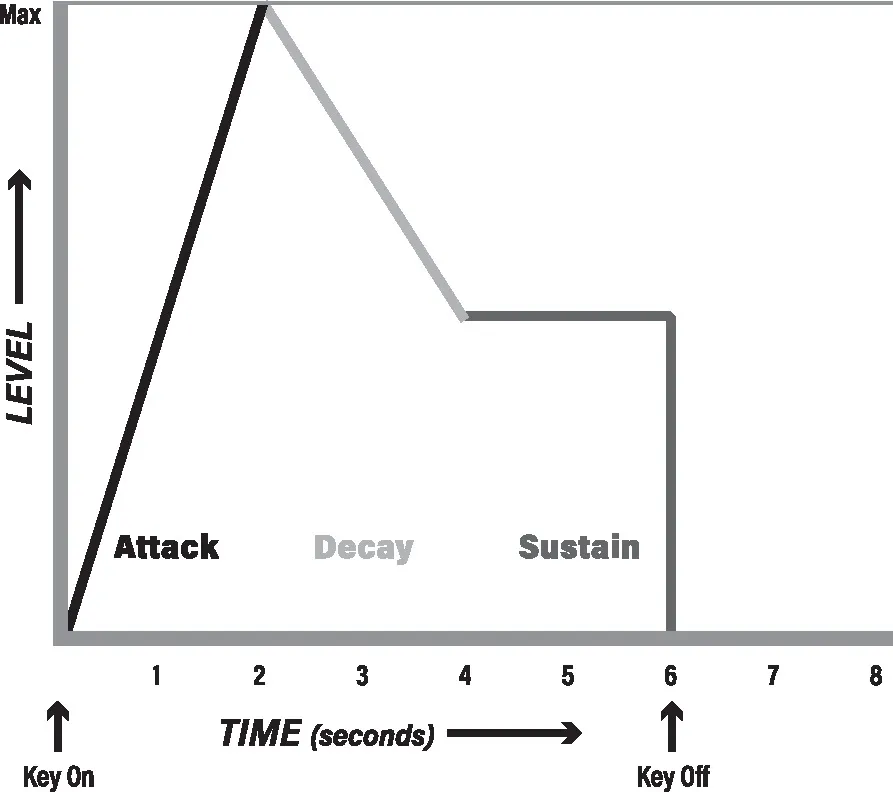
One point that is potentially confusing is that the decay stage is only active if the sustain level is set to less than 100%. In other words, the decay stage setting...
Table of contents
- Cover
- Title Page
- Acknowledgments
- Copyright Page
- Table of Contents
- A Note about the Synthesizers
- The Fundamentals of Synthesis
- Sources
- Modifiers
- Controllers
- An Overview of Electronic Music History
Frequently asked questions
Yes, you can cancel anytime from the Subscription tab in your account settings on the Perlego website. Your subscription will stay active until the end of your current billing period. Learn how to cancel your subscription
No, books cannot be downloaded as external files, such as PDFs, for use outside of Perlego. However, you can download books within the Perlego app for offline reading on mobile or tablet. Learn how to download books offline
Perlego offers two plans: Essential and Complete
- Essential is ideal for learners and professionals who enjoy exploring a wide range of subjects. Access the Essential Library with 800,000+ trusted titles and best-sellers across business, personal growth, and the humanities. Includes unlimited reading time and Standard Read Aloud voice.
- Complete: Perfect for advanced learners and researchers needing full, unrestricted access. Unlock 1.5M+ books across hundreds of subjects, including academic and specialized titles. The Complete Plan also includes advanced features like Premium Read Aloud and Research Assistant.
We are an online textbook subscription service, where you can get access to an entire online library for less than the price of a single book per month. With over 1.5 million books across 990+ topics, we’ve got you covered! Learn about our mission
Look out for the read-aloud symbol on your next book to see if you can listen to it. The read-aloud tool reads text aloud for you, highlighting the text as it is being read. You can pause it, speed it up and slow it down. Learn more about Read Aloud
Yes! You can use the Perlego app on both iOS and Android devices to read anytime, anywhere — even offline. Perfect for commutes or when you’re on the go.
Please note we cannot support devices running on iOS 13 and Android 7 or earlier. Learn more about using the app
Please note we cannot support devices running on iOS 13 and Android 7 or earlier. Learn more about using the app
Yes, you can access The Fundamentals of Synthesizer Programming by Joseph Akins, Alan Campbell in PDF and/or ePUB format, as well as other popular books in Media & Performing Arts & Music. We have over 1.5 million books available in our catalogue for you to explore.