Is it ever appropriate to diagnose and treat oral and dental problems without knowing the full extent of the problem? With more than 50% of anatomical structures and associated pathologies located below the gingivae and unseen to the eye, that's the reality without the use of high-quality, accurately interpreted radiographs. Atlas of Dental Radiography in Dogs and Cats presents hundreds of actual radiographic images, which are clearly labeled to facilitate accurate identification of normal and abnormal features. This valuable new atlas shows you exactly how to correlate common dental conditions with radiographic signs. Radiographs are also compared side by side with actual anatomical photographs to confirm surface landmarks visible on the radiographs. Correct positioning techniques for producing diagnostic radiographs as well as helpful tips and pitfalls when obtaining quality radiographs are logically presented. This approach helps you produce consistently high-quality radiographs, sharpen your interpretive skills, and confidently treat a wide range of dental problems.- Presents the most logical and useful approach to dental and oral radiography, using actual anatomical photographs for accurate clinical correlation- Depicts original and color-labeled radiographs side-by-side for accurate identification of normal and abnormal structures- Helps both veterinarians and technicians take the best possible radiographs, interpret them accurately, make sound treatment decisions, and monitor results- Provides clear, technical guidance for taking quality radiographs and identifying artefacts and results of improper imaging technique and film development- Presents clear pictorial instructions – from 2 angles – for correct positioning of the X-ray beam and intraoral films- Offers new opportunities for expanded professional services and revenues in your practice- Provides proof of compliance with standards of care for medical record documentation, helping you legally protect yourself, your staff, and your practice
- 288 pages
- English
- ePUB (mobile friendly)
- Available on iOS & Android
eBook - ePub
Atlas of Dental Radiography in Dogs and Cats
About this book
Trusted by 375,005 students
Access to over 1.5 million titles for a fair monthly price.
Study more efficiently using our study tools.
Information
Topic
MedicinaSubtopic
Medicina veterinariaPART ONE
INTRODUCTION
CHAPTER 1 Introduction to Dental Radiography
Veterinary Dental Radiology
Dental and oral diseases, many of which cause discomfort and inflammation, are common in dogs and cats. These patients present a diagnostic challenge because they often show no outward sign of their discomfort. Furthermore, many of the methods that assist diagnosis in human patients, such as identification and localization of discomfort, thermal and electrical pulp testing, and local anesthesia testing, are not helpful in animal patients. In addition to these obstacles, most of the pathology-related tissues are below the gingival margin, hidden from direct visualization. So while radiography is a narrow method of adding additional information to that which we get during a physical examination, in the oral cavity it is a tremendously important one. In addition to diagnosing problems, dental and oral radiographs also provide critical information for treatment planning, treatment evaluation, and treatment success.
The information on radiographic images must be carefully considered during interpretation. Radiographic opacities and lucencies can be unreliable at best, and outright misleading at worst. Even among experts, there is large interobserver variation in the interpretation of dental radiographs. It has been shown that dentists significantly improved their diagnostic accuracy in finding radiographically visible features when they were given reference images with which to compare their radiographs. This book provides a readily available collection of reference dental and oral radiographic images, both of normal anatomy and of many of the pathological processes commonly found in dogs and cats.
Basics of Radiographic Principles
The basic principles of dental and oral radiography are similar to those for general radiography—the goal is to achieve high-resolution (ability to visualize and differentiate small objects) images with sufficient contrast and gray scale to be able to see and identify the structures.
Radiographs are images of shadows that are cast by tissues and structures of varying radiopacity. Structures that absorb x-rays are radiopaque, and those that transmit them are radiolucent. The final radiograph merges all the structures in a three-dimensional area into a two-dimensional image. It could be considered similar to taking all the slices of a computed tomography study and printing them all on top of each other on a single page. The interpreter needs to mentally reexpand the flat image into its original multilayered size to help make sense of the information on it. Interpretation of radiographs is often facilitated by evaluating two views taken at 90-degree angles. Unfortunately, due to the adjacent anatomy, radiographs of teeth cannot be made along the mesiodistal (side-to-side) axis. Veterinary dental radiographs are mostly taken along the facial-oral axis. When superimposition of structures interferes with radiographic interpretation, oblique projection radiographs should also be made by changing the horizontal angulation (tube shift) while keeping the vertical angulation the same (see “bisecting angle” technique in Chapter 12).
Interpretation also follows the same rules as for general radiographs, including reading the entire film in a consistent manner and, if reading emulsion films, using a good source of illumination and magnification. An example of a good film-reading routine might be to first scan the entire film for an overall impression of the anatomy, looking for things that are present that should not be and for things that are not present but should be. Then evaluate each tooth crown, the pulp chambers, the root canals, the periodontal ligaments, the lamina dura for integrity, the trabecular bone, and finally the cortical bone.
When evaluating a radiograph, always keep in mind the significance of multiple layers of overlapping structures. An important consequence of this is the “summation effect.” The summation effect is the result of superimposed structures and tissues either adding to the radiopacity (addition) or subtracting from it (subtraction) depending on their relative radiopacities (Figure 1-1). Any object that can absorb x-rays and that is superimposed over bony structures will create the appearance of increased bone density in the area. Alternately, when an air-filled structure lies over bone, it will appear less dense. A second very important effect is the “tangential effect,” in which two-dimensional details are diminished when they are perpendicular to the x-ray beam, while they are emphasized when they are parallel to the x-ray beam. This is true of both radiopaque and radiolucent structures. For example, the alveolus forms a white line where the bony plate parallels the x-ray beam and disappears where it is perpendicular to it. Similarly, a root fracture that makes a very black line when it is aligned parallel to the beam can completely disappear when perpendicular to the beam. A third effect involves the difficulty of localizing structures in the missing third dimension. Are they closer to the tube head, or closer to the film/sensor? This sometimes requires a second or third radiograph at different tube angle(s) to determine whether one structure is closer to, or farther from, the tube than a second close or overlapping structure (see “tube shift” in Chapter 12).
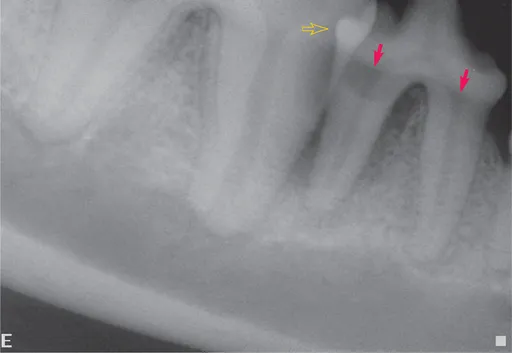
FIGURE 1-1 Structures that are radiolucent subtract radiodensity from superimposed structures, making them seem to disappear due to the summation effect. In this radiograph, the radiolucent regions on the roots of the fourth premolar and first molar teeth just below the crowns (arrows) are not defects in the teeth. They are caused by lack of overlying alveolar bone apically and enamel coronally. Conversely, when radiodense structures are superimposed across a relatively radiolucent structure, they can seem to appear from a void. In this case, the overlapping contact surfaces of the fourth premolar and first molar tooth allow visualization of the distal aspect of the premolar tooth (open arrow).
Conventions for Textbook
The standard for veterinary gross anatomical nomenclature is the Nomina Anatomica Veterinaria (NAV). We have attempted to include many of these terms in italics in the normal sections. But even with the NAV and in today’s world of shared informatics, agreement about correct terminology can be elusive. For example, the correct term for describing the surface of teeth that are facing outward away from the oral cavity is the “vestibular” surface. For the same surface of the maxilla (the bone that holds the canine, premolar, and molar teeth), the correct term is “facial,” and for the mandible (the bone that holds all the lower teeth), the correct term is “buccal” for the premolar and molar area and “labial” for the incisor area. For this book, we have chosen to use nomenclature that is commonly accepted and in common use. For the above described surfaces, we used the terms “labial” when referring to the aboral surfaces of teeth or bones in the incisor and canine tooth areas and “buccal” when referring to the aboral surfaces of teeth or bones in the premolar and molar areas. We use the accepted dental nomenclature of “mesial” and “distal” to describe the directions toward the midline and away from the midline, respectively, when referring to teeth. When referring to bones and facial structures other than teeth, the terms “medial” and “lateral” would apply to the incisive area and “rostral” and “caudal” for the canine, premolar, and molar areas instead of “mesial” and “distal,” respectively. In the same way, while “coronal” and “apical” are used to describe the vertical directions on the teeth, the terms “dorsal” and “ventral” are used for these dimensions on bones and nondental structures. The authors are aware of the fact that a structure on a brachycephalic animal could be physically “rostral” (i.e., toward the nose) but correctly termed “caudal” to another structure. But we use the term “rostral” because it is preferred to “anterior” by the NAV. Similarly, while the “permanent” dentition remains far less than permanent with the prevalence of severe periodontitis in today’s pet population, we use the term “permanent” for the secondary dentition as directed by the NAV.
Nearly all the clinical dental radiographs were made using digital radiography (Schick Technologies CDR). The largest sensor size currently available is similar in size to a size 2 (periapical) dental film. Due to this size limitation, many of the radiographs used to demonstrate normal structures in the dog were made using conventional dental radiograph film exposed on size 4 (occlusal) F-speed film (Kodak Insight) and digitized with either a Nikon CoolPix 8400 or a CoolPix 995 camera. Clinical and specimen photographs were made using the CoolPix 995 camera.
This reference is designed primarily as a practical clinical tool to assist the user during interpretation of dental and oral radiographs of the dog and the cat. This is not intended to be a complete radiology text, but instead it concentrates on the practical skills of making and interpreting radiographs. The first two sections show normal radiographic anatomy of the dog and cat. Each species section is divided into the adult maxillary arch, the adult mandibular arch, and the deciduous dentition. Radiographs depicting various lesions associated with a few common problems accompany the normal films to assist the practitioner in identifying both the normal and the abnormal anatomy; practitioners can quickly turn to the relevant anatomical location and compare their patient’s film with the normal and abnormal examples shown.
Additional detail related to specific pathological processes follows the anatomical sections. These chapters are designed to help the practitioner or student understand the underlying processes that cause radiographic changes and to become familiar with a wider range of radiographic lesions related to each pathology. Finally, we discuss technique, a few basics of radiology, and equipment. These sections are meant to help the practitioner to identify artifacts and procedural problems, and are included both for individuals learning the basics of dental radiology and as a brush-up for the seasoned practitioner.
Throughout the text, radiographs are oriented as though the reader is looking at the patient (Figure 1-2). Maxillary teeth are oriented with the roots dorsal to the crowns, and mandibular teeth are oriented with the roots ventral to the crowns. A patient’s right quadrants will show the molars to the left of the premolars, whereas the left quadrants will show the molars to the right of the premolars. This is the preferred viewing orientation for intraoral radiographs. It allows identification of individual teeth without the need to rely on film labels. For example, looking at the radiograph in Figure 1-3, the viewer can determine that it is a maxillary tooth due to the anatomy (presence of the nasal cavity and a three-root premolar). The roots are therefore oriented dorsally and the crown ventrally. With the convex “dot” toward the viewer, it can be seen that the third premolar is on the left, the fourth premolar is in the center, and the first molar is on the right. Therefore, this is the animal’s left upper quadrant and the teeth are positioned as though you were looking at the patient’s teeth in situ from the left side.
FIGURE 1-2 Orientation of films for...
Table of contents
- Cover
- Title Page
- Copyright
- DEDICATION
- PREFACE
- ACKNOWLEDGMENTS
- Table of Contents
- PART ONE: INTRODUCTION
- PART TWO: RADIOGRAPHIC ANATOMY
- PART THREE: RADIOGRAPHIC EVIDENCE OF PATHOLOGY
- PART FOUR: OBTAINING DIAGNOSTIC DENTAL RADIOGRAPHS
- INDEX
- Instructions for online access
Frequently asked questions
Yes, you can cancel anytime from the Subscription tab in your account settings on the Perlego website. Your subscription will stay active until the end of your current billing period. Learn how to cancel your subscription
No, books cannot be downloaded as external files, such as PDFs, for use outside of Perlego. However, you can download books within the Perlego app for offline reading on mobile or tablet. Learn how to download books offline
Perlego offers two plans: Essential and Complete
- Essential is ideal for learners and professionals who enjoy exploring a wide range of subjects. Access the Essential Library with 800,000+ trusted titles and best-sellers across business, personal growth, and the humanities. Includes unlimited reading time and Standard Read Aloud voice.
- Complete: Perfect for advanced learners and researchers needing full, unrestricted access. Unlock 1.5M+ books across hundreds of subjects, including academic and specialized titles. The Complete Plan also includes advanced features like Premium Read Aloud and Research Assistant.
We are an online textbook subscription service, where you can get access to an entire online library for less than the price of a single book per month. With over 1.5 million books across 990+ topics, we’ve got you covered! Learn about our mission
Look out for the read-aloud symbol on your next book to see if you can listen to it. The read-aloud tool reads text aloud for you, highlighting the text as it is being read. You can pause it, speed it up and slow it down. Learn more about Read Aloud
Yes! You can use the Perlego app on both iOS and Android devices to read anytime, anywhere — even offline. Perfect for commutes or when you’re on the go.
Please note we cannot support devices running on iOS 13 and Android 7 or earlier. Learn more about using the app
Please note we cannot support devices running on iOS 13 and Android 7 or earlier. Learn more about using the app
Yes, you can access Atlas of Dental Radiography in Dogs and Cats by Gregg A. DuPont,Linda J. DeBowes in PDF and/or ePUB format, as well as other popular books in Medicina & Medicina veterinaria. We have over 1.5 million books available in our catalogue for you to explore.