First published in 2004. This set of 3 volumes collects together for the first time rare and scattered material on the history of pre-cinema. It includes articles on stereoscopic photography; the use of kaleidoscopes; optical illusions; theatre design; magic lanterns and mirrors; shadow theatre, and much more. The articles are taken from sources such as The Magazine of Science, The Art Journal, The British Journal of Photography, Scientific American, American Journal of Science and Arts, and The Mirror. Volume 1 includes the areas of Camera Obscura to Chronophotography and Optical Toys and Devices Magic Mirrors.
- 368 pages
- English
- ePUB (mobile friendly)
- Available on iOS & Android
eBook - ePub
A History of Pre-Cinema V1
About this book
Trusted by 375,005 students
Access to over 1.5 million titles for a fair monthly price.
Study more efficiently using our study tools.
Information
Topic
PhilosophySubtopic
Philosophy History & TheoryVolume one
PART 1 From camera obscura to chronophotography
DOI: 10.4324/9781003101543-1
The MAGAZINE OF SCIENCE And School of Arts.
DOI: 10.4324/9781003101543-2
No. I.] SATURDAY, APRIL 6, 1839. [Price 1½.

THE CAMERA OBSCURA.
This instrument, the object of the above engraving, and present description, was invented by Friar Bacon more than five hundred years ago. It is of such simple construction as to be easily understood, and represents the objects subjected to it in all their vivid colors, and with so unerring a fidelity, that it has always been a favourite amusement to view its varied and animating pictures. The following is an explanation of its construction:—
The engraving represents a room, into which the light penetrates only through the top at C. The rays of light A, tinged with the color of the objects reflected, pass through a hole in the side of the upper part of the instrument, and strike upon the looking-glass or reflector B, from this they are cast down upon the double convex lens C, fixed in the cross partition F G—here they diverge in proportion to the focus of the lens, and passing onwards are last met by the white table below, D E, where the original objects are vividly depicted. The accuracy of proportion and truth of perspective will, however, not be ensured by a flat table, as will be evident upon considering that on a flat surface the rays of light passing through the lens will be shorter in the centre of the picture, than those that reach the sides, (as is seen in the figure;) in consequence, the representation will be somewhat distorted, and also more brilliant towards the centre than near the circumference of the field of view. To remedy this, two methods suggest themselves; one, to have the table D E part of a hollow sphere of a radius according to the distance of the lens. This arrangement has a serious objection in delineating the objects represented because of the impossibility of laying a sheet of paper on a spherical body. An alteration, therefore, of the lens itself is the only remaining resource; if this, instead of being double convex, be a meniscus glass, (that is, like a watch glass, thick in the middle,) having its concave side next the object, and if radii of the two surfaces be as 1 to 2, the outer rays will be rendered longer than those near the centre, and by this means the correctness and brilliancy of the picture will be greatly increased.
The upper part of the instrument is made to turn round upon a groove at F G, by which means the reflector may be directed to any side of the landscape; the reflector B is also moveable on a joint near the centre of its sides, like a dressing-glass, and thus it is made to reflect either distant or near objects. The hole in the side, at the top may have a convex lens inserted in it, but although by this contrivance a larger field of view is obtained, brilliancy is lost in equal proportion.
The Camera Obscura has many modifications: the above construction may be adapted to a large conical box, there being one hole or more cut in the side of it, to view the objects represented on the table within; or it may be made still more easily in that form usually called a Portable Camera.
How to Make a Camera Obscura.
DOI: 10.4324/9781003101543-3
WE are many of us familiar with the small wooden or iron building to be seen at various places of amusement labelled the Camera Obscura, and perhaps we have paid the modest sum of twopence to enter and watch the effects produced. These are very pretty. The gay scene outside the building, of holiday makers and pleasure seekers in all their surroundings, is reproduced in life-like accuracy and distinctness on a white screen placed in the centre of the room, which is quite dark. How is it done?
The Camera Obscura may be made in two forms, although the essential principle is the same. It is an arrangement of a lens, mirror, and screen, whereby any scenery or view may be reduced to a small scale and thrown on to a screen as a picture, and, if necessary, traced and copied. The one form is a small portable box, in which the picture produced is viewed by one person, and copied if required, and the other is a larger structure which could be erected in a small tent or summerhouse.
We shall first describe a small instrument, by means of which natural scenery and buildings can be focussed on to a screen and copied. A section of the complete instrument is shown at Fig. 1. The rays of light proceeding from some outside object, say a church in the near distance, pass into the camera through a lens contained in a sliding tube (A), by which it may be focussed on to a plain mirror (F), and thence reflected to a piece of ground glass (G), which is protected from the daylight by a hood or other darkening contrivance (D.) The observer sees the image by looking at (G.)
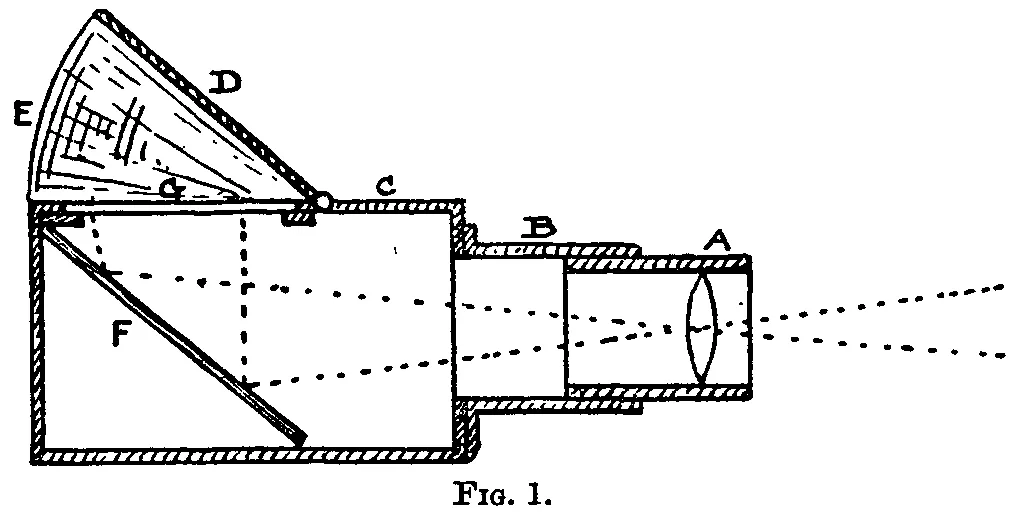
The size of the box depends on what is known as the focal length of the lens at (A.) A lens with a focal length of 15 or 16 inches makes a convenient sized-camera, and this can be purchased of any optician at a small price. The length of the box must be less than the focal length of the lens, in this instance about 13 inches. Hence proceed according to the following instructions:—
Make a box 13 inches long, 8 inches wide, and 8 inches deep, out of wood ¼-inch thick (stouter wood produces a heavy and cumbrous apparatus), leaving the top quite open, so that the fittings (G, D), etc., may be added later on. Paint the interior a dead black colour to obviate reflections from the sides. In one end of the box cut a circular hole, somewhat larger than the diameter of the lens, say ½-inch larger. Next fit the lens into a short sliding tube. This may be done in several ways. The tube may be made of tin, brass or paper. If metal is used, make a short cylinder 3 inches long, in diameter equal to that of the lens. To fix the latter, procure some stout copper wire, cut off two lengths, bend each into a circular form, somewhat longer than the bore of the tube. When pressed into the tube these pieces spring outwards against the sides of the cylinder, and if placed one on each side of the lens, the latter will be secured. The length of the pieces should be ¼-inch less than the circumference of the bore of the tube. If a paper tube is wanted, make it by winding à long sheet of paper 3 inches wide on a wooden cylinder, the diameter of which is equal to that of the lens. As the paper is being wound tightly on, apply plenty of gum or starch paste, so that when of sufficient thickness the tube may be put aside to dry into a hard hollow cylinder. Fix the lens as directed. Of course a metal tube is preferable and less troublesome. Paint the interior dead black. To the end of the box screw a short metal cylinder (B) 1½ inches long. The tube (A) should slide easily, but not loosely, to and fro, in the cylinder or carrier (B.)
Having made a satisfactory fit with the tubes (A, B), remove the lens tube (A), put it aside, and proceed to fit up the box itself. Insert at an angle of 45° a piece of looking glass cut to the dimensions 10 inches by 8 inches. Fix in position as shown in Fig. 1 at the back of the box facing the tubes (B) and (A), and secure it at the bottom by a small strip of wood nailed to the box. The lid (C) will secure the top end and prevent any movement. For the lid (C) plane up a piece of wood 8½ inches by `2½ inches, and cut at one end a hole 7 inches by 8 inches. On the under side nail two narrow strips of wood, overlapping the hole, to form ledges, upon which removable sheets of glass may be laid. (See Fig. 2.)
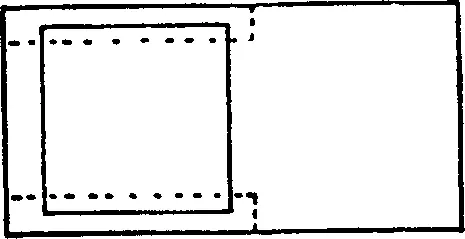
Procure the glass 7 inches by 8 inches in two sheets, one ground glass, the other plain, either of which is to fit tightly into the hole to prevent slipping. The lid (C) is then screwed on to the box.
The completion of the apparatus may be readily learnt from Fig. 1. (D) is a hinged lid of wood, and (E) shows the arrangement by which all side light is cut off from the screen (G). Two wedge-shaped pieces of black cloth are nailed to each side of the lid and to the edges of the box itself. The lid (D) can then be opened slightly or to the full extent. It is hardly necessary to give detailed instructions as to fitting these items.
The apparatus is now ready for use. Put in the piece of ground glass, insert the sliding tube (A), and turn the instrument towards some object in the landscape, with the back of the box towards the observer. Lift up the lid (D) and move the sliding tube (A) to and fro until a sharp clear image of the object is seen at (G) on the glass. If a black cloth, such as photographers use, is thrown over the observer’s head, the image will appear bright and clear, owing to the exclusion of all outside light. To make a drawing of the object, remove the ground glass and replace it with the plain sheet. On this lay a piece of thin paper and trace the image with a sharp pencil. The box should be ...
Table of contents
- Cover Page
- Half-Title Page
- Title Page
- Copyright Page
- Table of Contents
- Acknowledgements
- Introduction
- Volume One: Part 1 From camera obscura to chronophotography
- Volume One: Part 2 Optical, philosophical toys
Frequently asked questions
Yes, you can cancel anytime from the Subscription tab in your account settings on the Perlego website. Your subscription will stay active until the end of your current billing period. Learn how to cancel your subscription
No, books cannot be downloaded as external files, such as PDFs, for use outside of Perlego. However, you can download books within the Perlego app for offline reading on mobile or tablet. Learn how to download books offline
We are an online textbook subscription service, where you can get access to an entire online library for less than the price of a single book per month. With over 1.5 million books across 990+ topics, we’ve got you covered! Learn about our mission
Look out for the read-aloud symbol on your next book to see if you can listen to it. The read-aloud tool reads text aloud for you, highlighting the text as it is being read. You can pause it, speed it up and slow it down. Learn more about Read Aloud
Yes! You can use the Perlego app on both iOS and Android devices to read anytime, anywhere — even offline. Perfect for commutes or when you’re on the go.
Please note we cannot support devices running on iOS 13 and Android 7 or earlier. Learn more about using the app
Please note we cannot support devices running on iOS 13 and Android 7 or earlier. Learn more about using the app
Yes, you can access A History of Pre-Cinema V1 by Stephen Herbert in PDF and/or ePUB format, as well as other popular books in Philosophy & Philosophy History & Theory. We have over 1.5 million books available in our catalogue for you to explore.