Collagraph printmaking is an accessible and environmentally friendly way of making striking prints with a unique texture. At its simplest it is a method of printing from collaged plates; at its most sophisticated, it is an innovative and exciting experimental medium. This book is a guide to the technique, with step-by-step instructions for creating and printing simple plates for the beginner, as well as tips, ideas and directions for those with more experience. There is advice on how to get started at the kitchen table; a guide to additional materials and equipment; step-by-step instructions for building collagraph plates and techniques for printing in monochrome using relief and intaglio methods. This will be of great interest to all printmakers, designers, artists, textile designers, teachers and craftsmen. It is superbly illustrated with 133 colour photographs, and Suzie MacKenzie is an award-winning artist printmaker with has private collections worldwide.
- 96 pages
- English
- ePUB (mobile friendly)
- Available on iOS & Android
eBook - ePub
Making Collagraph Prints
About this book
Trusted by 375,005 students
Access to over 1 million titles for a fair monthly price.
Study more efficiently using our study tools.
Information
Topic
ArtSubtopic
Art TechniquesCHAPTER ONE
MATERIALS AND EQUIPMENT
Plate-Making Materials
The Base Plate
When making collagraphs, the surface that the print is taken from is usually called a plate. Acrylic sheet, sheet metals such as aluminium or steel, and wood-based materials such as thin plywood or 3mm MDF all work well as a base for collagraph. Cardboards such as environmount, greyboard, millboard, paper drypoint plates and standard mountboard – which comes in textured and untextured finishes – make excellent plates as they are inexpensive as well as easy to cut, work, and glue textures to. Boards made from layers of paper laminated together, such as mountboard or environmount, are ideal for the ‘cutting-and-peeling’ approach to platemaking.

Materials for Adding to the Plate
When beginning to experiment with collagraph, there is often an overwhelming desire to collect anything with an interesting texture to add to the plate. However, there are a couple of things that should be borne in mind at this point; firstly, remember that anything selected must be stuck firmly to the plate – some materials, for example fresh plant material, are difficult if not impossible to stick securely; and secondly, that chunky or heavily textured materials of any kind should be avoided – ‘paper-thin’ is best. Thicker items and anything absorbent – string, fabric, corrugated cardboard, plant stems – will trap excess amounts of ink either within the material itself or around the edges and will cause pools of ink to spread across the print. While there are ways of dealing with these items to create successful prints from them, such as slicing them lengthwise or embedding them in medium, it is easiest to avoid them when starting out and save them for exploration once you have more experience. Further, it takes some time to begin to appreciate which items really will print in interesting ways – some very promising-looking textures can make uninteresting printed areas, while other quite unpromising materials prove exciting when printed. Experience will help you to assess these with more success as you progress. The following materials all work well for plate-building:
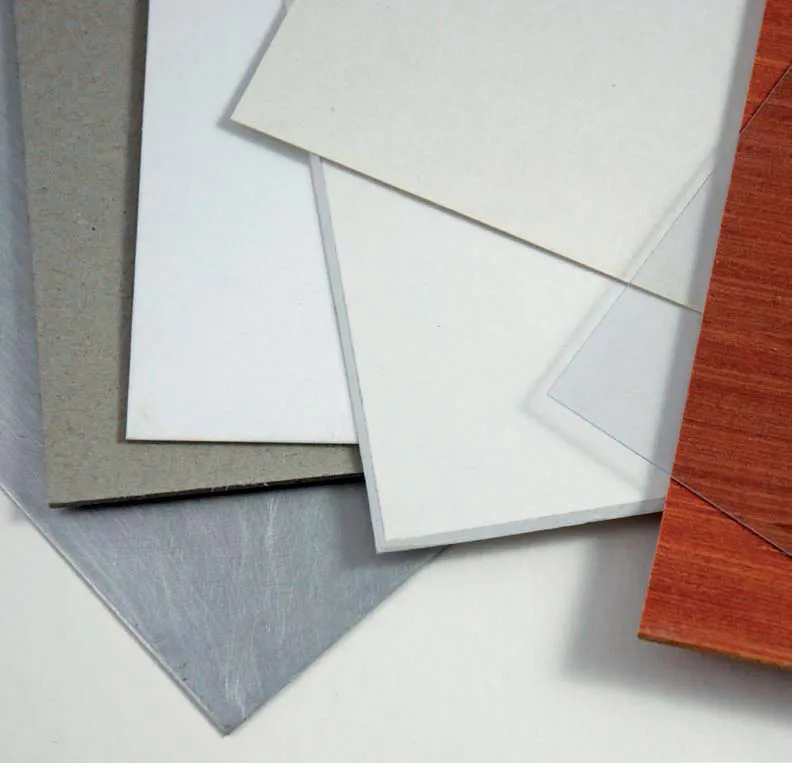
Fig. 1.1 The plate can be made of anything that is thin and sturdy enough to go through the press (if it is to be intaglio-printed), is easy to attach materials to, and also easy to cut into and mark if you wish to work in this manner.
•All types of papers, including hand-made and textured papers with inclusions, tissue paper, brown wrapping paper, sandpaper (medium grade to begin with, but later experiment with the different effects fine and coarse grades make) and textured wallpapers. They are easy to cut or tear and to glue, and they print well. A word of caution about textured wallpapers – the cheaper, embossed paper type works better than the blown vinyl papers, which are spongy and tend to compress under the pressure of the press and therefore do not make for such a successful print.
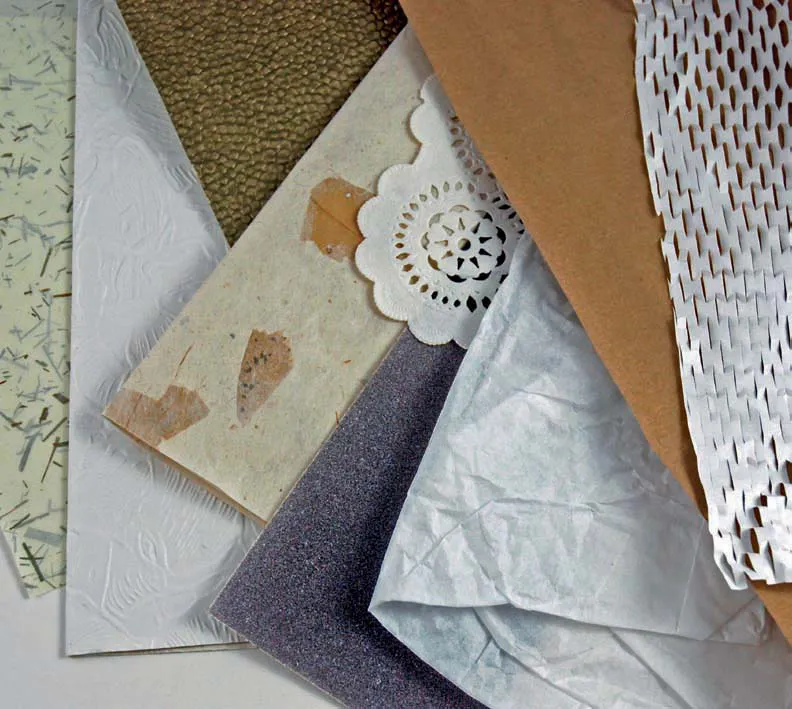
Fig. 1.2 Remember that the colour of the papers used for platemaking is irrelevant and will neither show nor affect the colours in your finished print – only the texture matters. That said, at the inking and printing stage it is easier to get an idea of how the print will work if the papers are white or light-coloured; some printmakers like to give the completed plate a spray with white gloss paint as a sealant so that any colours are covered.
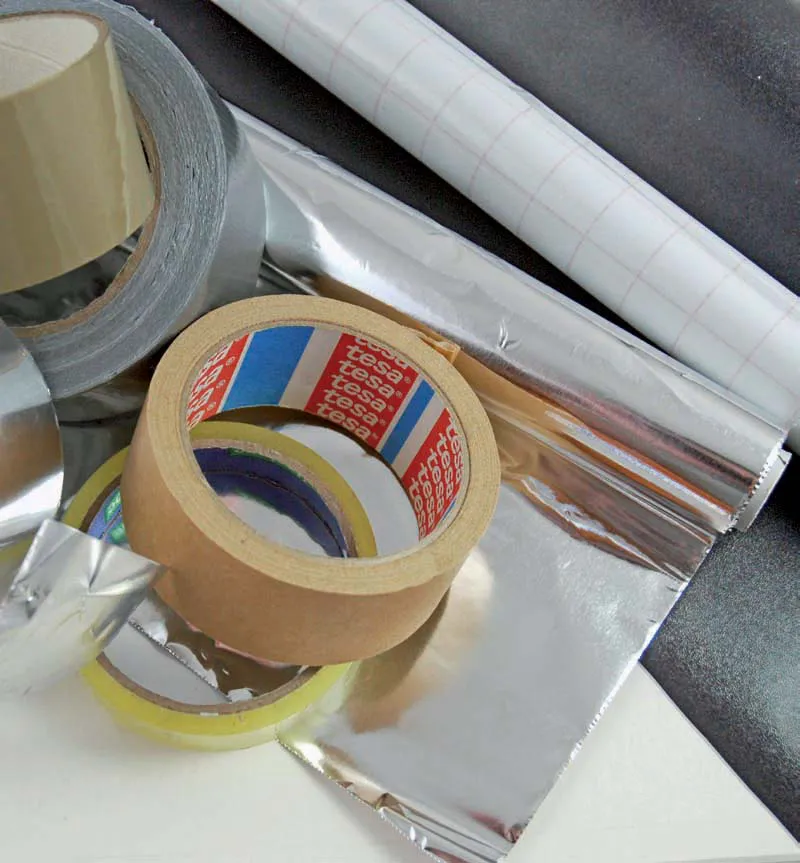
Fig. 1.3 Tapes and sticky-backed plastic are best used over larger areas of the plate as small pieces can peel off after repeated wiping and cleaning. H ow well they perform depends very much on the brand and this is not always easy to predict; more expensive is not always better in this case.
•Foil and sticky-backed plastics, which come in clear and textured varieties. The clear type wipes almost clean when printing and can work well for large, light-toned areas. The blackboard-textured type prints an attractive textured mid-tone. Aluminium foil can be used either crumpled or smooth for various effects.
•All types of tape – masking tape, parcel tape, duct tape, aluminium tape. They make interesting geometric shapes and can be cut or torn into a variety of shapes.
•Thin fabrics such as organza and scrim. These can also be frayed to make interesting textures. It is easy to remove threads from scrim to create a looser weave that holds the ink differently.
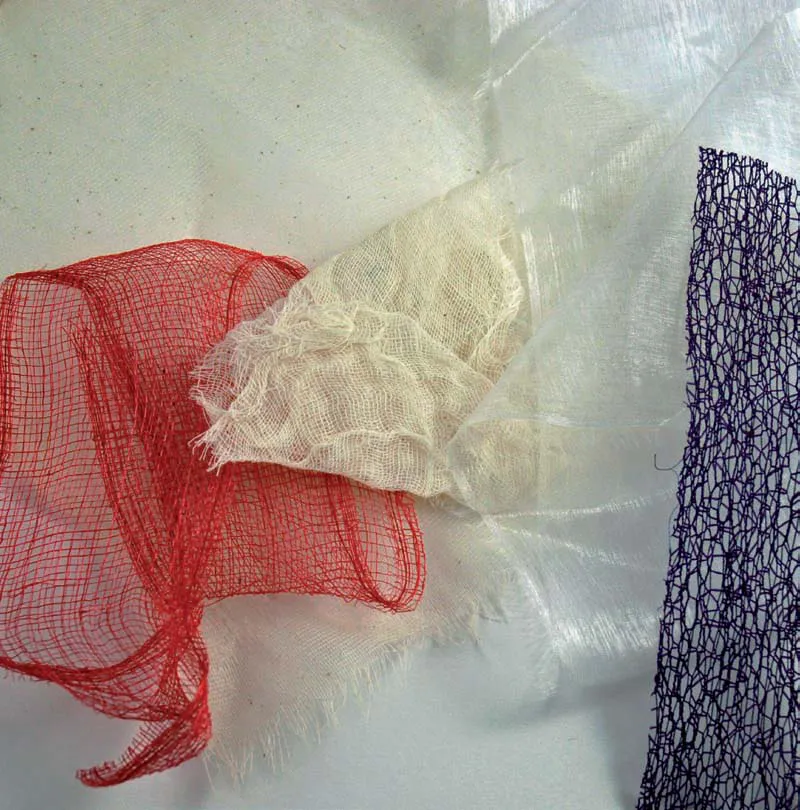
Fig. 1.4 Try to avoid using thicker fabrics, which have a tendency to soak up the ink and cause pooling on the print unless carefully and thoroughly sealed.
•Artists’ acrylic gels, pastes and mediums. These are available in a variety of brands and a range of different bodies and textures, and are invaluable in creating interesting, painterly marks. Gritty mediums such as micacious iron oxide, moulding pastes and pumice gels are good for holding ink and creating dark areas. A carborundum paste is available commercially that is more controllable than loose carborundum, though more expensive. Flat, glossy mediums will wipe nearly clean and create lighter areas in the print – builder’s wood glue, the white type, also works well for this. Heavy gels will hold their texture on drying and print according to how they have been applied – see Chapter 3 for more detailed information. Thick acrylic paint also works well, though it is best to use white as it makes it easier to see when inking and wiping the plate.
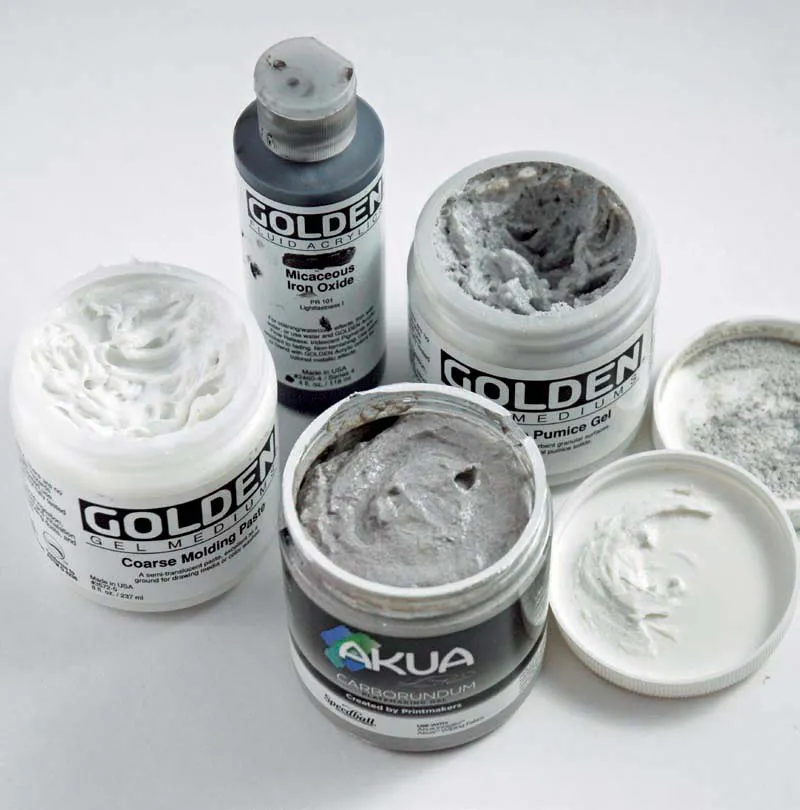
Fig. 1.5 Traditionally, printmakers have used carborundum to achieve velvety dark areas in the print. However, this has a tendency to get everywhere, and there are health and safety considerations with its use, as it is a fine silicon carbide grit. Alternatives such as those shown here are now available.
•Tile adhesive – the waterproof type for bathroom tiling. This can also be used for coating the plate, creating textures that can be worked into before it dries. As it is relatively gritty it will print dark, but can be sanded with wet-and-dry paper or worked over with wood glue or acrylic mediums in layers to create light areas.
•Naturally-occurring items such as crushed eggshells and coffee grounds. When applied with glue, these will hold ink and print dark. Other natural materials that adhere and print well include dried flowers, grasses, leaves and feathers.
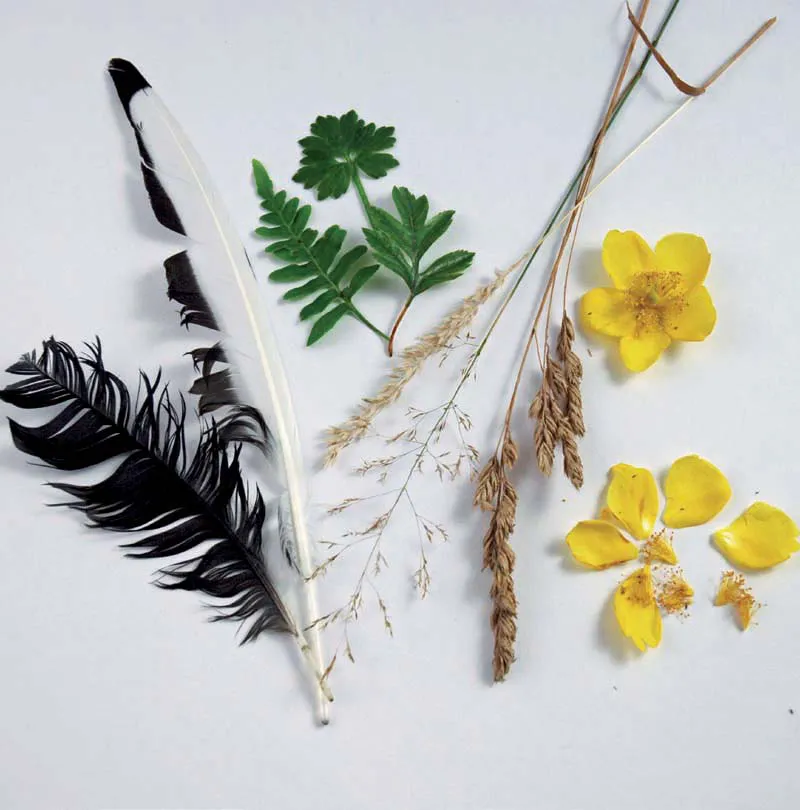
Fig. 1.6 Naturally occurring materials should be dried, and pressed if necessary, so that they can be glued to the plate thoroughly and will be robust enough to go through the inking, wiping, printing and cleaning process the required number of times.
•Adhesives. Waterproof PVA, or white builder’s wood glue, forms a strong bond, and can also be used as a gloss medium and for mixing with carborundum, eggshells, sand or coffee grounds. Its use is recommended for plates made from wood-based materials such as MDF, plywood and cardboards. Spray mount also provides a strong, almost instant bond to cardboard plates that is resilient enough for editions of thirty and more, though they can begin to dissolve if you use white spirit to clean the plate. When gluing to metal plates it is advisable to use two-part epoxy glues such as Araldite. It is useful to have access to boards and weights (books or bricks), or joiners’ clamps, to compress the plate while the glue sets.
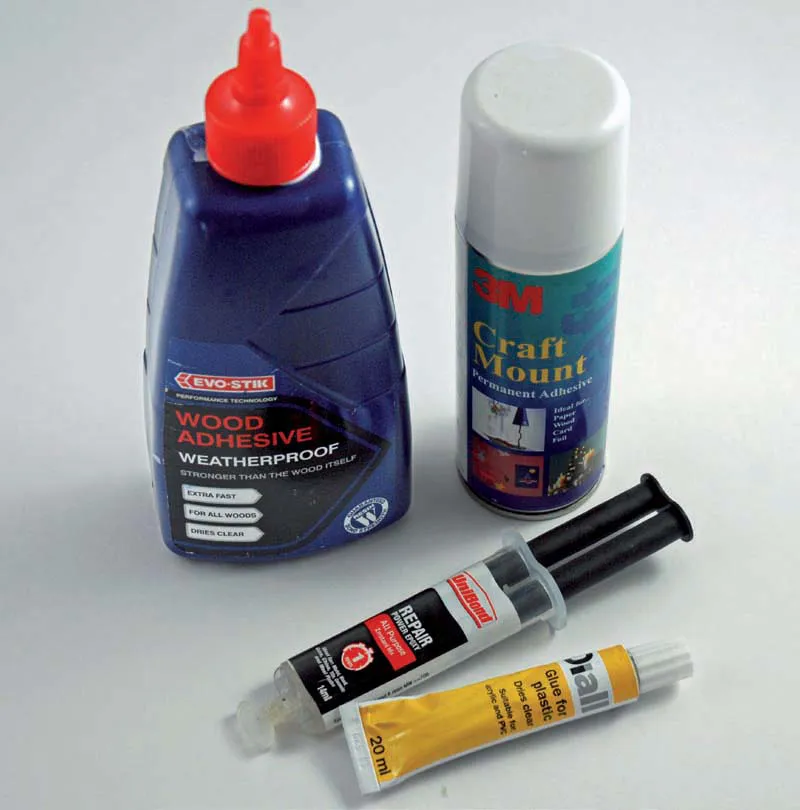
Fig. 1.7 The type of adhesive you choose should depend on the material you have chosen as the base plate for your collagraph.
•Sealants. Different collagraph printmakers work with different sealants, and some do not use a sealant at all – as with so many facets of printmaking this is largely a matter of personal preference and what works well for any particular type of plate. The purpose of sealing the plate is essentially to stop the ink being absorbed by the materials used in its construction; depending on how your own plates are made, you may find that the ink itself seals the plate after the first application. However, if experimenting with different colours in printing, it is important to seal so that the plate can be cleaned thoroughly. Here are some suggestions for suitable materials to use:
A very dilute solution of white builders’ wood glue, thin enough not to obscure any fine detail and which soaks into the absorbent areas of the plate, creating a stronger bond for anything that is stuck to it, works well. For areas that are to print lighter, work over with extra coats and finish with a thin coat of gloss acrylic spray varnish.
Shellac, which can be bought ready-mixed or as flakes for mixing with methylated spirits (button polish and knotting varnish are also shellac-based products) is a favourite sealant among many collagraphers. If you mix your own, it is possible to alter the consistency and build up layers so that some areas of the plate wipe cleaner – and print lighter – than others. The mix proportions are not critical, but a couple of centimetres of flakes in a jam-jar topped up to roughly twice the level with methylated spirits is a good place to start; add more methylated spirits for a thinner, more dilute mix, and more flakes for a thicker mix. The flakes will take a while to dissolve, so it is best prepared in advance. Thin coats of freshly mixed shellac will dry within a few minutes ready for printing, dependant on ambient temperature and humidity. It will keep well for weeks in a sealed jar.
For many years Johnson’s Klear floor varnish, now sold as Johnson’s Pledge multisurface polish, essentially a very dilute acrylic gloss varnish, was recommended for collagraph plate-making. However, the formula has been altered many printmakers consider it is no longer as effective as a sealant.
Some printmakers use yacht varnish to seal their plates; others prefer a gloss medium such as Liquitex.
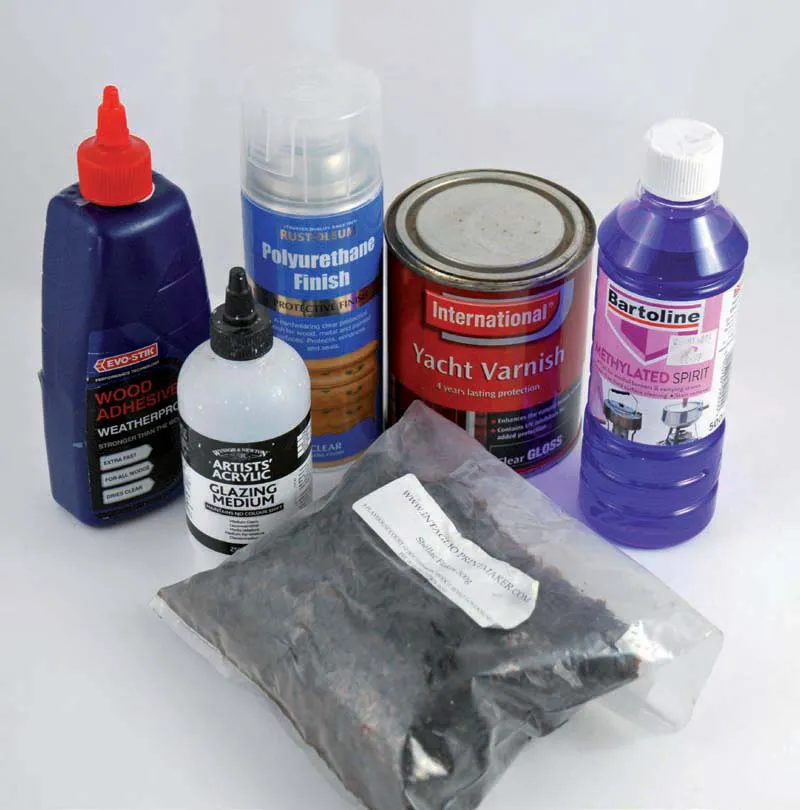
Fig. 1.8 The sealant...
Table of contents
- Cover
- Title Page
- Copyright
- Contents
- Introduction
- 1 Materials and Equipment
- 2 Building a Simple Collagraph Plate
- 3 Building more Complex Collagraph Plates
- 4 Printing in Monochrome
- 5 Printing in Colour
- 6 Proofingand Editioning
- Glossary of Terms
- Bibliography and Further Reading
- UK Suppliers
- List of Contributors
- Index
Frequently asked questions
Yes, you can cancel anytime from the Subscription tab in your account settings on the Perlego website. Your subscription will stay active until the end of your current billing period. Learn how to cancel your subscription
No, books cannot be downloaded as external files, such as PDFs, for use outside of Perlego. However, you can download books within the Perlego app for offline reading on mobile or tablet. Learn how to download books offline
Perlego offers two plans: Essential and Complete
- Essential is ideal for learners and professionals who enjoy exploring a wide range of subjects. Access the Essential Library with 800,000+ trusted titles and best-sellers across business, personal growth, and the humanities. Includes unlimited reading time and Standard Read Aloud voice.
- Complete: Perfect for advanced learners and researchers needing full, unrestricted access. Unlock 1.4M+ books across hundreds of subjects, including academic and specialized titles. The Complete Plan also includes advanced features like Premium Read Aloud and Research Assistant.
We are an online textbook subscription service, where you can get access to an entire online library for less than the price of a single book per month. With over 1 million books across 990+ topics, we’ve got you covered! Learn about our mission
Look out for the read-aloud symbol on your next book to see if you can listen to it. The read-aloud tool reads text aloud for you, highlighting the text as it is being read. You can pause it, speed it up and slow it down. Learn more about Read Aloud
Yes! You can use the Perlego app on both iOS and Android devices to read anytime, anywhere — even offline. Perfect for commutes or when you’re on the go.
Please note we cannot support devices running on iOS 13 and Android 7 or earlier. Learn more about using the app
Please note we cannot support devices running on iOS 13 and Android 7 or earlier. Learn more about using the app
Yes, you can access Making Collagraph Prints by Suzie MacKenzie in PDF and/or ePUB format, as well as other popular books in Art & Art Techniques. We have over one million books available in our catalogue for you to explore.