Time and circumstance often prevent the perfect photograph from being taken. This book explains how to enhance an image using readily available software in order to obtain the photo you wanted to take. It explains how to analyse a photograph to recognize what needs to be done, and then shows how to improve it. Instead of being a guide to one specific software program, the book looks at different styles of workflow and process. It covers transferable skills and uses a variety of software for all budgets. Written with accessible clarity and practical detail, this book is a must for everyone who enjoys their photography and wants to take their images to the next level. Topics covered include: the digital image and the terms used, from pixels to histograms; software to suit all budgets, from the best of the free programs to the most expensive; downloading, organizing and viewing images; the essential elements of the image (how it was exposed, the tonal range, noise and sharpness) and finally, further options such as (composition, monochrome, colour palette and cloning tools). Examples of real photos and problems are given, along with step-by-step guides to how they can be rectified. It is a must for everyone who enjoys their photography and will be of great interest to biologists, naturalists, scientists and natural historians as well. It is superbly illustrated with 218 colour photos. Julian Cremona is a passionate photographer who specializes in extreme close-up photography and focus stacking.
- 160 pages
- English
- ePUB (mobile friendly)
- Available on iOS & Android
eBook - ePub
Photographic Image Enhancement and Workflow
About this book
Trusted by 375,005 students
Access to over 1.5 million titles for a fair monthly price.
Study more efficiently using our study tools.
Information
Subtopic
Digital MediaChapter 1
Understanding the Digital Image
The year 2000 was momentous for a number of reasons. In photographic history it marked the peak of the use of film, with approximately 85 billion photos taken. Whilst film usage has been in steady decline ever since, many millions of films were used in the last few years. However a conservative estimate of the number of digital photographs created in 2017 exceeds a trillion, with many sources placing the number significantly higher. Much of this rise has been due to smart-phones with new models invariably marketed for the in-phone camera more than any other feature. Unlike film, with a tangible material to work with, the digital image is a binary-coded computer file and how it looks depends on many factors, not least the display screen. Before looking at the enhancement of this digital file, understanding the properties of it is fundamental.

Fig. 1.1
A wide-angle lens on a mirrorless camera was used to take this photo from an airliner landing at Houston airport. Shooting through the multi-layered window reduces the quality of light and colour. Enhancement has restored these to provide a good tonal range and sharp detail.
PIXELS, BITMAPS AND RESOLUTION
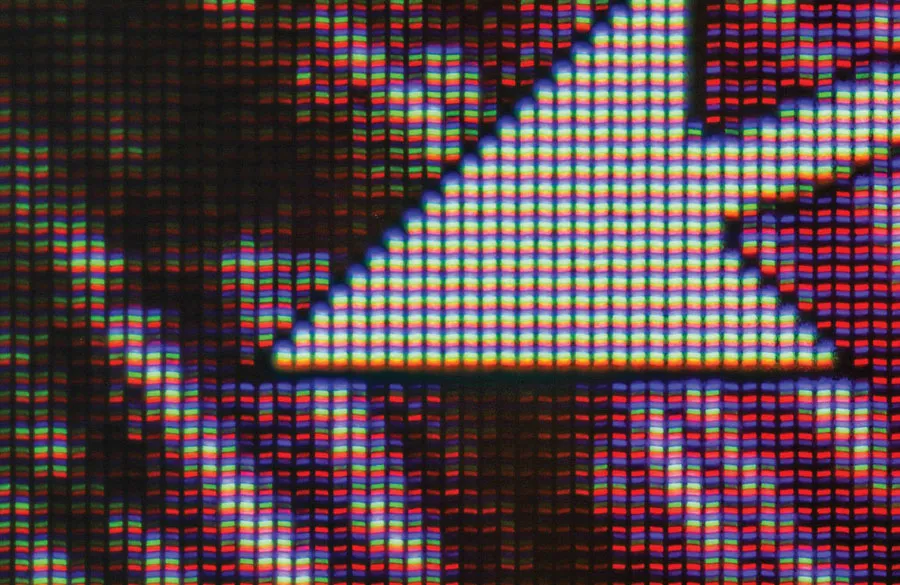
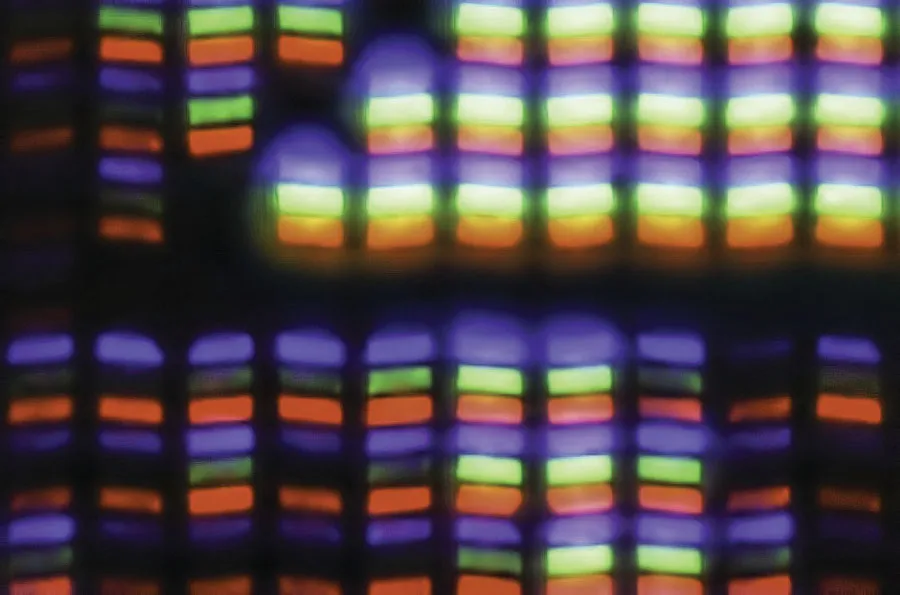
Fig. 1.2
A tiny portion of a computer monitor with the mouse pointer for scale. Also shown is a small part of this that has been enlarged to see the individual pixels made up of three parts: red, green and blue. Note the wide variation in brightness/tone.
If our digital image is broken down to the smallest possible element that can be controlled and altered, we find the pixel. The term is derived from the term picture element. The number of pixels in an image is referred to as the resolution and is set within the camera. The higher the number, the better quality of photograph that can be printed out and viewed, although this only applies to a certain level of enlargement and even then, this has caveats that we will look at separately. Resolution is measured in two dimensions, width and length. For example, 3,000 pixels across by 2,000 pixels down multiplies to give a resolution of 6 million or 6 megapixels. This is often abbreviated to 6 MP.
Even if two photos from two different cameras have the same resolution they may not be the same quality, especially if one is a phone camera and the other is a DSLR. This is down to sensor size. Compact cameras and phones typically have small sensors, around 6.17 × 4.55mm. Micro Four Thirds cameras have dimensions of 17.3 × 13mm, an APS-C sensor in Canon DSLRs measures 22.2 × 14.8mm, with full frame sensors at 36 × 24mm. Medium format cameras like the Hasselblad have sensors of 53.7 × 40.2mm dimensions. These different-sized sensors may not necessarily produce a significantly higher resolution of pixels, but large sensors can accommodate larger photosites. These are the light, sensitive spots that create the signal to produce a pixel, and larger photosites will produce a better quality of pixel than a small photosite. With identical resolutions, a larger sensor will have bigger photo-sites and hence better light-gathering capability. All things being equal (which they often are not) this should produce better image quality.
What do we mean by better quality? Large pixels have a better signal to noise ratio; noise can be a problem, as we will see, and it refers to random colours and oddities in the pixels which we want to minimize to produce a smoother and more detailed image. Additionally, the dynamic range will be better with large pixels as they can take on more photons of light to have a wider range of brightness to dark pixels.
Pictures composed of pixels are called bitmap files and as they are enlarged, so they take on a blocky appearance. In this regard they have a finite level of enlargement. By contrast, there are computer files that are infinite in their enlargement. These are vectormaps and instead of pixels the lines are created by mathematical algorithms so no blocks will appear. Software programs that edit vector maps are predominantly used by design professionals dealing with line drawings.

Fig. 1.3
Monitor resolution. Screenshot of FastStone Image Viewer on a 3MP monitor, 1920 × 1080 pixels.
A bitmap image is displayed on a computer monitor according to the size defined by the resolution of its screen. Additionally, the software that displays the photo may have to stretch or shrink the image to make it fit. Monitors have a certain resolution and this is usually the prime feature affecting their cost. An HD screen, fairly typical on laptops and basic monitors, will be 1,920 × 1,080 pixels. A look inside the settings of the computer display will quickly confirm the resolution. In this instance the maximum number of pixels the screen can show is 1,920 across. A common image resolution of APS-C sensors found in DSLR and Compact System Cameras (CSC) is 24 MP, that is 6,000 × 4,000 pixels. The image, then, has more than three times the pixel number across it than the display can show and so software will need to reorganize the picture to reduce the size to fit. Likewise, if the image is only 800 × 600 pixels (as often found on websites), to fill the screen software will have to expand or interpolate the photo by inserting pixels. As can be expected, the latter example will not produce as good a picture as the former, with more pixels to play with.

Fig. 1.4
Monitor resolution. Unlike Fig. 1.3, the monitor resolution is much higher at 3200 × 1800 and although the thumbnails are smaller, more are visible. The sizes of thumbnails can generally be changed to suit. To maintain the size of the text and other features it is possible to set this in Settings within the operating system.
There are several consequences of this information. Unless you need all those 24 million pixels you could quite happily get away with far fewer to display on a computer. A 6 MP image would look just as good as the 24 MP version on the HD monitor. There can be advantages to reducing resolution, for example, if you run slide shows. Lower resolution images will give smaller file sizes and small file sizes will mean that less storage space is required. You may think this is insignificant but as time goes on, after a few years of digital photography the storage of photos can become a real headache. Additionally, small files take less time and processing power for the software to expand them to fill the screen. High-resolution images can slow down slide shows, although this will depend on the computer processor and memory. Digital projectors are just another form of monitor with resolution and display issues. In the final chapter we look at monitor calibration and how to ensure that colours are correctly displayed.
When working on your photographs within editing software, a very useful tool will be to zoom in and out of the image, changing the display for a close or wide view. With zoom controls there will be different options, such as ‘Fit to screen’ and different percentages. Fit to screen scales the entire picture to be seen within the window. In the case of the 24 MP image with an HD monitor, clicking ‘Fit’ will represent around a 30 per cent scale and will probably display that at the top of the screen; 100 per cent will enlarge the picture so that you are looking at the exact size of the image. This is a useful view as it is easier to check if the photo is in focus. Higher percentages such as 300–400 per cent enable a magnification to view almost to pixel level.
Why do you need a higher pixel density than the monitor can display? Printing large photographs, for one. Also, you are not always sure what your monitor resolution is likely to be like in the future. Ultra HD or 4K refers to screens with 3,840 × 2,160 pixel resolution and they have been around for a while, 8K resolution of 7,680 × 4,320 is already available, if currently rather expensive. These higher than HD densities of pixels can produce superb-looking, smooth images, although not always practical and projectors lag behind desktop screens by some margin. The practicality comes when using some computer programs because as the monitor resolution increases, the computer has to scale up windows and other components such as fonts and typefaces. With some software this does not always work, with low pixel density icons displaying smaller and smaller as the resolution increases. The general compromise of what is considered the ideal monitor is a 27in QHD at 2,560 × 1,440 pixels. Ultimately, before buying a new monitor check the reviews online as well as trying them out for yourself. There is also a benefit in having dual screens with the main screen displaying the editing software and a second one to the side displaying another program. This is especially helpful when trying to compare two images. Probably the most important reasons for your images to have a high resolution is if you hope to print them large.
All bitmaps have a default physical size for printing that is set within the image file by the camera. This can easily be changed at a later stage, in the computer. Early digital cameras had a large size by default that has changed in recent years. There are two phrases to look out for in the image information: pixels per inch (PPI) and dots per inch (DPI). PPI is straightforward as it is describing how many pixels an image contains per inch of distance and interprets resolution that is constant across all equipment. DPI is a term used in printing and in theory is the same as PPI but in practice will be different, as one pixel does not typically produce one dot when printed on paper. Usually several dots per pixel occur (called ‘dithering’) and will vary across the equipment. However, they are still useful guides. Let us have a look first at some metadata in an image.
IMPORTANCE OF EXIF METADATA

Fig. 1.5
Three sets of EXIF metadata from three images taken on a smartphone (left), a Compact System Camera (centre) and a DSLR (right).
When a digital photograph is taken, the camera sets down information about how the image was taken and its various attributes. This metadata, as it is called, is incorporated into the file and saved. This data is incredibly useful. The basics are easy to view within most editing software (often listed under properties). In Fig. 1.5 we see examples of information from three images. The middle one tells us that it is a JPEG format file and the resolution is 6,000 × 4,000 (24 MP) and 24bit; the print size is 17.4 × 11.43in and the DPI is 350 × 350. This would produce a high-quality print as 300 DPI is the normal requirement for magazines and books; 150 DPI would produce a good-quality print and a quick bit of maths shows the increase in size to 40 × 26in. Cameras vary considerably as to what this default DPI value will be. The data from the other two cameras has the DPI as 72. In all of these cases the DPI is really PPI but it is a very useful way of working out possible print sizes quickly. As DPI is for printing it only really needs to ...
Table of contents
- Cover Page
- Title Page
- Copyright Page
- Contents
- Introduction
- 1 Understanding the Digital Image
- 2 Everyone Uses Photoshop, Don’t They? A Guide to Software
- 3 Workflow 1: Download and Viewing
- 4 Workflow 2: Basic Image Enhancement
- 5 Is further work necessary?
- 6 Practicalities and Image Rescue – Enhancement Scenarios
- 7 Specialist Cases and Software
- 8 And Finally
- Index
Frequently asked questions
Yes, you can cancel anytime from the Subscription tab in your account settings on the Perlego website. Your subscription will stay active until the end of your current billing period. Learn how to cancel your subscription
No, books cannot be downloaded as external files, such as PDFs, for use outside of Perlego. However, you can download books within the Perlego app for offline reading on mobile or tablet. Learn how to download books offline
Perlego offers two plans: Essential and Complete
- Essential is ideal for learners and professionals who enjoy exploring a wide range of subjects. Access the Essential Library with 800,000+ trusted titles and best-sellers across business, personal growth, and the humanities. Includes unlimited reading time and Standard Read Aloud voice.
- Complete: Perfect for advanced learners and researchers needing full, unrestricted access. Unlock 1.5M+ books across hundreds of subjects, including academic and specialized titles. The Complete Plan also includes advanced features like Premium Read Aloud and Research Assistant.
We are an online textbook subscription service, where you can get access to an entire online library for less than the price of a single book per month. With over 1.5 million books across 990+ topics, we’ve got you covered! Learn about our mission
Look out for the read-aloud symbol on your next book to see if you can listen to it. The read-aloud tool reads text aloud for you, highlighting the text as it is being read. You can pause it, speed it up and slow it down. Learn more about Read Aloud
Yes! You can use the Perlego app on both iOS and Android devices to read anytime, anywhere — even offline. Perfect for commutes or when you’re on the go.
Please note we cannot support devices running on iOS 13 and Android 7 or earlier. Learn more about using the app
Please note we cannot support devices running on iOS 13 and Android 7 or earlier. Learn more about using the app
Yes, you can access Photographic Image Enhancement and Workflow by Julian Cremona in PDF and/or ePUB format, as well as other popular books in Media & Performing Arts & Digital Media. We have over 1.5 million books available in our catalogue for you to explore.