The VW Air-Cooled Engine is a no-nonsense engine manual that any practical-minded person can understand, giving a highly illustrated step-by-step guide to dismantling and rebuilding a Type 1 engine. Most of the operations described in the book can be applied to the Type 4 unit used in 1700, 1800 and 2-litre Transporter models as well. Topics covered included workshop essentials; keeping the engine healthy; removing and stripping down the engine; examination of the engine components; reassembling the engine and ancillaries and full specifications of the various Type 1 and Type 4 engines. With over 300 colour images, this book will be an invaluable resource for anyone involved in the repair and maintenance of these iconic engines.
- 144 pages
- English
- ePUB (mobile friendly)
- Available on iOS & Android
eBook - ePub
About this book
Trusted by 375,005 students
Access to over 1.5 million titles for a fair monthly price.
Study more efficiently using our study tools.
Information
CHAPTER 1
WORKSHOP ESSENTIALS
The Volkswagen air-cooled engine is relatively simple to maintain and repair and, although the flat-four layout is fairly unconventional today, a few well-chosen garage essentials and tools are all that is needed for the home mechanic to be able to tackle most jobs.
A good start is the tool kit that was supplied with the car, consisting of a body jack, a few useful spanners, hub cap-removal tool and a double-ended box spanner. One end of the box spanner is for removal of the wheel bolts while the other end doubles as a spark plug removal tool and is the correct size to remove or tighten the nut on the generator – especially useful for replacing a broken fan belt out on the highway.
However, the body jack should only be used to change a wheel in the event of a puncture out on the road, as it isn’t suitable for any major repairs. The tool kit supplied with the car should be kept in the car with a few additions for problems encountered when away from home. I personally carry the tools shown in Figs 1.2 and 1.3.
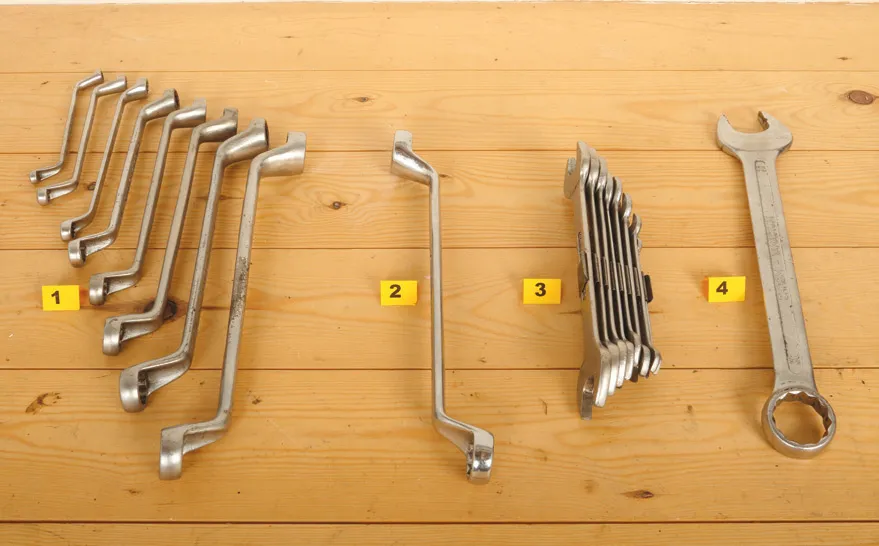
Fig 1.2 Spanners for maintenance of air-cooled Volkswagen engines: 1) ring spanners, 6–22mm; 2) additional 21mm spanner for generator pulley nut, Type 1 engine; 3) open-ended spanners, 6–22mm; 4) additional 30mm combination spanner for the crankshaft pulley nut, Type 1 engine.

Fig 1.3 Other basic tools for working on the air-cooled engines: 1) locking pliers; 2) expanding pliers; 3) pliers; 4) metric feeler gauges; 5) assortment of screwdrivers; 6) hammer.
Some of the repair procedures described in this book involve using heat, either a blowlamp or boiling water, so for safety wear leather welding gloves, as the components are very hot to handle. When using a blowlamp or in any situation where metal fragments may become airborne, always protect your eyes with safety glasses or goggles. (Fig 1.1)
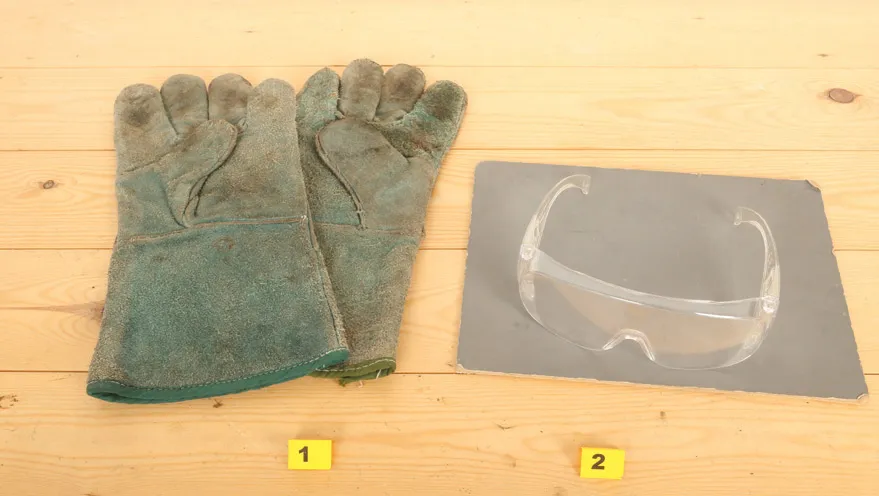
Fig 1.1 Safety equipment includes leather welding gloves for handling hot components and safety glasses.
Good-quality spanners are a must for a well-equipped workshop, with both ring and open-ended ones having their uses. When buying ring spanners, look for ones where the effort is exerted on the flat of the nut, not the corners. Buy sets that include the range of sizes from 6mm to 22mm. Additional sizes that are useful are 30mm for the crankshaft pulley nut, and 21mm for the generator pulley nut, though the VW box spanner will do for the latter.
Other useful tools to carry in the vehicle or at your workshop include locking pliers, often referred to by the trade names of mole grips or vice grips. The expandable pliers (gas pliers) used by the plumbing trade are another valuable addition, as are regular pliers. Feeler gauges and various sizes of screwdriver are used for valve clearances and adjusting the contact breaker points or spark plug gaps. Finally, no toolbox should be without a hammer – though not to be used on the crankcase or cylinder heads.

Fig 1.4 Specialist tools for more advanced engine work: 1) centre punch; 2) Allen keys; 3) twelve-point, 8mm socket and Allen key inserts; 4) micrometer; 5) tool to press in crankshaft oil seal; 6) piston-ring clamp; 7) flat-ended circlip pliers; 8) long-nosed pliers; 9) extendable magnet; 10) pipe clamp.
For more advanced work the following tools have specific roles when rebuilding an air-cooled Volkswagen engine. Allen key bolts and those with a 12pt internal spline are used mostly on the 1700, 1800 and 2-litre engines. When rebuilding the crankshaft on earlier Type 1 engines, a centre punch is used to peen the rim of the nut into an indentation on the connecting rod. When measuring the crankshaft end float using feeler gauges, a micrometer is used to select the third shim. The flywheel oil seal on Type 1 engines is pressed in using a circular tool in conjunction with the flywheel retaining bolt. This can also be achieved with a block of wood and a mallet. When installing the cylinder barrel over the piston it is advisable to use a piston ring clamp as the rings are easily broken.
When stripping down or assembling the gears onto the crankshaft, they are held in place by a circlip. However, the usual style of circlip pliers with pointed ends to grip the holes in the circlip are useless for this job; instead, use circlip pliers with stout flattened jaws that insert between the ends of the circlip to open it out.
When removing the valves from the cylinder head, an extendable magnet or long-nosed pliers are essential to retrieve the collets.
The petrol tank on first- and second-generation Transporter models is situated above the engine; it is therefore essential to clamp the flexible pipe before disconnecting it from the engine. The pipe should be plugged and the clamp removed to avoid damaging the rubber pipe.
It often becomes apparent when working on an engine that special tools used by the dealer are not readily available, so it becomes necessary to apply a bit of ingenuity to either make or adapt tools to complete the job. For example Fig 1.5 shows a puller made specially to remove a particularly stubborn crankshaft pulley. The rubber suction valve-grinding tool illustrated is readily available from most motor factors or tool suppliers. A length of stout wire from a coat hanger has its uses, such as installing the thrust washers at the base of the distributor drive shaft and positioning the anti-chatter spring in the depression in the top of the shaft. When installing the cylinder barrels over the pistons, lengths of copper tube in conjunction with a cylinder head washer and nut hold the barrel in place while the crankshaft is turned to present the next piston.
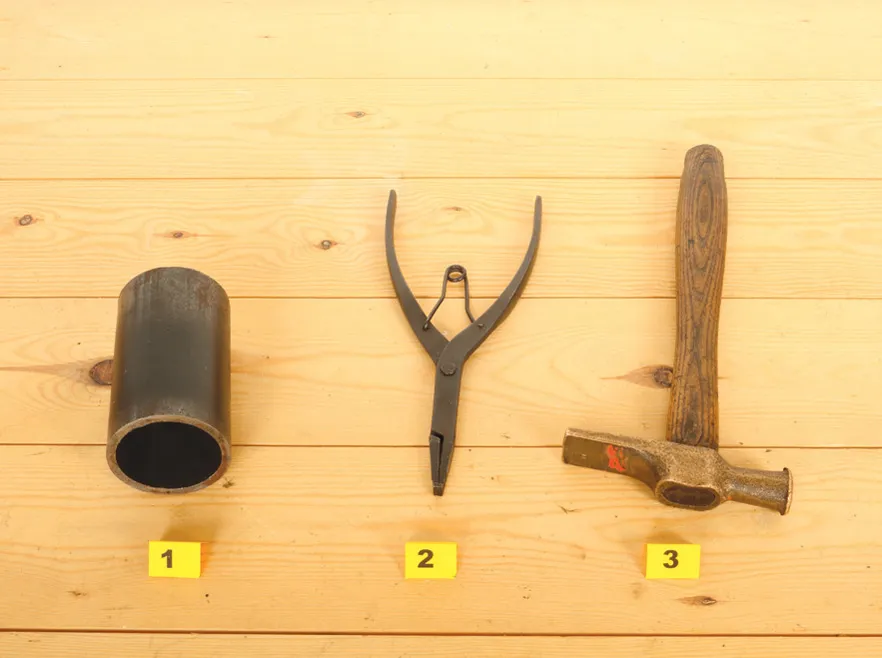
Fig 1.5 Home-made or adapted tools also have a role in advanced engine work. With the exception of item 2, all the items shown here are home-made or adapted from other uses: 1) home-made puller for removing the crankshaft pulley on Type 1 engines; 2) rubber suction tool for valve grinding; 3) a length of stout wire made from a coat hanger used to install the two washers in the distributor driveshaft bore and the anti-chatter spring in the top of the shaft; 4) copper tubes used to retain the cylinder barrels; 5) wooden tool for removing and installing the distributor driveshaft; 6) a Beetle king pin, now a drift for installing piston pins; 7) wire spring clips to retain cam followers.
A wooden peg, whittled to fit the depression in the distributor drive shaft, is used when removing or installing the shaft. If it proves to be stubborn to remove, an expensive tool is available but in this situation it is better to remove the shaft when the crankcase is opened.
When removing a piston, a Beetle king pin or similar is useful for drifting the pin out. The wire clips in Fig 1.5 were packing pieces used to hold a piece of machinery and were about to be thrown out. They have proved to be very useful for holding the cam followers in the right-hand case half when assembling an engine.
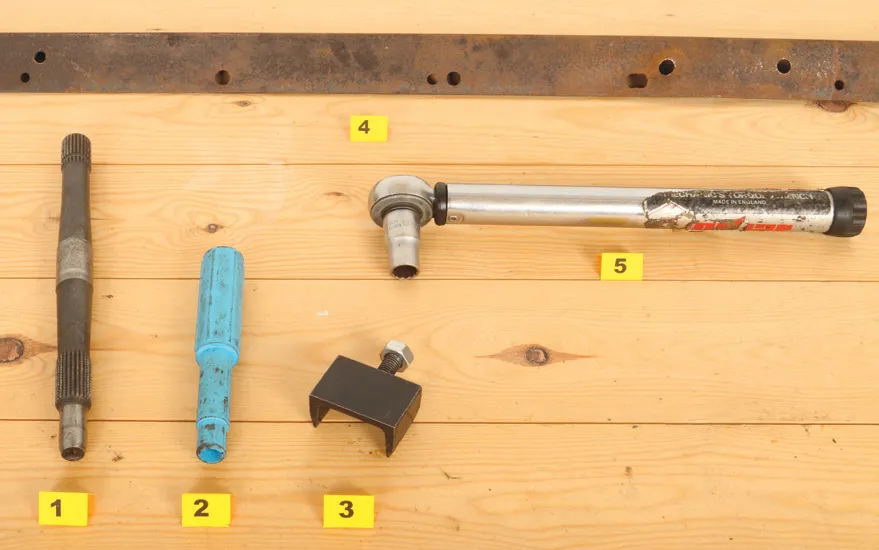
Fig 1.6 Installing the two gears and the spacer onto the crankshaft: 1) a length of steel tubing purchased from a local metal supplier makes a suitable drift; 2) the flat-ended circlip pliers are used to fit the retaining circlip; 3) a gunmetal hammer will not damage steel components.
When installing the cam gear, spacer and distributor drive gear onto the crankshaft, always wear leather welding gloves as they are very hot when removed from the boiling water. A length of metal tubing from a local metal supplier is a useful homemade tool to drift the gears into position. Flat-ended circlip pliers are used to install the circlip.

Fig 1.7 1) Gearbox input shaft used to hold the drive plate when installing the clutch pressure plate; 2) a plastic tool for holding the clutch plate; 3) flywheel lock; 4) a length of angle iron bolted to the flywheel using the clutch bolts is a safer option for holding the flywheel when tightening the high-torque bolt used on the Type 1 engine ; 5) torque wrench and 13mm socket for tightening the clutch bolts.
A well-equipped workshop wil...
Table of contents
- Cover Page
- Title Page
- Copyright Page
- Contents
- Preface and Acknowledgements
- 1. Workshop Essentials
- 2. The Type 1 Engine: Keeping it Healthy
- 3. Engine Removal
- 4. Removing the Exhaust and Ancillaries on Type 1 Engines
- 5. Engine Strip-Down
- 6. Examination of the Engine Components
- 7. Assembling the Crankshaft
- 8. Rebuilding the Crankcase
- 9. Removing the Exhaust and Ancillaries on 1700, 1800 and 2-Litre Type 4 Engines
- 10. Reassembling the Pistons and Cylinders
- 11. Rebuilding and Installing the Cylinder Heads
- 12. Replacing Ancillaries and Exhaust on Type 1 Engines
- 13. Replacing Ancillaries on 1700, 1800 and 2-Litre Type 4 Engines
- Appendix I: Specifications
- Appendix II: Engine and Chassis Numbers
- Useful Addresses
- Glossary
- Index
Frequently asked questions
Yes, you can cancel anytime from the Subscription tab in your account settings on the Perlego website. Your subscription will stay active until the end of your current billing period. Learn how to cancel your subscription
No, books cannot be downloaded as external files, such as PDFs, for use outside of Perlego. However, you can download books within the Perlego app for offline reading on mobile or tablet. Learn how to download books offline
Perlego offers two plans: Essential and Complete
- Essential is ideal for learners and professionals who enjoy exploring a wide range of subjects. Access the Essential Library with 800,000+ trusted titles and best-sellers across business, personal growth, and the humanities. Includes unlimited reading time and Standard Read Aloud voice.
- Complete: Perfect for advanced learners and researchers needing full, unrestricted access. Unlock 1.5M+ books across hundreds of subjects, including academic and specialized titles. The Complete Plan also includes advanced features like Premium Read Aloud and Research Assistant.
We are an online textbook subscription service, where you can get access to an entire online library for less than the price of a single book per month. With over 1.5 million books across 990+ topics, we’ve got you covered! Learn about our mission
Look out for the read-aloud symbol on your next book to see if you can listen to it. The read-aloud tool reads text aloud for you, highlighting the text as it is being read. You can pause it, speed it up and slow it down. Learn more about Read Aloud
Yes! You can use the Perlego app on both iOS and Android devices to read anytime, anywhere — even offline. Perfect for commutes or when you’re on the go.
Please note we cannot support devices running on iOS 13 and Android 7 or earlier. Learn more about using the app
Please note we cannot support devices running on iOS 13 and Android 7 or earlier. Learn more about using the app
Yes, you can access The VW Air-Cooled Engine by Ken Cservenka in PDF and/or ePUB format, as well as other popular books in Technology & Engineering & Aviation. We have over 1.5 million books available in our catalogue for you to explore.