Good lighting is fundamental to creating great images. This new book provides a roadmap for producing creative images with a flashgun. It introduces lighting principles and then advises on more complex lighting sets and situations. Techniques to create professional effects such as film noir and Hollywood lighting, high-speed synching and handling reflective surfaces are covered. Practical instruction and advice throughout apply the principles, and explain how photographs are taken and stunning results achieved. Includes a guide to the main characteristics of light - intensity, direction, quality and colour - with advice on modern flashguns and their features, and has practical examples, from portraiture to product photography. Illustrated with 276 colour photographs.

- 192 pages
- English
- ePUB (mobile friendly)
- Available on iOS & Android
eBook - ePub
About this book
Trusted by 375,005 students
Access to over 1.5 million titles for a fair monthly price.
Study more efficiently using our study tools.
Information
Topic
ArtSubtopic
PhotographyChapter 1
In the Beginning there was Light
Before we penetrate the mysteries of flashguns, often referred to as Speedlights (Nikon), Speedlites (Canon) or strobes, a short introduction to light is called for. A clear understanding of its properties and how it impacts upon your subjects is central to the art of creating great photographic images.

Fig. 1.0
This was taken on a location shoot using three speedlights to illuminate the model and surroundings. A variety of modifiers were used: honeycomb, soft-box and a 7" can. ƒ8 @ 1/125s ISO 400
Light is electromagnetic radiation, 390nm to 740nm in wavelength, comprised of photons. When these strike the sensor in your camera it produces a small electrical charge that is converted into a voltage, or digital data, to produce an image. Light illuminates all that we see around us and we would not exist without it; this invisible radiation, which travels in straight lines, becomes visible when it is reflected back with part of the spectrum being absorbed, depending upon the subject it is striking. We see a red flower, for example, because the blue and green parts of the electromagnetic spectrum have been absorbed. If we see white it means that all the spectrum colours have been reflected back, with little or none being absorbed, depending on the shade of white. If we see black that means all the light has been absorbed.
We cannot see the light until it has been reflected; however we can record it on film, on digital sensors or a light meter. This ability to record the light fathered photography and has evolved into the modern digital revolution.

Fig. 1.1
A glass blower shot on location at Bath Aqua Glass using two Yongnuo YN560II speedlights placed at the 1 o’clock and 9 o’clock positions, balanced on a 3:1 ratio power setting with both lights modified with a 7in Interfit reflector/can. ƒ11 @ 1/200s ISO 200
On one side there is all this light and on the other a camera that deals in ƒ-stops. The problem is that we do not know how bright, strong or intense the light is without resorting to some form of measurement, unless we are skilled enough to assess it visually. Despite all the technology built into a digital camera, it has limitations when measuring the light and you may need to resort to using a light meter, unless you are experienced in visualizing or sensing the amount of light available. Using meters is often frowned upon nowadays because it is claimed that modern cameras can do it all. That, however, is a matter of conjecture, just as it is true to say that a handheld light meter is not intelligent; it will only perform correctly if used properly.
LIGHT METERS
We first need to examine the uses to which a light meter may be put. Many photographers consider the use of a separate light/flash meter as unnecessary, believing it to be an obsolete piece of equipment taking up space in the camera bag, since the camera’s own meter and algorithms can take readings and sort it all out for you.
The problem is that camera meters only read the reflected light and can be fooled with high contrast and bright subjects, back and side lighting. Using the in-camera spot or centre-weighted mode will darken the image to 18 per cent grey; that is why a camera will more than likely underexpose a snow or beach scene, but overexpose a dark scene or black material as the meter assumes it is grey. The camera meter will provide different readings for subjects that reflect in a different way. A sky may have an exposure of ƒ16, for example, whereas the foreground will require an exposure several stops lower. The camera will make a choice depending upon the predominant element in the scene and the metering mode you have selected. Most modern DSLR cameras will allow you to spot meter, reading about 3 to 5 per cent of the scene, although this is loaded with problems unless you are prepared to take multiple readings and combine them into a usable interpretation.
Many experienced photographers may also dispense with a light meter, as it tends to slow their photography down, and rely upon their experience. That’s all well and good if you have that experience, but when you are starting out a little help and assistance is not a bad thing. It will also help you to understand the ‘trinity’ or exposure triangle, the relationship between ISO, aperture and shutter speed. Understanding this association will help lift your photography to another level.
Although light meters are available in a variety of specifications, you will only need to read the three modes of exposure: reflected, incident and the burst of flash. Some more advanced meters will also calculate ratios as well as spot metering to a 1-degree angle. Some meters have a wireless add-on that can fire either studio or portable battery-powered studio flash units. Using strobes you can fire the flash with wireless triggers, independent of the light meter.

Fig. 1.2
The most popular model in the Sekonic light meter range is the L308s, capable of reading both the ambient and flash light.

Fig. 1.3
Fighting fit. This shot was taken on location at a re-enactment event using a single Canon Speedlite on an extension pole above the soldiers. The flash was balanced to the available light to retain the detail in the sky and shutter speed was used to help control the ambient. ƒ22 @ 1/200s ISO 200
There are many light meters on the market. One of the simplest, most reliable and cost-effective meters for the stills photographer is the pocket-sized Sekonic L308s Flashmate, which is designed to read ambient or flash exposures in either reflected or incident mode, recording in half- or third-stop increments that mirror the exposure settings of DSLR and film cameras. When set to full-stop mode the exposures are displayed in tenth-stop increments with a repeated accuracy of ± 0.1 EV (exposure value). This is useful when using the more advanced portable studio flash units that are available, such as the Elinchrom Ranger Quadra unit, which accurately adjusts to a tenth of a stop.
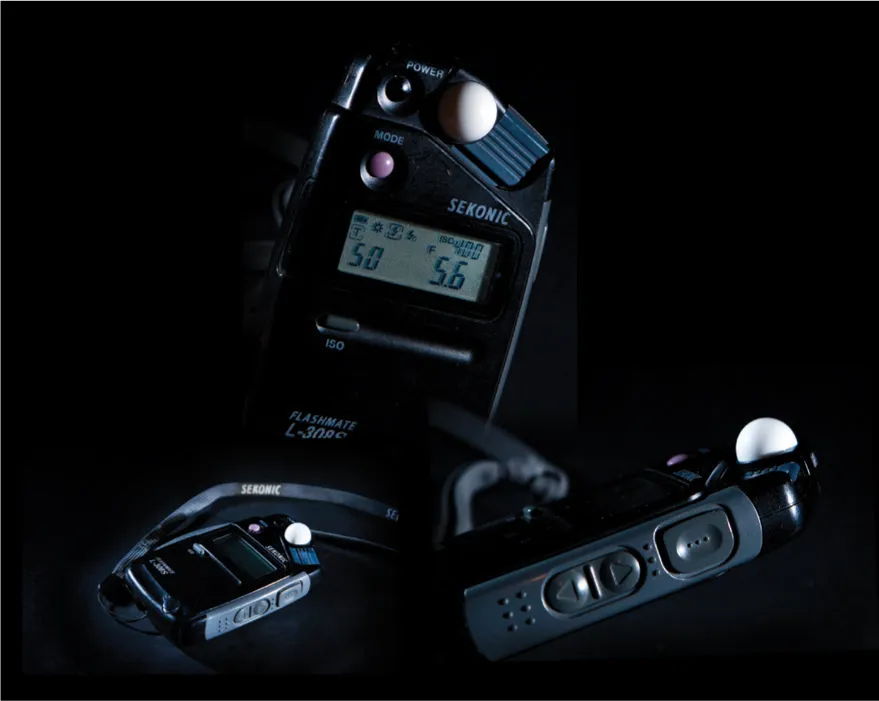
Fig. 1.4
Sekonic Flashmate L308s Flashmate. The readout, set to 1/50s @ ƒ5.6 with an ISO of 400, indicates that it is in the flash mode. The reading will only display when the flash has fired.
When you hold down the mode button as you switch on the meter, the shutter speed settings can be adjusted to suit your camera settings in increments from 60s down to 1/8000s.
Light meters can be confusing, so we will now discuss incident and reflected light, and how to use flash metering modes. Unlike in-camera light meters, handheld light meters read not only the reflected light from a subject but also the incident light (the light that is falling upon the subject) and the short burst of light from an electronic flash.
It is important to note that all meters are calibrated to assume that the subject in the scene is middle grey to ensure consistency, reflecting about 18 per cent of the light that falls upon it; this value can also be true of colours that reflect in the same way as 18 per cent grey. When you point the handheld light meter at a mid-toned area and press the button on the side to take the reading, the appropriate ƒ-stop or aperture will appear on the meter relative to the ISO and shutter speed that have been set.
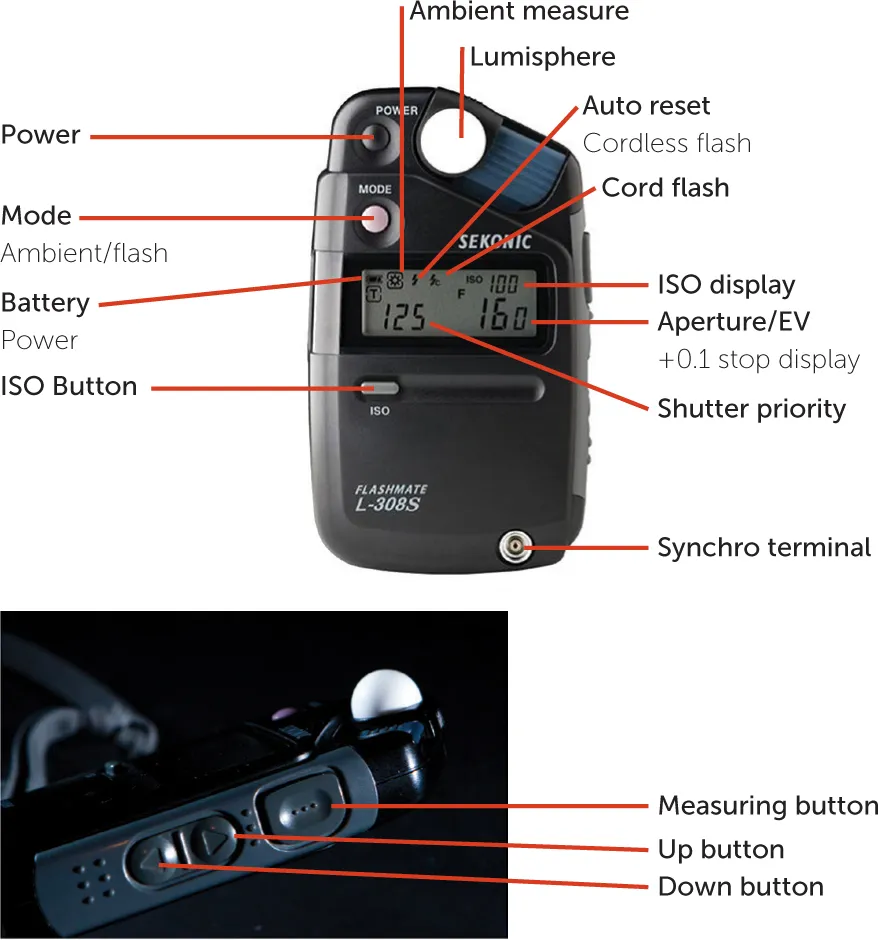
Fig. 1.5
The buttons on the Sekonic L308s are simple to operate. The readout displays that the ambient is ƒ16 @ 1/125s with an ISO of 100.

Fig. 1.6
Incident readings are taken with the meter pointing towards the light source and/or the camera reading the light that is falling on the subject.

Fig. 1.7
The lumisphere on the Sekonic needs to be moved to the right for incident light readings, and fully over the sensor for reflected readings.
When switched on, the meter’s LCD screen displays the ISO setting, mode, shutter speed and aperture or EV setting. The first item to deal with is the ISO, the sensitivity of the film or camera sensor you wish to use (see Chapter 5). Having set your ISO, in this case 200, adjust the mode dial to select the ambient option, displayed as a sun symbol in the top left-hand corner alongside the battery symbol. You can now decide upon your shutter speed, remembering that unless you are using a dedicated flash unit you will not be able to exceed your flash synchronization speed, which will be in the region of 1/200s to 1/250s, depending on your camera’s focal plane shutter, if fitted.
If you are taking an incident light reading, which is not available on cameras, slide the white translucent lumisphere dome over the sensor, if it is not already in position. The dome is shaped so that any available light falling on the subject at an angle is recorded, capturing light from many angles. Hold the meter so that it is at the closest point of the subject to the camera, pointing at your camera or shooting position, and then press the top button on the side to record a reading. The display will indicate an aperture for the given shutter speed. If you wish to change the shutter speed, press one of the toggle switches on the side of the me...
Table of contents
- Cover Page
- Title Page
- Copyright Page
- Acknowledgements and Thanks
- Contents
- Introduction
- 1 In the Beginning there was Light
- 2 Camera Flash, Triggers and More
- 3 Modifying the Light
- 4 Flash Functions
- 5 Key Shifting
- 6 Depth of Field
- 7 Portraits
- 8 The Hollywood Influence
- 9 Dealing with Black and White
- 10 Reflective Surfaces
- 11 Shooting an Interior
- 12 High-speed Flash
- Index
Frequently asked questions
Yes, you can cancel anytime from the Subscription tab in your account settings on the Perlego website. Your subscription will stay active until the end of your current billing period. Learn how to cancel your subscription
No, books cannot be downloaded as external files, such as PDFs, for use outside of Perlego. However, you can download books within the Perlego app for offline reading on mobile or tablet. Learn how to download books offline
Perlego offers two plans: Essential and Complete
- Essential is ideal for learners and professionals who enjoy exploring a wide range of subjects. Access the Essential Library with 800,000+ trusted titles and best-sellers across business, personal growth, and the humanities. Includes unlimited reading time and Standard Read Aloud voice.
- Complete: Perfect for advanced learners and researchers needing full, unrestricted access. Unlock 1.5M+ books across hundreds of subjects, including academic and specialized titles. The Complete Plan also includes advanced features like Premium Read Aloud and Research Assistant.
We are an online textbook subscription service, where you can get access to an entire online library for less than the price of a single book per month. With over 1.5 million books across 990+ topics, we’ve got you covered! Learn about our mission
Look out for the read-aloud symbol on your next book to see if you can listen to it. The read-aloud tool reads text aloud for you, highlighting the text as it is being read. You can pause it, speed it up and slow it down. Learn more about Read Aloud
Yes! You can use the Perlego app on both iOS and Android devices to read anytime, anywhere — even offline. Perfect for commutes or when you’re on the go.
Please note we cannot support devices running on iOS 13 and Android 7 or earlier. Learn more about using the app
Please note we cannot support devices running on iOS 13 and Android 7 or earlier. Learn more about using the app
Yes, you can access Flash Photography by Terry Hewlett in PDF and/or ePUB format, as well as other popular books in Art & Photography. We have over 1.5 million books available in our catalogue for you to explore.