The Botanical Illustrator's Handbook takes a closer look at how to accurately portray the riches of the botanical world. It tackles and explains many of the difficulties that artists encounter so they can extend and expand their choice of subject matter. Written by a respected artist and drawing on her wealth of experience, it offers new insights and a fresh approach to the wonders of botanical illustration.Topics covered include: advice on the labelling and quality of paper, and choice of pencils, paints and brushes; techniques for the mixing and handling of greens; chapters on magnification, managing detail and using scale bars; instructions for using perspective techniques, and painting complex structures such as pine cones and umbellifers, and tricky details such as hairs. Full of advice on labelling, quality of paper, artist materials and mixing techniques and superbly illustrated with 160 colour illustrations.
- 128 pages
- English
- ePUB (mobile friendly)
- Available on iOS & Android
eBook - ePub
Botanical Illustrator's Handbook
About this book
Trusted by 375,005 students
Access to over 1.5 million titles for a fair monthly price.
Study more efficiently using our study tools.
Information
Topic
ArtSubtopic
Art General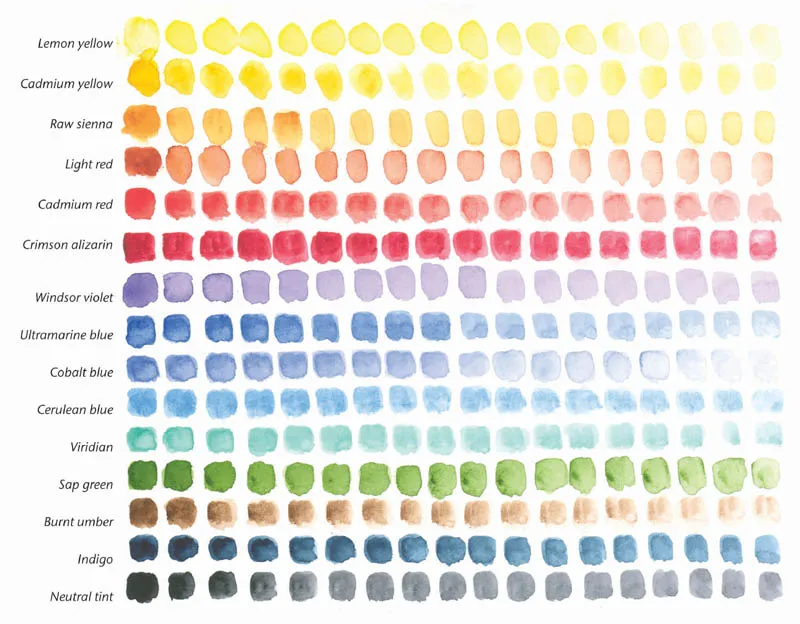
Colour chart.
CHAPTER 1

UNDERSTANDING YOUR MATERIALS
‘He who has begun his task has half done it’
Horace 65-8BC Epistles
In the artists’ search for the magic sword that will solve all their problems at a stroke, the most lively talk among them is often discussion of the latest piece of kit or colour available. Many groups have among them a kit junkie who will buy and try out all the latest bits of kit. Such a person is your friend. I hope this chapter will amplify and give some background to his or her discoveries. If we understand the organic nature of our materials and the procedures through which they become available to us, we can make better informed choices for our own requirements.
Paper
Paper is the most important of all materials. Even with the best quality paint and brushes it is hard to achieve anything on unsuitable paper. Good quality paper is expensive because it has been specially made for your medium in a complex process.
While the Western world was still using papyrus and parchment, over two thousand years ago the Chinese were developing paper, and by the second century were producing it commercially. There is evidence of pulp mills in Samarkand in the eighth century, and manufacture was taking place in Italy in 1220. Paper was in common use in Germany by 1400, coinciding with and enabling the new printing techniques. Leonardo da Vinci was very careful with it, wasting nothing.
Paper is usually made from wood pulp, but the higher the percentage of other fibres – for example cotton, linen, flax, recycled rag or hemp – the better the quality. It will be stronger, and less acid. First the fibres are made into a slurry, which is thoroughly beaten and mixed. It is then spread and dried, and as the water content is reduced it becomes thinner. Then it is pressed.
Thou hast most traitorously corrupted the youth of the realm in erecting a grammar school: and whereas, before, our forefathers had no other books but the score and the tally, thou hast caused printing to be used; and contrary to the king, his crown and dignity, thou hast built a paper mill. Shakespeare, Henry V1, Part2
Since the nineteenth century in Europe paper has been made in a continuous roll using the Fourdrinier machine. It is this process that gives us some of the expressions used today. The paper is run between the rollers to give it a harder surface, and sized with gelatine or modified starches to bind the surface. A cylinder mould mimics hand manufacture by lifting the sheet out of the slurry slowly. The fibre direction is more random, but the slowness of the procedure makes it more expensive.
Wood-pulp paper contains acid, is volatile, and does not keep. Also the action of the rollers in conjunction with the short fibres makes it wrinkle more in one direction than the other when wet. Paper for printing is made hard in order to take the printing inks, while that intended for watercolour is softer but more heavily sized to regulate the absorbency. Some good papers are both internally and externally sized. Hand-made or top quality papers are still set on wire screens to dry in a box frame called a deckle. The process makes one sheet at a time and leaves an uneven edge called a ‘deckle edge’, while the wire screen leaves an imprint called the ‘laid lines’, a feature of the best laid paper. The watermark imprint is made by weaving a design into the wires. Papers intended for watercolour are sized to give a smooth glaze, and a whitening agent may also be added into the finish. Internal sizing improves paper quality and makes it less absorbent. Acid-free paper is made with a chalk filler and has the active acid pulp removed during manufacture. It creates an archival quality of paper for artwork that can be preserved for long periods.
Cold press paper is run through the rollers while they are cold.
‘Not’ paper is the same as cold press, and the ‘not’ stands simply for ‘not hot’. Hot press paper is made once the rollers have heated up because of the length of time they have been running. The effect is to iron the paper and give it a hard, smooth, glossy finish that can resist heavy washes, blending and colour lifting. Hot press paper, even at a magnification of ×35 on the surface, shows no features on its surface.

Cold press or Not paper × 35.
Bristol board is prepared to take pen, pencil and airbrush. It can take a light colour wash, but has not got a suitable finish for successful watercolour painting. The weight of paper also needs some clarification, and it does not help that there are two ways of measuring the thickness of paper. Gsm or g/m squared actually measures the weight of a square metre of paper, which is helpful. The weight of paper measured in pounds (lb) is less clear, in that the weight refers to a ream, which is 500 sheets of imperial-sized paper. Most paper manufacturers now give both weights, which, with small variations for the makes, equate as below:
80lb = 170 gsm
90lb = 185 gsm
140lb = 300 gsm
300lb = 638 gsm
Imperial size is 30 × 20in, half imperial 22 × 15in, and a quarter imperial 15 × 11 in. To paint watercolour with underlying washes without stretching your paper, 140lb, 300 gsm is the minimum weight. Even so, if you know you have some large, broad leaves to do, or a large area over which you will apply an initial wash, it is advisable to stretch your paper. Lighter weights need stretching anyway, unless your medium is a dry one, such as pencil. Some artists favour blocks with sealed edges, which are intended not to cockle. If wet washes are used on them, however, the cockling will go through the entire block and be much worse, so this course is only advisable if you paint quite dry. If you work by transferring your initial sketches on to good paper using a lightbox, you can transfer the drawing first and then stretch the paper with the drawing already on it.

Hot press paper × 35.
The procedure for paper stretching is as follows:
• | Pass your sheet of paper through a container of clean, cold water, free of any soap products. |
• | Hold it up to let the excess water run off it, then lay it on a board. |
MDF boards have a good finish with about the right amount of absorbency. Shiny boards will not hold the tape needed to anchor the paper (see next point below). | |
• | While the paper continues to absorb the moisture, cut four strips of brown paper parcel tape the length of the sides of the paper. Draw the gummed side of the strips quickly over some clean water. |
When the gum is just evenly moist, lay the strips down the edges of the paper, covering between ½ and ¼in of the paper and the rest on the board, starting with the short sides first.
Bigger pieces of paper will exert more pull on the gummed strip, so you need more tape on the paper. Smaller sheets of paper exert less pull, but the maximum area should be left for the image. The paper will look quite cockled. Pull it gently from the ends to be sure that the brown paper tape will lie flat enough to stick evenly.
Take care not to touch the surface of the paper unnecessarily.
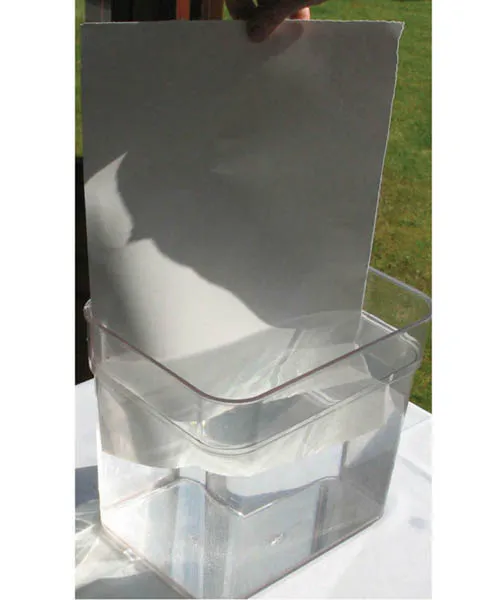
Wetting the paper.
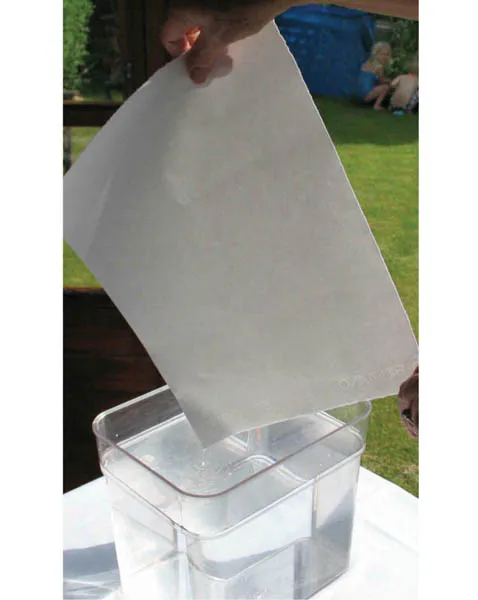
Letting the excess water run off it.
• | Blot any excess surface moisture lightly with a piece of paper towel. The paper must then dry slowly and flat (overnight is good) to give a nice taut surface that will not cockle when wet. |
• | Fast or uneven drying will produce a warp, as will a gap between the brown tapes in a corner. Equally, excess water seeping under the edge of the tape will wash the gum off the brown paper and lift it. |

Laying it on the board.

Wetting the strips of brown paper parcel tape.

Laying the first gummed strip down a short edge of the paper.

Gently pulling the paper.

Laying down the side strips.

The paper will look quite cockled.

The paper is now dry and flat.
Warped paper is unusable, and the sized surface is unlikely to survive a second stretching. While the current fashion is to have no evidence of paper cockle at all on paintings, it is possible that this will alter in the future. As the difference between prints and originals becomes harder to tell, it could be that the natural organic response of paper to watercolour could become a prized hallmark of the authenticity of the original.
Brushes
It comes as no surprise that the best brushes are said to be made of ‘sable’ – but are they? It is not the sable of nobles and kings or the dowry of Genghis Khan. Sable for fur garme...
Table of contents
- Cover Page
- Title Page
- Copyright Page
- CONTENTS
- Introduction
- 1. UNDERSTANDING YOUR MATERIALS
- 2. MAGNIFICATION – SEEING IS BELIEVING
- 3. USING PERSPECTIVE TO CREATE DEPTH
- 4. THE TROUBLEWITH GREENS
- 5. STEMS, LEAF JOINS AND HAIRS
- 6. FIBONACCI AND OTHER MATHEMATICAL MODELS
- 7. COMPLEX STRUCTURES ANDWHITE FLOWERS
- 8. EPHEMERAL FLOWERS
- 9. FIELDWORK
- 10. UNDERSTANDING PLANT NAMES IN LATIN
- 11. PROTECTING AND EXHIBITING YOURWORK
- Appendix A – Plant Conservation Organizations and Useful Contacts
- Appendix B – Latinate Words used in Plant Names
- Bibliography
- Glossary
- Index
Frequently asked questions
Yes, you can cancel anytime from the Subscription tab in your account settings on the Perlego website. Your subscription will stay active until the end of your current billing period. Learn how to cancel your subscription
No, books cannot be downloaded as external files, such as PDFs, for use outside of Perlego. However, you can download books within the Perlego app for offline reading on mobile or tablet. Learn how to download books offline
Perlego offers two plans: Essential and Complete
- Essential is ideal for learners and professionals who enjoy exploring a wide range of subjects. Access the Essential Library with 800,000+ trusted titles and best-sellers across business, personal growth, and the humanities. Includes unlimited reading time and Standard Read Aloud voice.
- Complete: Perfect for advanced learners and researchers needing full, unrestricted access. Unlock 1.5M+ books across hundreds of subjects, including academic and specialized titles. The Complete Plan also includes advanced features like Premium Read Aloud and Research Assistant.
We are an online textbook subscription service, where you can get access to an entire online library for less than the price of a single book per month. With over 1.5 million books across 990+ topics, we’ve got you covered! Learn about our mission
Look out for the read-aloud symbol on your next book to see if you can listen to it. The read-aloud tool reads text aloud for you, highlighting the text as it is being read. You can pause it, speed it up and slow it down. Learn more about Read Aloud
Yes! You can use the Perlego app on both iOS and Android devices to read anytime, anywhere — even offline. Perfect for commutes or when you’re on the go.
Please note we cannot support devices running on iOS 13 and Android 7 or earlier. Learn more about using the app
Please note we cannot support devices running on iOS 13 and Android 7 or earlier. Learn more about using the app
Yes, you can access Botanical Illustrator's Handbook by Sally Pinhey in PDF and/or ePUB format, as well as other popular books in Art & Art General. We have over 1.5 million books available in our catalogue for you to explore.