This book shows you how to make the most of natural light when photographing children on location or at home and to take beautiful pictures to cherish. It emphasizes the importance of understanding the qualities of natural light at certain times of the day and in different seasons. Focusing on the fundamentals of traditonal protraiture, it encourages you to create images in your own style and with timeless beauty. The book explains control of light and exposure, advises on composition and perspective and emphasizes communication, expression and creating visual emotion.It also shares ideas for locations and seeing beyond the ordinary and encourages experimentation and creativity. Invaluable for both parents and aspiring professional photographers. Superbly illustrated with 222 colour photographs.
- 128 pages
- English
- ePUB (mobile friendly)
- Available on iOS & Android
eBook - ePub
Photographing Children in Natural Light
About this book
Trusted by 375,005 students
Access to over 1.5 million titles for a fair monthly price.
Study more efficiently using our study tools.
Information
Topic
ArteSubtopic
Fotografía
Fig. 1.0
Understanding how the position of the sun at given times of day and at different times of the year, will help you create images that go beyond the norm of location portrait photography.
Chapter 1
Why Natural Light?
Removing ourselves out of the somewhat artificial environment of the studio into what can be an unpredictable workplace can be daunting for the inexperienced or those who have worked within a ‘fixed formula’. It’s no easy task, especially if you’ve learnt your trade, established yourself in a studio environment and are perhaps in that comfort zone of what works for you.
However, working in available light will not limit the creative once they understand what is possible and what (to a point) isn’t. It provides an opportunity to create images which are both simplistic or complex in their make-up, depending on how the light is used. Whether the image is a beautiful backlit shot taken in a cornfield where we can incorporate flare and imbue a classical nostalgic feel, or whether an interior window light offers a chance for graphic drama, a different feel can be achieved at different times of day depending on the strength, quality and colour of the light. Yes, it can be unpredictable, and it is a challenge to bring all the elements together, but the results are individual and there are no boundaries in terms of creativity.
That wonderful hour when the sun rises and later when it sets has been indoctrinated in us as being the best time of day during which to take beautiful portraits and, when handled well, we can indeed produce something special at those times. However, in reality this isn’t always possible and, given that the light comes in many guises throughout the day or year, we must use what is available at these times to create something specific.
You may not want that soft backlit shot; you may be looking for something more harsh. There are no rules as to when the best time is for you to shoot, but you do need to understand the effects of these given times in order to implement the ideas and learn how to control ‘wayward’ light. If you are selling your images in a professional capacity, it is essential to grasp what your market demands with regard to the feel of your ‘product’, as well as find out what is the most flattering light for a particular style and what, crucially, is going to sell.
Studio versus Location Lighting
One of the advantages of working in a studio is that you can position lights as you wish, which of course you can’t do with the sun, so when you’re outside you need to move yourself and your subject, as well as factoring in a little more planning with regard to the time and position of the light source. Within the studio environment, we talk more about high key and low key lighting set-ups than we do for location shots. The meaning of ‘key’ flirts with a similar analogy in music – the ‘pitch’ or tonal range. High key in a studio is a sharp-lit image, holding minimal shadow detail, even sometimes to the point of being burnt out. This is obtained through use of a light background and artificial lighting/flash, in some cases using multiple light set-ups. In contrast, a studio low key image uses just one or two lights, targeting a small area of the subject and giving a more subtle view, almost to the point of effecting three dimensions through the use of deep shadows, and so on.
In Fig. 1.1, despite the inside exposure being balanced with the exterior, overexposing by a stop has lifted the image and given it a soft, whimsical feel. We don’t necessarily need all the detail within the image – of course, going by the rules, we would want to retain all the detail, but there are times when we need to use stronger exposure to create a mystique, anonymity and atmosphere. When you’re making images to this effect, by over- or underexposing, it has to look purposeful rather than lacking in control; this also applies to other methods, such as using movement or harsh light to accentuate the graphic.
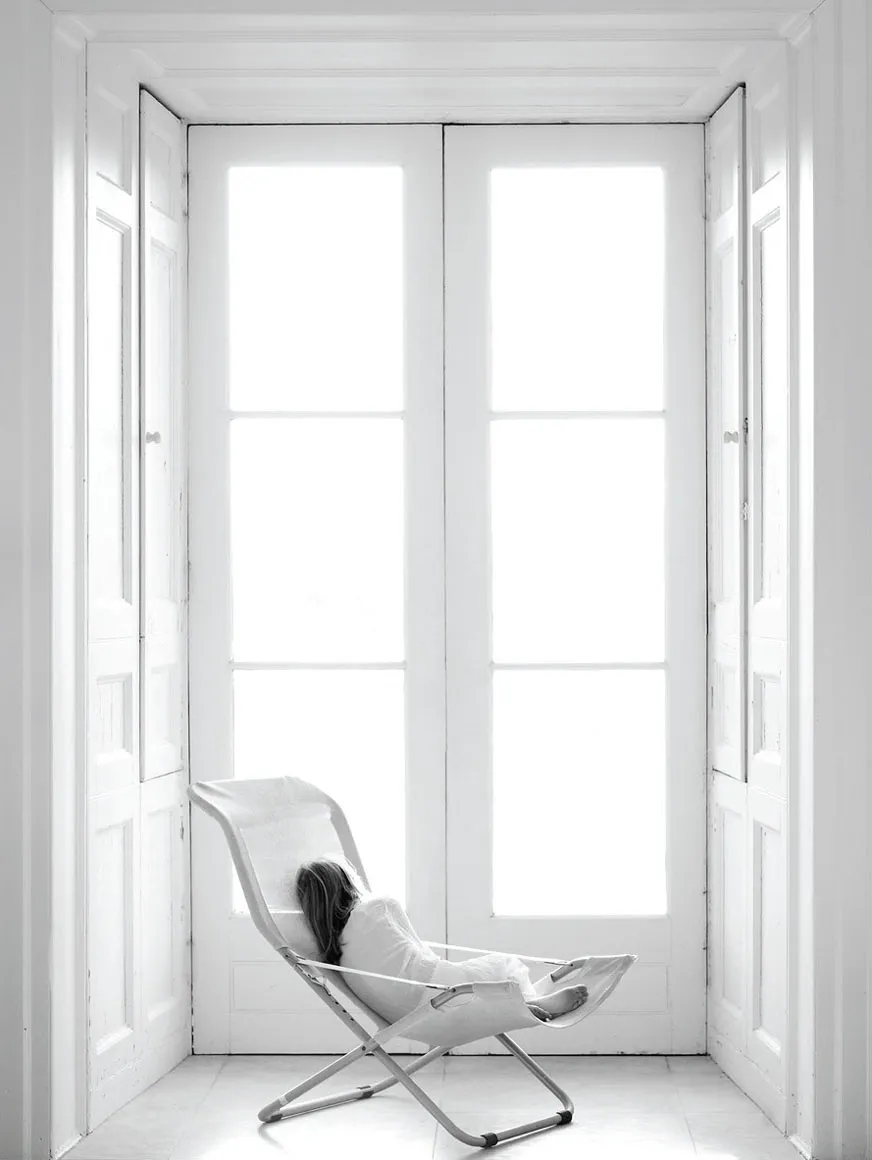
Fig. 1.1
High key on location: the lack of tonal range creates a high key effect by using the white walls to envelope the strong sunlight flooding through the window, with an added reflector to balance the softness of the light to the fore, shrouding the subject. The only real mid tone is in the child’s hair, perhaps similar to a pencil drawing.
The lighting ratio is the ratio of light levels from the brightest area to the darkest part of the subject; the brightest lit are lit by both key and fill. In Fig. 1.3 the ‘kissing’ light is where the light, to the human eye, just kisses the face and graduates into darkness, with a high light ratio between the face and the back of the head (contrast). A spot meter reading was taken from the face. In order to exaggerate the definition and to define that spotlight effect, the camera was then set to underexpose in order to gradually create a natural vignette and ensure beautiful detail in the face while eliminating detail in the hair. If the detail in the hair had been required, a reflector to the left could have been added or the shot exposed for longer – but the latter would then have compromised the detail in the face by overexposure. A reflector to the left would be the preferable solution. A shallow depth of field has also ensured that the eye is directed to the face and there is no distraction from the surrounding area.
The downside to underexposing and retrieving detail from an image file is that you may create noise within the shadow areas. This can of course be a creative choice and you can use this as an element in your work.

Fig. 1.2

Fig. 1.3
Fig. 1.2 Fig. 1.3
Low key studio portrait (Fig. 1.2), using one light on the front; the background is lit with a small spill with a honeycomb. (Photo: Saraya Cortaville)
In contrast, Fig. 1.3 is utilizing window light on location, in an otherwise dark room, with no fill-in to lift detail in the hair.
There are often compromises to be made when there are such extreme contrast ranges. You need to decide which part of the image is the most important. Although we aim to achieve the best possible results at camera stage, having post-processing options in your mind when you are shooting may make this decision easier. Both the high key (Fig. 1.1) and low key (Fig. 1.3) location images are quiet and sensitive, yet lit and exposed in different ways.
Disciplining oneself to view a location in terms of what is achievable with the given light in that location is part of training the eye to work with the imagination and to have the fundamental skills to achieve the desired effect. So the thought processes with regard to lighting in the studio or on location are the same, but on location they can be used to different effect in order to incorporate the environment and the narrative we are looking to project.

Fig. 1.4
This photograph demonstrates natural directional light. The quality from either side of the cloisters swathes the child in soft daylight, with added reflection from the white stone floor, thus there is no need for additional reflectors.
Light from Different Angles
Given the capabilities of modern DSLR cameras, we have the opportunity to produce both high and low key images to a professional quality. High ISO ratings enable us to push our cameras, particularly in very low lighting, giving us the opportunity to make pictures with depth and feeling in almost any conditions. By using directional light – a definitive light source – we can add shape and form to a portrait, enhance or detract areas of an image that are perhaps less flattering, and manipulate or mould a figure or subject in a particular way.
In Fig. 1.4, the lighting is perfectly balanced between the exterior and the child inside. This image was shot on a manual spot metering mode; a light reading was taken from the child. If the exterior had been much darker (up to two stops), the child may well have been overexposed if this had been taken on an automatic mode. We can afford to stop down a further half stop if necessary in order to bring back even more detail, but slightly overexposing the image in its entirety at the shooting stage ensures that we have more detail throughout the file which can then be bought back in the RAW conversion.
Once you have the set-up as seen in Fig. 1.6, you have the basis for your canvas and your building block has been created. You can then experiment with posing and composition, and push your creativity within that one area, utilizing the location in various ways.
Introducing backlighting, with the sun behind your subject, will offer you imagery which is sympathetic at most times of the day, though a different approach is required depending on the strength and direction of the sun. Understanding when and where the sun is at a location prior to your shoot will make your job easier. For example, if you arrange your shoots at midday in summer, the sun will be at its most powerful and highest in the sky. If you have no choice but to shoot at this time, you have two options.

Fig. 1.5
Having a broad directional light straight on to your subject will ensure good, s...
Table of contents
- Cover Page
- Title Page
- Copyright Page
- Contents
- Foreword
- Introduction
- 1 Why Natural Light?
- 2 Kit
- 3 An Idea, Inspiration and Getting Creative
- 4 Location
- 5 Timing and Natural Light Conditions
- 6 Posing, Placement, Communication
- 7 Composition, Space, Image Quality
- Further Information
- Index
Frequently asked questions
Yes, you can cancel anytime from the Subscription tab in your account settings on the Perlego website. Your subscription will stay active until the end of your current billing period. Learn how to cancel your subscription
No, books cannot be downloaded as external files, such as PDFs, for use outside of Perlego. However, you can download books within the Perlego app for offline reading on mobile or tablet. Learn how to download books offline
Perlego offers two plans: Essential and Complete
- Essential is ideal for learners and professionals who enjoy exploring a wide range of subjects. Access the Essential Library with 800,000+ trusted titles and best-sellers across business, personal growth, and the humanities. Includes unlimited reading time and Standard Read Aloud voice.
- Complete: Perfect for advanced learners and researchers needing full, unrestricted access. Unlock 1.5M+ books across hundreds of subjects, including academic and specialized titles. The Complete Plan also includes advanced features like Premium Read Aloud and Research Assistant.
We are an online textbook subscription service, where you can get access to an entire online library for less than the price of a single book per month. With over 1.5 million books across 990+ topics, we’ve got you covered! Learn about our mission
Look out for the read-aloud symbol on your next book to see if you can listen to it. The read-aloud tool reads text aloud for you, highlighting the text as it is being read. You can pause it, speed it up and slow it down. Learn more about Read Aloud
Yes! You can use the Perlego app on both iOS and Android devices to read anytime, anywhere — even offline. Perfect for commutes or when you’re on the go.
Please note we cannot support devices running on iOS 13 and Android 7 or earlier. Learn more about using the app
Please note we cannot support devices running on iOS 13 and Android 7 or earlier. Learn more about using the app
Yes, you can access Photographing Children in Natural Light by Bella West in PDF and/or ePUB format, as well as other popular books in Arte & Fotografía. We have over 1.5 million books available in our catalogue for you to explore.