Advanced Fashion Drawing is a practical book showing not only how to draw the figure but also how to illustrate it in today's fashion and lifestyle market.
Designed specifically for those interested in illustrating fashion and lifestyle commercially, Bil Donovan demonstrates how to create an illustration with a sense of fashion, rather than one that concentrates solely on the fashion figure.
A series of demonstrations and exercises help the advanced illustration student hone their skills and increase their level of draughtsmanship, while establishing their own personal style.
- 192 pages
- English
- ePUB (mobile friendly)
- Available on iOS & Android
eBook - ePub
About this book
Trusted by 375,005 students
Access to over 1.5 million titles for a fair monthly price.
Study more efficiently using our study tools.
Information
Topic
DesignSubtopic
Art GeneralChapter One
Line
A line is a line is a line. In the act of drawing, perhaps no other component or factor is as valuable in shaping and communicating depth, life, energy, and personality as a line.
A line can be rigid or fluid. It can have weight and presence or be delicate and seem to float translucently beneath the surface of the paper. It can be quick or studious, continuous, rhythmic, or aloof. Line can be all or a combination of these characteristics.
The personality of a line can be used to define leather or chiffon, create a texture to mimic reptile goods, capture the movement in a skirt, or with one stroke illustrate the arch of an eyebrow.
We will explore the personality of line in Chapter 4. Here we will begin with the basic contour line. Integrity of line will be examined through a balancing act; exercises incorporating straight, curved, and opposition of line will be included to allow the student to acquire a basic foundation for seeing and communicating the figure.
The Contour Line
The contour line creates a solid outline of the image; it is very different to a rapidly executed sketch. It will be used to discover and realize the silhouette of the figure.
Integrity of Line
There are numerous ways to observe and draw the figure. The method applied in this book uses a balancing method. In this method you will draw the figure in stages, starting from the left side, then moving to the right, and then back to the left, and so on down the figure using various points on the model to anchor your line. This exercise is most successful if done very slowly, maintaining the integrity of the line, not allowing one side of the drawing to extend too far below the other, much like the balancing movement of a seesaw. It is important to balance the length of line from one side of the figure to the other, allowing yourself time to observe distance, proportions, and the angles of the figure.
1.1 The Balancing Act
Preparation
For this exercise, the following supplies are necessary:
One pad of 18 x 24in (A2) white all-purpose paper or comparable
Charcoal pencils—hard to medium
Kneaded eraser
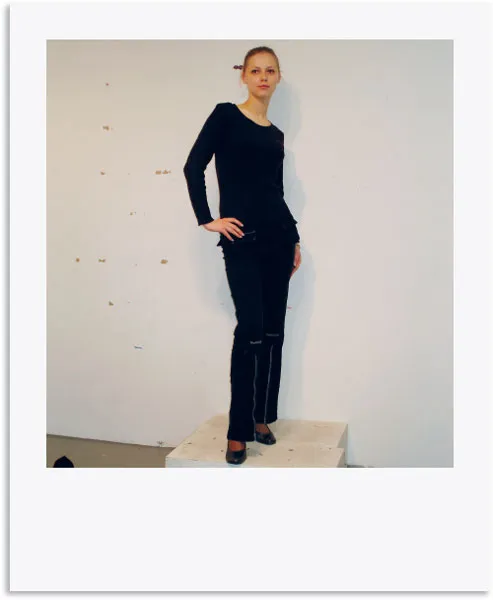
Ideally, this lesson should be done with a live model. Although the same results can be achieved with the use of a photo, it is to your benefit to accustom yourself to drawing from life rather than photos. Drawing from life is more challenging and is a proven method of training your eye to communicate three-dimensional form in a drawing. Photos are usually distorted, so a drawing from a photo of a fashion model will seem squat and out of proportion.
Ask a friend, acquaintance, or family member to pose for a series of positions. If this is not an option, you could use any bottle that has some unusual curved and straight lines in its shape, such as a wine bottle or perfume decanter, an accessory such as a shoe, a pair of sunglasses, or a handbag—and of course, there is always the option of drawing yourself in a mirror.
To prepare, you will need the supplies listed and a surface to work upon. The live model or the selected photo should be simple in dress, pose, and nature. If a photo is your only option then this reference should be posted on a surface directly in front of you rather than placed beside the drawing pad. This will allow you to observe from a distance and mimic the idea of a live model who would be posing in a similar position in relation to your drawing surface.
We begin the initial drawing using a charcoal pencil on a pad of 18 x 24in (A2) all-purpose paper that has been turned horizontally.
Note:
It is important with each drawing of the figure that you make while carrying out the exercises in this book that you place the head at the top of the horizontal paper. This allows you to begin to get a sense of proportion. The consistency of this placement will encourage you to think about size and how to fit the whole fi gure into the space on the paper.
1.1 The Balancing Act
Directions
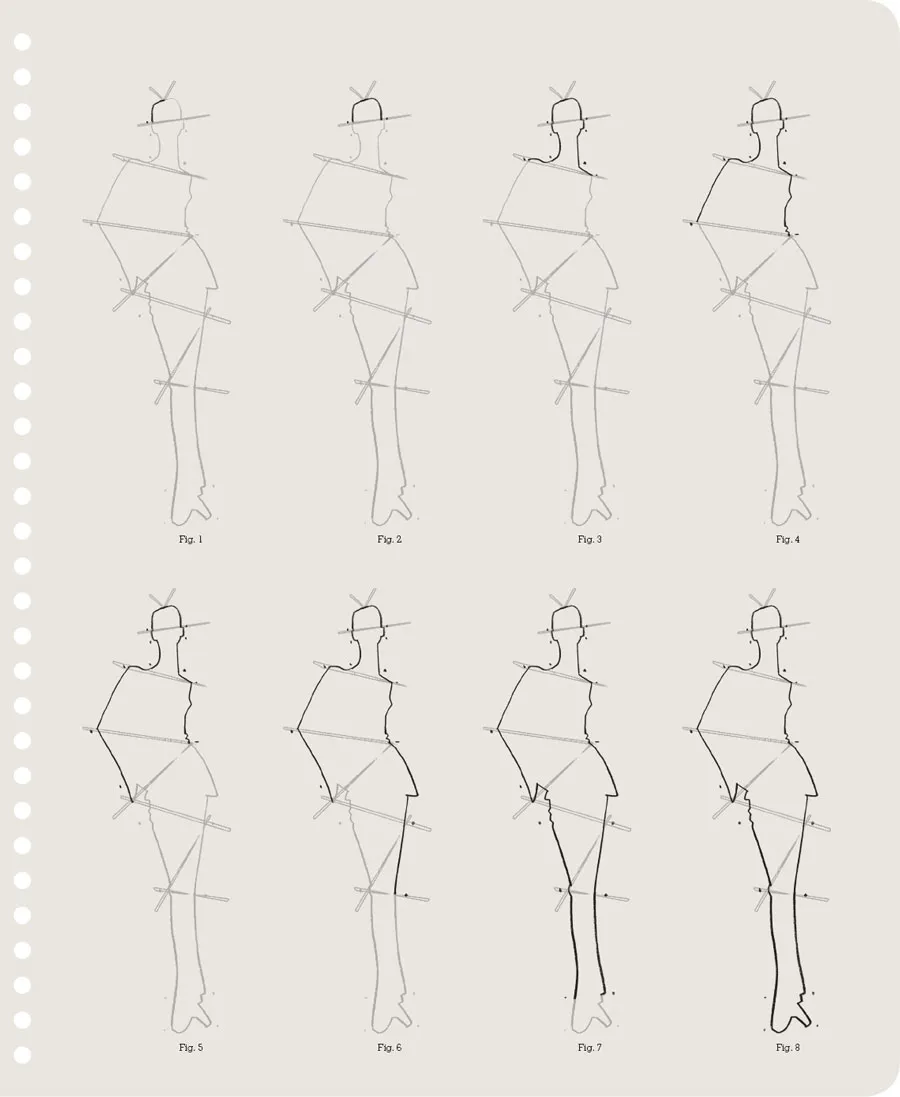
One technique that will be used throughout most of the chapters in this book is that of drawing from the top of the model’s head down to the feet. This is a technique where the eye slowly follows the outside shape of the form and communicates that observation with a contour line. This is an important tool in developing a good sense of draftsmanship.
Step One
Beginning from the center point of the head, slowly observe the slant of the head, noting the slant of the diagonal. Begin to draw a strong contour line from the center point to the left side of the head, anchoring that line to the top of the ear (see Figure 1).
Step Two
Once accomplished, return to the top of the center point of the head and begin to follow the shape of the right side of the head and anchor this line to the top of the right ear, observing as you continue which ear is higher or lower than the other (see Figure 2).
Step Three
Return to the left side and continue from the ear to the base of the neck or shoulders. Then balance this line on the other side, comparing which side of the neck or shoulder is higher and which is lower (see Figure 3).
Step Four
Once the shoulder lines are balanced, follow through to an area that is distinctly higher or angular in nature, such as the elbow or waist or top of the hip, again comparing which of these anchor points is higher or lower than the same point of the body on the opposite side (see Figure 4).
Follow this method, continuing to allow gravity to drag your line down the figure and constantly making pit stops to observe, compare, and make adjustments, until you have drawn the contour shape of the complete figure (see Figures 5–8).

Robert Risko’s image of Madonna Dancing with Derby in Green incorporates a mixture of straight lines complemented by curved lines.
1.2 Straight Line
Imagine that you are given the task of communicating the figure in a language of strictly straight lines. The terms “curve,” “round,” and “fluid” do not exist in this language. Now entertain the idea that you will draw this figure with your charcoal as if you were using a ruler to accomplish the task. If you did use a ruler, this challenge would soon become very tedious. Having to draw every fold in the garment or every loose hair on the head would eventually cause you to try to limit the number of lines you used, forcing you to become more selective. Use this idea of selectivity to accomplish this drawing. The aim is to make yourself focus and find the line that best communicates the image.
Preparation
For this exercise, the following supplies are necessary:
One pad of 18 x 24in (A2) white all-purpose paper or comparable
Charcoal pencils—hard to medium
Kneaded eraser
The pose used for this exercise has negative space visible between the arms, which, unlike the solid shape created by the balancing-act outline, will be represented in the final drawing.
In this and the following two exercises, you will be drawing a single figure using a straight line, a curved line, and a combination of the two. The purpose of these exercises will be more apparent if you see the resulting three figures side-by-side on the paper, so start this first straight-line drawing on the left-hand side of an 18 x 24in (A2) piece of paper, pinned horizontally to your drawing surface. Position the top of the head of this figure near the upper left-hand side of the pad and close to the edge...
Table of contents
- Cover
- Title Page
- Copyright
- Contents
- Preface and Acknowledgments
- Introduction
- Chapter One: Line
- Chapter Two: Elongating the Figure using Verticals, Horizontals, and Diagonals
- Chapter Three: Beginning a Vocabulary of Shapes
- Chapter Four: Line Quality
- Chapter Five: Composing the Figure within an Environment
- Chapter Six: Media
- Chapter Seven: The Computer and Illustration
- Chapter Eight: Fabric, Prints, and Texture
- Chapter Nine: Finding Your Voice
- Chapter Ten: Breaking the Rules
- Glossary
- Picture Credits
- Further Reading
- Index
Frequently asked questions
Yes, you can cancel anytime from the Subscription tab in your account settings on the Perlego website. Your subscription will stay active until the end of your current billing period. Learn how to cancel your subscription
No, books cannot be downloaded as external files, such as PDFs, for use outside of Perlego. However, you can download books within the Perlego app for offline reading on mobile or tablet. Learn how to download books offline
Perlego offers two plans: Essential and Complete
- Essential is ideal for learners and professionals who enjoy exploring a wide range of subjects. Access the Essential Library with 800,000+ trusted titles and best-sellers across business, personal growth, and the humanities. Includes unlimited reading time and Standard Read Aloud voice.
- Complete: Perfect for advanced learners and researchers needing full, unrestricted access. Unlock 1.5M+ books across hundreds of subjects, including academic and specialized titles. The Complete Plan also includes advanced features like Premium Read Aloud and Research Assistant.
We are an online textbook subscription service, where you can get access to an entire online library for less than the price of a single book per month. With over 1.5 million books across 990+ topics, we’ve got you covered! Learn about our mission
Look out for the read-aloud symbol on your next book to see if you can listen to it. The read-aloud tool reads text aloud for you, highlighting the text as it is being read. You can pause it, speed it up and slow it down. Learn more about Read Aloud
Yes! You can use the Perlego app on both iOS and Android devices to read anytime, anywhere — even offline. Perfect for commutes or when you’re on the go.
Please note we cannot support devices running on iOS 13 and Android 7 or earlier. Learn more about using the app
Please note we cannot support devices running on iOS 13 and Android 7 or earlier. Learn more about using the app
Yes, you can access Advanced Fashion Drawing by Bil Donovan,William Bil Donovan in PDF and/or ePUB format, as well as other popular books in Design & Art General. We have over 1.5 million books available in our catalogue for you to explore.