Adobe Premiere Pro CC For Dummies
eBook - ePub

Adobe Premiere Pro CC For Dummies

John Carucci

Share book
  1. English
  2. ePUB (mobile friendly)
  3. Available on iOS & Android
eBook - ePub

Adobe Premiere Pro CC For Dummies

John Carucci

Book details
Book preview
Table of contents
Citations

About This Book

When the filming stops, the real video production work begins

Ever wonder how your favorite video creators regularly put out such slick content? They're probably using Adobe Premiere Pro CC, a go-to video production app for both professional and amateur video creators.

Adobe Premiere Pro CC For Dummies walks you through each step of editing and producing slick and stylish videos that stand up to what the pros post. From transferring your digital movie files from your camera or phone to your computer all the way to uploading your latest creation to YouTube or the web, this book has the info you need to bring your ideas to life.

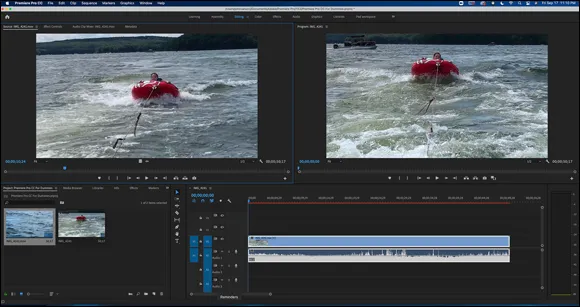
If you're new to video production, you can begin at the beginning with the handbook's user-friendly guide to the basics of setting clips on the timeline and making them flow seamlessly. Or, if you've already got a few videos under your belt, you can skip right to the more advanced material, like special effects and handy tricks of the trade.

You'll also find:

  • Instruction on joining video clips into a continuous final product, complete with transitions, special effects, and more
  • Advice on improving sound, getting rid of color errors, and customizing the look of your videos with filters and aftereffects
  • Straightforward guides to adding voiceovers and soundtracks to your videos

So, if you're new to Adobe Premiere Pro CC—or digital video editing in general— Adobe Premiere Pro CC For Dummies is the first and last resource you'll need to start editing like a pro.

Frequently asked questions

How do I cancel my subscription?
Simply head over to the account section in settings and click on “Cancel Subscription” - it’s as simple as that. After you cancel, your membership will stay active for the remainder of the time you’ve paid for. Learn more here.
Can/how do I download books?
At the moment all of our mobile-responsive ePub books are available to download via the app. Most of our PDFs are also available to download and we're working on making the final remaining ones downloadable now. Learn more here.
What is the difference between the pricing plans?
Both plans give you full access to the library and all of Perlego’s features. The only differences are the price and subscription period: With the annual plan you’ll save around 30% compared to 12 months on the monthly plan.
What is Perlego?
We are an online textbook subscription service, where you can get access to an entire online library for less than the price of a single book per month. With over 1 million books across 1000+ topics, we’ve got you covered! Learn more here.
Do you support text-to-speech?
Look out for the read-aloud symbol on your next book to see if you can listen to it. The read-aloud tool reads text aloud for you, highlighting the text as it is being read. You can pause it, speed it up and slow it down. Learn more here.
Is Adobe Premiere Pro CC For Dummies an online PDF/ePUB?
Yes, you can access Adobe Premiere Pro CC For Dummies by John Carucci in PDF and/or ePUB format, as well as other popular books in Informatik & Digitale Medien. We have over one million books available in our catalogue for you to explore.

Information

Publisher
For Dummies
Year
2022
ISBN
9781119867227
Edition
1
Part 1

Getting Familiar with the Adobe Premiere Pro Universe

IN THIS PART …
Learn how you can use Premiere Pro for video editing projects.
Become familiar with the Premiere Pro workspace.
Learn about hardware requirements.
Identify what accessories you’ll need to capture video.
Learn how to tweak settings for you needs and customize windows.
Chapter 1

Perusing the Premiere Pro Landscape

IN THIS CHAPTER
Bullet
Getting to know the workspace
Bullet
Introducing the panels
Bullet
Describing each tool
Bullet
Briefing on the libraries
Way back in the early 20th century, the only way to edit a videotape package was to put it together in linear order. You know, the first scene first, then the second, blah, blah, blah. Nowadays, Adobe Premiere Pro lets you randomly drag clips (parts of a movie file) around and put them in any order you like. This is known as nonlinear editing. The really cool thing is that you can shuffle clips around as many times as you like until you’re happy with the results.
As with any software, learning how to navigate the Premiere Pro features is extremely important. This chapter introduces you to the Premiere Pro workspace, including the panels, tools, and libraries.
In the workspace, various configurations of panels allow you to control various aspects of making a movie: audio mixing, controlling effects, and managing project assets. One of the key panels here is the timeline, which is the place you arrange, and often rearrange your clips to make your movie.

Understanding What Premiere Pro Can Do

Premiere Pro brings the creative power of post-production moviemaking from the editing suite to the convenience of your computer screen. Tape-to-tape editing, film splicing, and workprint are a few of the antiquated terms now in the rear-view mirror thanks to nonlinear editing.
That’s quite a contrast from the way things used to be. For years, putting a movie together involved a series of steps that had to occur in sequential order. Imagine splicing pieces of film from different reels and putting them together and then realizing that you missed an entire scene. That’s not a good feeling, and you get little forgiveness for skipping parts of the order.
Premiere simplifies the process of telling stories visually by making it more affordable, more flexible, and allowing you to change your mind and experiment with placing clips in the timeline without penalty. Change your mind and see how it plays out without any worry. You also don’t get your fingers sticky with film cement, and you won’t get cut with a razor blade. While the software is intuitive, it’s important to have a lay of the land to fully understand its potential.
Premiere Pro lets you to place elements in a timeline, a long panel that appears at the bottom of the screen where you add video clips. The order in which you add the clips doesn’t matter; you can drop in the last scene first, and the first scene later on, or in any other combination. It still plays out in linear fashion, regardless of when you add the clips. Yet, while Premiere Pro is intuitive, it’s important to have a lay of the land to fully understand what the software can do.

Dissecting the Workspace

Premiere Pro makes you feel like a video-editing superhero whose special powers transform your movie project from appalling to appealing. Not quite as cool as x-ray vision or web-slinging, but producing effective, clean edits is a power in its own way.
Remember
Before you can create an award-winning masterpiece, you need to get familiar with the workspace. C’mon, even Batman had to know his way around Gotham City, right? So think of yourself as Batman (your choice on which actor…okay, Christian Bale, no wait, Robert Pattison, or go old school with Michael Keaton or Adam West). No matter. You should learn your way around Premiere Pro so when you see the Bat-Signal — or most likely a text message on your iPhone — to edit an important package, you intimately know the Premiere Pro tools and functions that are at your disposal. The following sections give you an overview of what you see when you open Premiere Pro.

Breaking down the interface

The Premiere Pro interface looks overwhelming at first glance because so many choices make it hard to focus on anything specific. Yeah, there’s a ton of great stuff; it’s just a matter of focusing on what’s necessary. I’ll address the points of contention, taking it from the top — of the screen, that is, where you’ll find nine menu headers whose deep nesting make it feel like “bursting” nest syndrome. Consider the overwhelming screen real estate, shown in Figure 1-1.
Snapshot of Premiere Pro showing the editing workspace
FIGURE 1-1: Premiere Pro showing the editing workspace.
While complex, the workspace actually makes sense. You just need to look at it as a series of individual components that work together as a single entity. The Project panel (lower left in Figure 1-1) shows the ingested movie files, and the timeline (lower right in Figure 1-1) has an edited clip. On top, the Source Monitor panel shows clip content while the Program Monitor panel plays out clips on the timeline.

Ingesting and Editing

Remember
Ingesting refers to transferring your video content from the camera of card into Premiere Pro. Editing is the means of putting that ingested content into some cohesive order.
Remember
The screen is far less scary when viewing the workspace as individual sections, or panels, each with its own special function. Although the panels have specific functions, they all work together. For example, the Projects panel stores your assets and sequences that you could drag into the timeline and then view on the Program Monitor panel before deciding to color-correct the video by making a selection in the Effects panel and fine-tuning it in the Effect Controls panel.

Understanding the panels

The panels in Premiere Pro are stylish, functional, and easy to navigate once you get the hang of working with them. You can click on one panel and interact that action with another panel. So, you can be in the Projects panel, select a clip, set its In and Out points, and drag the clip into the timeline. Once there, you can click on the clip, activate the Audio Meters, and make adjustments to the sound. Need to be more focused? Then for precise work, fill the screen with a single panel by highlighting it and pressing the accent key.
While each panel is a stand-alone, they all work together to create your video. It isn’t necessary to understand every panel to do great work. The more you know, the more you can do, but you can easily get started by simply learning how a few panels work.
Tip
When you click in a particular panel, the area becomes activated, as indicated by a blue borderline. This allows you to perform whatever task that panel offers. For example, when selecting the Timeline panel, you can move clips around, change their length, or delete them altogether.

Getting around the workspace

Unlike a lot of software that folks use (I’m looking at you, Office 365), you can customize where different elements of the Premiere Pro interface live. Think of the interface of what you see on the screen, and the workspace, the particular way they are arranged.
Timeline on the bottom, monitors on top enjoys popularity; but so does the reverse. And even then, some users tuck the timeline to get a better view of the Project panel. Other users like a deep timeline to see multiple audio and video channels. Still others keep it compact so they have more monitor real estate. It’s all about freedom of choice, and Premiere Pro makes it like a buffet where you get to choose what...

Table of contents