For thirty years, Roy Underhill’s PBS program, The Woodwright’s Shop, has brought classic hand-tool craftsmanship to viewers across America. Now, in his seventh book, Roy shows how to engage the mysteries of the splitting wedge and the cutting edge to shape wood from forest to furniture.
Beginning with the standing tree, each chapter of The Woodwright’s Guide explores one of nine trades of woodcraft: faller, countryman and cleaver, hewer, log-builder, sawyer, carpenter, joiner, turner, and cabinetmaker. Each trade brings new tools and techniques; each trade uses a different character of material; but all are united by the grain in the wood and the enduring mastery of muscle and steel.
Hundreds of detailed drawings by Eleanor Underhill (Roy’s daughter) illustrate the hand tools and processes for shaping and joining wood. A special concluding section contains detailed plans for making your own foot-powered lathes, workbenches, shaving horses, and taps and dies for wooden screws.
The Woodwright’s Guide is informed by a lifetime of experience and study. A former master craftsman at Colonial Williamsburg, Roy has inspired millions to “just say no to power tools” through his continuing work as a historian, craftsman, activist, and teacher. In The Woodwright’s Guide, he takes readers on a personal journey through a legacy of off-the-grid, self-reliant craftsmanship. It’s a toolbox filled with insight and technique as well as wisdom and confidence for the artisan in all of us.

- 192 pages
- English
- ePUB (mobile friendly)
- Available on iOS & Android
eBook - ePub
About this book
Trusted by 375,005 students
Access to over 1.5 million titles for a fair monthly price.
Study more efficiently using our study tools.
Information
1
Faller
We experimented, as young boys will, and we felled one large hickory with the saw instead of the axe, and barely escaped with our lives when it suddenly split near the bark, and the butt shot out between us. I preferred buckeye and sycamore for my own axe; they were of no use when felled, but they chopped delightfully.
— William Dean Howells, My Year ina Log Cabin, 1893
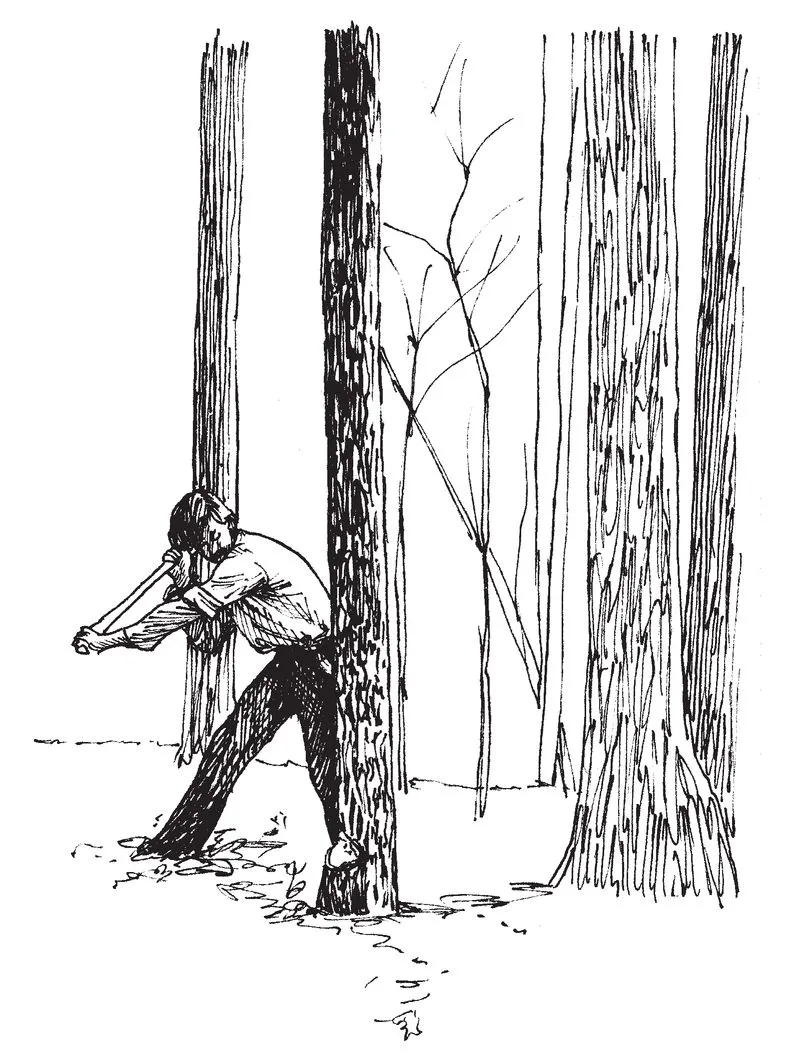
It’s just a piece of steel on the end of a stick, but let’s see what your axe has to say. Hold the end of the helve in one hand and, with the other hand held close to the axe head, carry it up over your shoulder. Start the swing, sliding your top hand down to meet the other. The springy hickory helve stores part of the energy from the start of the swing and then releases it near the end of the swing. Just as the end of a whip breaks the sound barrier, the axe head accelerates over the arc of the swing to the instant of impact with the wood. Right now the wood still belongs to the tree. Here’s where it all begins.
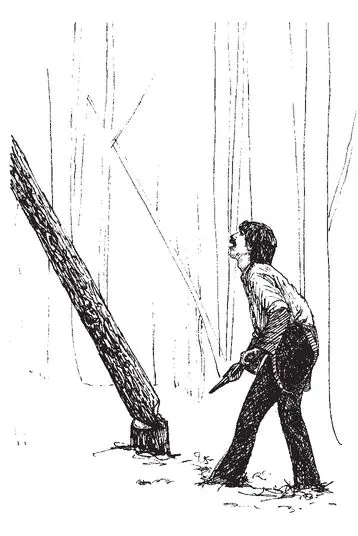
You’ll first cut the notch on the side of the tree facing the direction in which you want it to fall — but don’t cut yet. This is dangerous. First, see if the tree is leaning or heavier on one side. If the tree really leans, consider dropping it at right angles to the lean. Dropping in the same direction as a severe lean can cause the tree to split and go over before you’re ready. Guy ropes placed high in the tree can encourage it to fall where you want but also add the dangers of climbing and of ropes under high tension.
Find a clear path for the tree to hinge to the ground. Branches, dead or living, can break free and spear you. If the tree you’re felling hangs up in another tree, you may have to drop them both — never a safe or clean process. Consider the landing area. A hump or hollow can crack the log when it lands. A tree landing on an upward slope is liable to jump downhill. Wherever it lands, figure out how you’re going to get the logs out.
Take nothing for granted. Get everyone and everything out of the way. I’ve dropped many trees, but the last one landed right on my mailbox, demolishing it. Amusing to the neighbors, but not my intention. You can determine where the top of the tree should end up by stepping back from the tree at right angles to the direction of the fall. Hold your axe handle in your extended arm and sight the top and bottom of the tree relative to it. Now, keeping the end of the handle aligned with the base of the tree, pivot the axe handle in the direction of the fall. It projects a scale model of the falling tree onto the landscape.
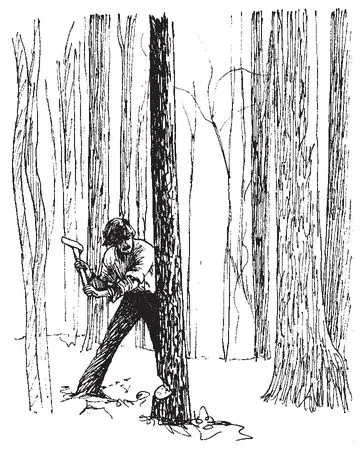
Now we’re ready to chop for real. Just for now, make the first swing straight in at the tree. The edge of the axe makes contact from the center outward, easing the shock of impact. The middle of the curve of the sharp bit of the axe intersects the bundled fibers of the tree at right angles to their length. The curve of the bit also makes all but the center of the bit cut with a shear and allows greater penetration for the leading edge. The sharp blade has struck the tree with tremendous force — but without much result.
The steel edge severed the fibers, pushing them aside, but the pressure of the compressed wood on either side of the cut quickly stopped the progress of the blade. With this straight-in blow, the wedging action halted the edge action. Not much happened, but the next strike will not be like the first.
The next stroke comes in higher on the tree than the first and at a downward-sloping angle. Gravity adds its force to the swing, but, more important, now the wedge action of the axe is your helper. The edge severs the fibers, and as the compression builds up on the cheeks of the blade, the wood splits apart — the chip moving out on the face of least resistance. The split continues downward until it reaches the first cut. Now, the chip of wood moves outward and relieves the pressure on the cheeks. The edge continues far deeper into the wood before its momentum is spent. The converging blows and the splitting out of chips between them fell the tree. Little strokes fell great oaks.
When you need a break, stop to study one of the chips. You’ll see that the area showing split marks is far greater than that cut by the edge. You’ll also feel the water in the tree. A living tree is about half water by weight. This water fills the cells, swelling them, making the wood softer and easier to cut and split than when it dries out. All woodworking takes place on a continuum of wood moving from wet to dry. Right now, we want the wood green and easy to cut and split. Later, we’ll go to great lengths to prevent the wood from splitting. We’ll move from the risk of the axe to the certainty of the plane.
Back to work. The edge of the axe cuts in, and the cheeks split chips away, creating an ever-deepening notch. The notch is relatively flat bottomed, with a top slope of about 45 degrees. The notch widens as it deepens, until it reaches just beyond halfway through the tree. The tree is now unsupported on that side and begins the slightest lean in that direction.
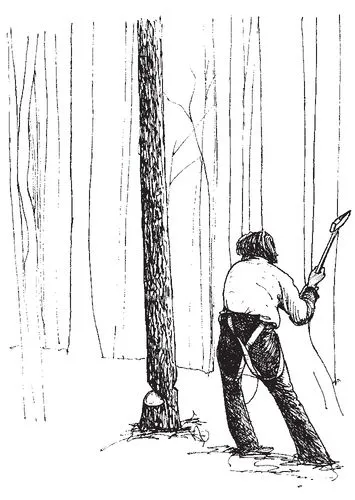
Now to the back cut. It’s good to have someone with you. First, for safety. Second, your companion can pull the other end of the saw for the cut that drops the tree. You can drop the tree with another axe notch, but the saw cuts faster and leaves less torn fiber in the hinge.
With one of you on each end of the saw, set the teeth a few inches above the level of the axe cut and give it a start. You may find it easier to support the middle of the saw with your hand or toe until you get a kerf going. Say “to me,” or something of the sort, so your comrade will know that you’re about to pull.
You’re always advised to pull a crosscut saw, never push it. Pushing a long “misery whip” is like pushing a rope, causing it to bend in the kerf and drag. Still, you should feed the saw and your arms back to your partner on the return stroke. Don’t bear hard into the cut, but rather pull the saw across the surface and “let the saw do the work.” Right.
No matter how well the saw is cutting, the dreaded pinch may await you as you saw through the still-standing tree. A slight ill breeze and the tree can lean back the opposite way from where you intended. You can drive an iron wedge into the kerf behind the saw, but this is a better preventive than a cure. Until the breeze turns in your favor, all the wedges in the world aren’t going to tip that tree back over. You simply wait.
The idea of the front notch and back cut is to hinge the tree down — the intact wood between the two cuts holds together until it finally snaps like a popsicle stick. As you get closer to the middle, the tree will start to give signs of what it’s going to do — nodding in the direction where it wants to go.
Get ready now. Both of you need a clear path to get away to the sides, and never to the back, where the butt might shoot. Cut as fast as you can toward the end. You want this hinge to be just thick enough to direct the fall but not slow it. You need the unimpeded velocity of the fall to drive the top of the tree through the surrounding branches.
It’s going over now. Branches cracking, leaves falling, the tree twists and quivers on its way down. It lands and rolls. The surrounding trees sway. The final few leaves are still drifting down as you walk back, glancing up at the canopy for still-hanging snags, blinking at the sunlight you’ve let into the forest, not quite ready to look squarely at your fallen tree.
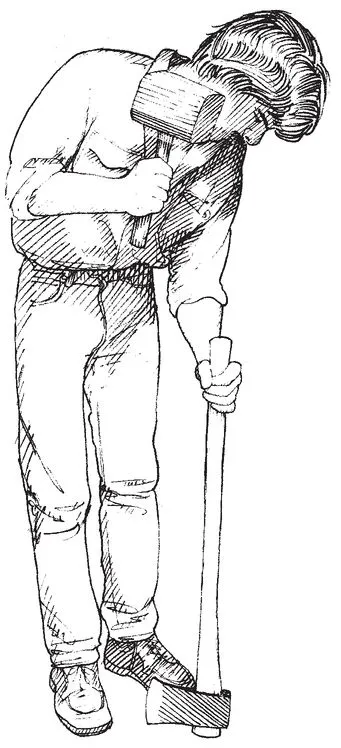
Drive the helve into the eye as inertia holds the head.
Helves
How’s your axe? If the head has been creeping up (about to fly off the handle), you may just need to drive the wedges a bit more — or it may be time for a new helve. If enough meat of the hickory helve remains, you can drive the helve farther through the head to freshen the wedged end. You might need to shave away some of the shoulder below the head, paying close attention to the hang of the axe. The bit of the axe should be in line with the helve and slightly “closed” — tilted toward the tail end of the helve to keep the bit at right angles to the arc of the swing.
New helve or old, drive it through the axe head using inertia as your anvil. Hold the axe in one hand with the head hanging down and smack the butt end of the helve with a mallet. Inertial mass will keep the heavy axe head still as the helve drives in.
If you are driving an existing helve deeper into a head, you can remove or reset the old wedges by carefully sawing away any protruding handle. This may expose enough of a wedge so that you can tap it from side to side and work it free, or drive it deeper. If you need a larger iron wedge, a smith can easily make one or you can likely find one at a good hardware store.
You also have to remove the iron wedge if you need to replace the central wooden wedge. The wooden wedge must be hard enough to resist crushing, but not so hard that it won’t conform and grip in the slot sawn in the end of the helve. Glue on the wedge helps it grip, and the steel wedge driven in diagonally across it locks it in place. A softer wooden wedge may take the steel wedge with less chance of splitting, but I still use hickory, split from the same billet used to make the helve.
Just as the wood splits in one direction and not in the other, it also swells and shrinks unevenly. Like age on a man, water makes wood softer, heavier, and fatter — but not taller. Tightly fit an axe head with a handle made out of unseasoned wood and check it six months later. It will still measure the same length but will knock around in the axe head like the clapper in a bell. Ideally, then, you’ll keep a small stack of hickory, ash, locust, or maple billets seasoning in your loft — drying for years before you need them for handles and helves.
Once dry, wood remains hygroscopic, taking in or releasing water in balance with its environment. Henry David Thoreau may have stuck the head of his borrowed axe in Walden Pond to swell and tighten the helve...
Table of contents
- Also by Roy Underhill
- Title Page
- Copyright Page
- Table of Contents
- Dedication
- Introduction
- 1 - Faller
- 2 - Cleaver and Countryman
- 3 - Hewer
- 4 - Log Builder
- 5 - Sawyer
- 6 - Frame Carpenter
- 7 - Joiner
- 8 - Turner
- 9 - Cabinetmaker
- Conclusion
- Appendix
- Bibliography
- Acknowledgements
Frequently asked questions
Yes, you can cancel anytime from the Subscription tab in your account settings on the Perlego website. Your subscription will stay active until the end of your current billing period. Learn how to cancel your subscription
No, books cannot be downloaded as external files, such as PDFs, for use outside of Perlego. However, you can download books within the Perlego app for offline reading on mobile or tablet. Learn how to download books offline
Perlego offers two plans: Essential and Complete
- Essential is ideal for learners and professionals who enjoy exploring a wide range of subjects. Access the Essential Library with 800,000+ trusted titles and best-sellers across business, personal growth, and the humanities. Includes unlimited reading time and Standard Read Aloud voice.
- Complete: Perfect for advanced learners and researchers needing full, unrestricted access. Unlock 1.5M+ books across hundreds of subjects, including academic and specialized titles. The Complete Plan also includes advanced features like Premium Read Aloud and Research Assistant.
We are an online textbook subscription service, where you can get access to an entire online library for less than the price of a single book per month. With over 1.5 million books across 990+ topics, we’ve got you covered! Learn about our mission
Look out for the read-aloud symbol on your next book to see if you can listen to it. The read-aloud tool reads text aloud for you, highlighting the text as it is being read. You can pause it, speed it up and slow it down. Learn more about Read Aloud
Yes! You can use the Perlego app on both iOS and Android devices to read anytime, anywhere — even offline. Perfect for commutes or when you’re on the go.
Please note we cannot support devices running on iOS 13 and Android 7 or earlier. Learn more about using the app
Please note we cannot support devices running on iOS 13 and Android 7 or earlier. Learn more about using the app
Yes, you can access The Woodwright’s Guide by Roy Underhill,Eleanor Underhill in PDF and/or ePUB format, as well as other popular books in Tecnología e ingeniería & Oficios técnicos y manufactureros. We have over 1.5 million books available in our catalogue for you to explore.