Leverage the WiFi chip to build exciting Quadcopters
Key Features
- Learn to create a fully functional Drone with Arduino and ESP8266 and their modified versions of hardware.
- Enhance your drone's functionalities by implementing smart features.
- A project-based guide that will get you developing next-level drones to help you monitor a particular area with mobile-like devices.
Book Description
With the use of drones, DIY projects have taken off. Programmers are rapidly moving from traditional application programming to developing exciting multi-utility projects.
This book will teach you to build industry-level drones with Arduino and ESP8266 and their modified versions of hardware.
With this book, you will explore techniques for leveraging the tiny WiFi chip to enhance your drone and control it over a mobile phone. This book will start with teaching you how to solve problems while building your own WiFi controlled Arduino based drone. You will also learn how to build a Quadcopter and a mission critical drone. Moving on you will learn how to build a prototype drone that will be given a mission to complete which it will do it itself. You will also learn to build various exciting projects such as gliding and racing drones. By the end of this book you will learn how to maintain and troubleshoot your drone.
By the end of this book, you will have learned to build drones using ESP8266 and Arduino and leverage their functionalities to the fullest.
What you will learn
- Includes a number of projects that utilize different ESP8266 and Arduino capabilities, while interfacing with external hardware
- Covers electrical engineering and programming concepts, interfacing with the World through analog and digital sensors, communicating with a computer and other devices, and internet connectivity
- Control and fly your quadcopter, taking into account weather conditions
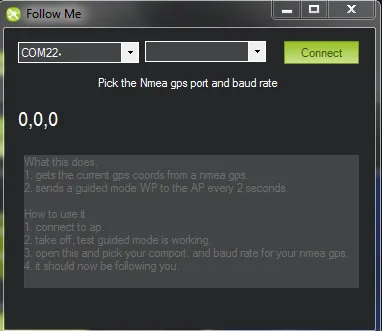
- Build a drone that can follow the user wherever he/she goes
- Build a mission-control drone and learn how to use it effectively
- Maintain your vehicle as much as possible and repair it whenever required
Who this book is for
If you are a programmer or a DIY enthusiast and keen to create a fully functional drone with Arduino and ESP8266, then this book is for you. Basic skills in electronics and programming would be beneficial. This book is not for the beginners as it includes lots of ideas not detailed how you can do that. If you are a beginner, then you might get lost here. The prerequisites of the book include a good knowledge of Arduino, electronics, programming in C or C++ and lots of interest in creating things out of nothing.