A recipe-based guide to programming your Raspberry Pi 3 using PythonAbout This Book: • Leverage the power of Raspberry Pi 3 using Python programming• Create 3D games, build neural network modules, and interface with your own circuits• Packed with clear, step-by-step recipes to walk you through the capabilities of Raspberry PiWho This Book Is For: This book is for anyone who wants to master the skills of Python programming using Raspberry Pi 3. Prior knowledge of Python will be an added advantage.What You Will Learn: • Learn to set up and run Raspberry Pi 3• Build text classifiers and perform automation using Python• Predict sentiments in words and create games and graphics• Detect edges and contours in images• Build human face detection and recognition system• Use Python to drive hardware• Sense and display real-world data• Build a neural network module for optical character recognition• Build movie recommendations systemIn Detail: Raspberry Pi 3 Cookbook for Python Programmers – Third Edition begins by guiding you through setting up Raspberry Pi 3, performing tasks using Python 3.6, and introducing the first steps to interface with electronics. As you work through each chapter, you will build your skills and apply them as you progress. You will learn how to build text classifiers, predict sentiments in words, develop applications using the popular Tkinter library, and create games by controlling graphics on your screen. You will harness the power of a built in graphics processor using Pi3D to generate your own high-quality 3D graphics and environments.You will understand how to connect Raspberry Pi's hardware pins directly to control electronics, from switching on LEDs and responding to push buttons to driving motors and servos. Get to grips with monitoring sensors to gather real-life data, using it to control other devices, and viewing the results over the internet. You will apply what you have learned by creating your own Pi-Rover or Pi-Hexipod robots. You will also learn about sentiment analysis, face recognition techniques, and building neural network modules for optical character recognition.Finally, you will learn to build movie recommendations system on Raspberry Pi 3.Style and approach: Written in a cookbook style, this book contains a series of recipes on various topics. It is an easy-to-follow step-by-step guide with examples of feature integration suitable for any search application.
- 552 pages
- English
- ePUB (mobile friendly)
- Available on iOS & Android
eBook - ePub
Raspberry Pi 3 Cookbook for Python Programmers
About this book
Trusted by 375,005 students
Access to over 1.5 million titles for a fair monthly price.
Study more efficiently using our study tools.
Information
Building Robots
In this chapter, we will cover the following topics:
- Building a Rover-Pi robot with forward driving motors
- Using advanced motor control
- Building a six-legged Pi-Bug robot
- Controlling servos directly with ServoBlaster
- Avoiding objects and obstacles
- Getting a sense of direction
Introduction
A little computer with a "brain the size of a planet" (to quote Douglas Adams, the author of Hitchhiker's Guide to the Galaxy) would be perfect as the brain of your own robotic creation. In reality, the Raspberry Pi probably provides far more processing power than a little robot or rover needs; however, its small size, excellent connectivity, and fairly low-power requirements mean that it is ideally suited.
This chapter will focus on exploring the various ways we can combine motors or servos to produce robotic movement, use sensors to gather information, and allow our creation to act upon it.
Be sure to check out the Appendix, Hardware and Software List; it lists all of the items used in this chapter and the places you can obtain them from.
Building a Rover-Pi robot with forward driving motors
Creating robots does not need to be an expensive hobby. A small, rover-type robot can be constructed using household items for the chassis (the base everything is attached to), and a couple of small driving motors can be used to move it.
A Rover-Pi robot is a small, buggy-type robot that has two wheels and a skid or caster at the front to allow it to turn. One such robot is shown in the following image:

A home-built Rover-Pi robot
While it may not be in the same league as a Mars exploration rover, as you will see, there is plenty for you to experiment with.
You can also purchase one of many inexpensive robot kits that contain most of what you need in a single package (see the There's more... section at the end of this example).
Getting ready
The rover that we will build will need to contain the elements shown in the following diagram:
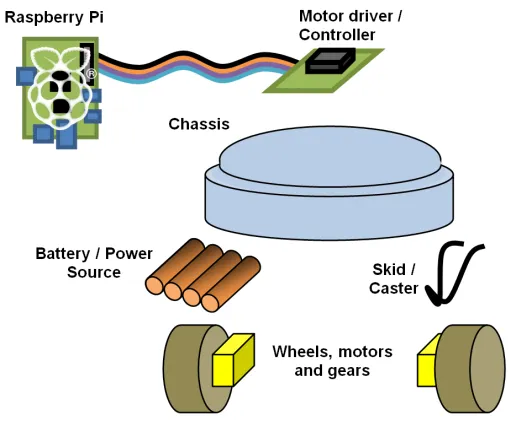
The separate parts of the Rover-Pi robot
The elements are discussed in detail as follows:
- Chassis: This example uses a modified, battery-operated push nightlight (although any suitable platform can be used). Remember that the larger and heavier your robot is, the more powerful the driving motors will need to be to move it. Alternatively, you can use one of the chassis kits listed in the There's more... section. A suitable push nightlight is shown in the following photo:

This push nightlight forms the basic chassis of a Rover-Pi robot
- Front skid or caster: This can be as simple as a large paper clip (76 mm/3 inches) bent into shape, or a small caster wheel. A skid works best when it is on a smooth surface, but it may get stuck on the carpet. A caster wheel works well on all surfaces, but sometimes, it can have problems turning.
- Wheels, motors, and gears: The wheel movement of the Rover-Pi robot is a combination of the motor, gears, and wheels. The gears are helpful, as they allow a fast-spinning motor to turn the wheels at a slower speed and more force (torque); this will allow for better control of our robot. A unit that combines the wheels, motors, and gears in a single unit is shown in the following photo:

These wheels, with built-in geared motors, are ideal for small rovers
- Battery/power source: The Rover-Pi robot will be powered using four AA batteries, fitted into the bay of the chassis. Alternatively, a standard battery holder can be used, or even a long wire connected to a suitable power supply. It is recommended that you power the motors from a supply independent from the Raspberry Pi. This will help to avoid a situation in which the Raspberry Pi suddenly loses power when driving the motors, which require a big jump in current to move. Alternatively, you can power the Raspberry Pi with the batteries using a 5V regulator. The following image shows a chassis with four AA batteries:

Four AA batteries provide a power source to drive the wheels
- Motor driver/controller: Motors will require a voltage and current greater than the GPIO can handle. Therefore, we will use a Darlington array module (which uses a ULN2003 chip). See the There's more... section at the end of this example for more details on how this particular module works. The following photo shows a Darlington array module:

This Darlington array module, available at http://www.dx.com, can be used to drive small motors
- Small cable ties or wire ties: This will allow us to attach items, such as a motor or a controller, to the chassis. The following photo shows the use of cable ties:

We use cable ties to secure the motors and wheels to the chassis
- The Raspberry Pi connection: The easiest setup is to attach the control wires to the Raspberry Pi using long cables, so that you can easily control your robot directly using an attached screen and keyboard. Later, you can consider mounting the Raspberry Pi on the robot and controlling it remotely (or even autonomously, if you include sensors and intelligence to make sense of them).
In this chapter, we will use the wiringpi2 Python library to control the GPIO; see Chapter 10, Sensing and Displaying Real-World Data, for details on how to install it using a Python package manager (pip).
How to do it...
Perform the following steps to create a small Rover-Pi robot:
- At the front of the chassis, you will need to mount the skid by bending the
paperclip/wire into a V shape. Attach the paperclip/wire to the front of the chassis by drilling small holes on either side, threading cable ties through the holes around the wire, and pulling tightly to secure. The fitted wire skid should look similar to the one shown in the following photo:
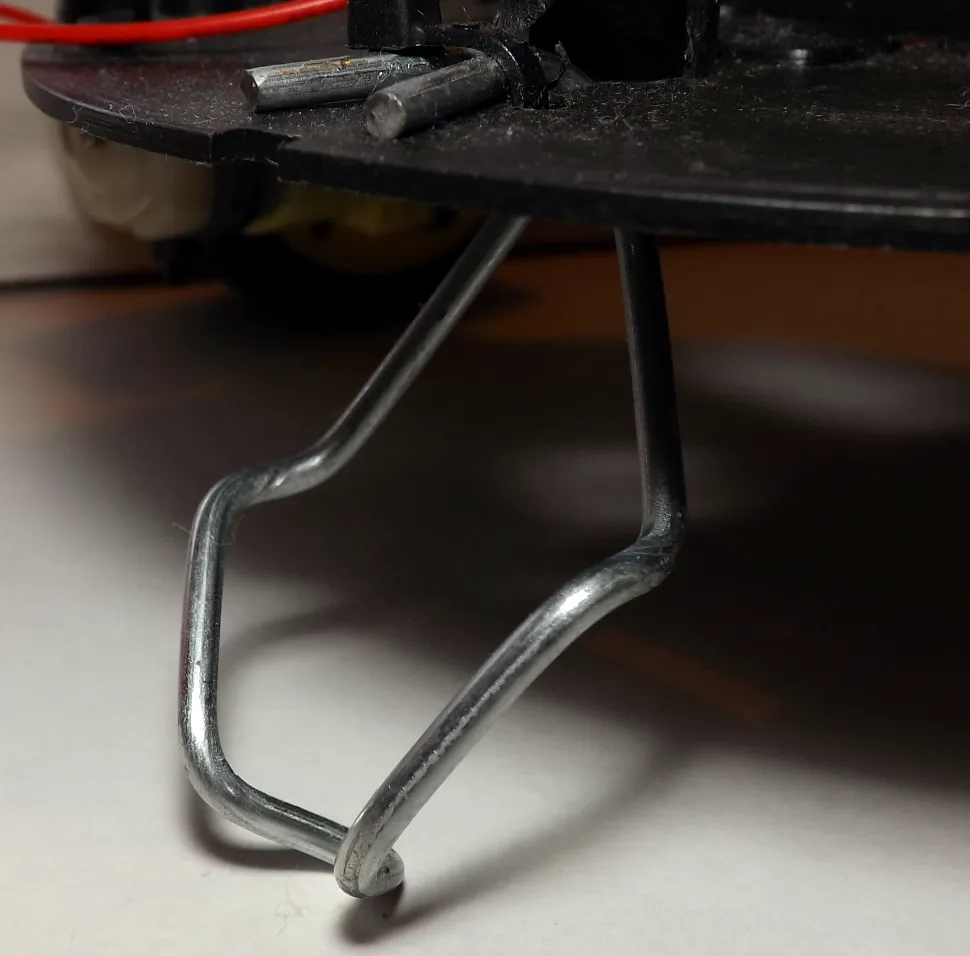
Wire skid fitted to the front of the Rover-Pi robot
- Before you mount the wheels, you need to work out the approximate center of gravity of the chassis (do this with the batteries fitted in the chassis, as they will affect the balance). Get a feel of where the center is by trying to balance the unit on two fingers on either side and finding out how far forward or backward the chassis tilts. For my unit, this was about 1 cm (approximately one-third of an inch) back from the center. You should aim to place the wheel axles slightly behind this so that the rover will rest slightly forward on the skid. Mark the location of the wheels on the chassis.
- Drill three holes on each side to mount the wheels using the cable ties. If the cable ...
Table of contents
- Title Page
- Copyright and Credits
- Dedication
- Packt Upsell
- Contributors
- Preface
- Getting Started with a Raspberry Pi 3 Computer
- Dividing Text Data and Building Text Classifiers
- Using Python for Automation and Productivity
- Predicting Sentiments in Words
- Creating Games and Graphics
- Detecting Edges and Contours in Images
- Creating 3D Graphics
- Building Face Detector and Face Recognition Applications
- Using Python to Drive Hardware
- Sensing and Displaying Real-World Data
- Building Neural Network Modules for Optical Character Recognition
- Building Robots
- Interfacing with Technology
- Can I Recommend a Movie for You?
- Hardware and Software List
- Other Books You May Enjoy
Frequently asked questions
Yes, you can cancel anytime from the Subscription tab in your account settings on the Perlego website. Your subscription will stay active until the end of your current billing period. Learn how to cancel your subscription
No, books cannot be downloaded as external files, such as PDFs, for use outside of Perlego. However, you can download books within the Perlego app for offline reading on mobile or tablet. Learn how to download books offline
Perlego offers two plans: Essential and Complete
- Essential is ideal for learners and professionals who enjoy exploring a wide range of subjects. Access the Essential Library with 800,000+ trusted titles and best-sellers across business, personal growth, and the humanities. Includes unlimited reading time and Standard Read Aloud voice.
- Complete: Perfect for advanced learners and researchers needing full, unrestricted access. Unlock 1.5M+ books across hundreds of subjects, including academic and specialized titles. The Complete Plan also includes advanced features like Premium Read Aloud and Research Assistant.
We are an online textbook subscription service, where you can get access to an entire online library for less than the price of a single book per month. With over 1.5 million books across 990+ topics, we’ve got you covered! Learn about our mission
Look out for the read-aloud symbol on your next book to see if you can listen to it. The read-aloud tool reads text aloud for you, highlighting the text as it is being read. You can pause it, speed it up and slow it down. Learn more about Read Aloud
Yes! You can use the Perlego app on both iOS and Android devices to read anytime, anywhere — even offline. Perfect for commutes or when you’re on the go.
Please note we cannot support devices running on iOS 13 and Android 7 or earlier. Learn more about using the app
Please note we cannot support devices running on iOS 13 and Android 7 or earlier. Learn more about using the app
Yes, you can access Raspberry Pi 3 Cookbook for Python Programmers by Tim Cox, Dr. Steven Lawrence Fernandes in PDF and/or ePUB format, as well as other popular books in Computer Science & Hardware. We have over 1.5 million books available in our catalogue for you to explore.