Create a new project. Before you download the assets from the link that follows, you need to prepare the import settings for the game art. The art assets for this project use a pixel art style, which means they look best when not filtered, which is Godot's default setting for textures. Filtering is a method by which the pixels of an image are smoothed. It can improve the look of some art, but not pixel-based images:
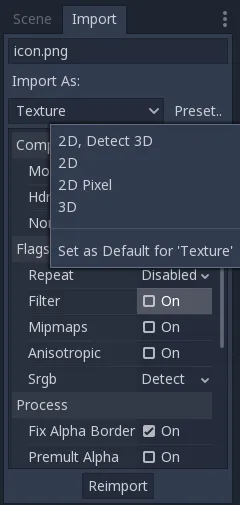
It's inconvenient to have to disable this for every image, so Godot allows you to customize the default import settings. Click on the icon.png file in the FileSystem dock, then click the Import tab next to the Scene tab on the right. This window allows you to change the import settings for the file you've selected. Uncheck the Filter property, then click Preset and choose Set as Default for 'Texture'. This way, all images will be imported with filtering disabled. Refer to the following screenshot:
If you've already imported images, their import settings won't be updated automatically. After changing the default, you'll have to reimport any existing images. You can select multiple files in the FileSystem dock and click the Reimport button to apply the settings to many files at once.
Now, you can download the game assets from the following link and unzip them in your project folder. Godot will import all the images with the new default settings, https://github.com/PacktPublishing/Godot-Game-Engine-Projects/releases
Next, open Project | Project Settings and under Rendering/Quality, set Use Pixel Snap to On. This will ensure that all images will be aligned properly—something that will be very important when you're designing your game's levels.
While you have the settings window open, go to the Display/Window section and change Stretch/Mode to 2d and Aspect to expand. These settings will allow the user to resize the game window while preserving the image's quality. Once the project has been completed, you'll be able to see the effects of this setting.
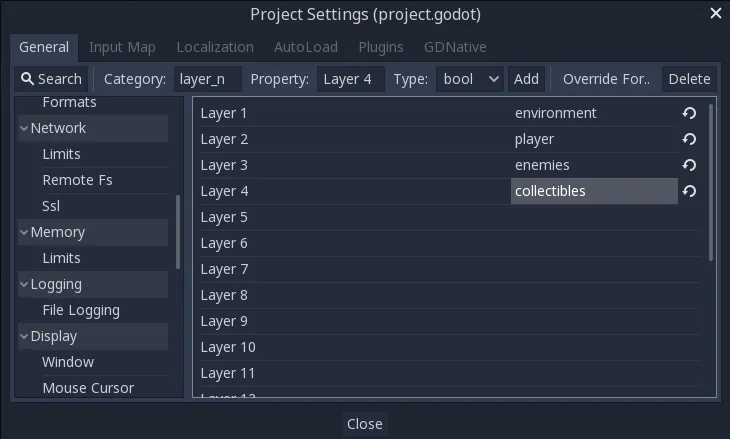
Next, set up the collision layer names so that it will be more convenient to set up collisions between different types of objects. Go to Layer Names/2d Physics and name the first four layers like this:
Finally, add the following actions for the player controls in the Input Map tab under Project | Project Settings:
| Action Name | Key(s) |
| right | D, → |
| left | A, ← |
| jump | Space |
| crouch | S, ↓ |
| climb | W, ↑ |
![]()
A platform game requires gravity, collisions, jumping, and other physics behavior, so you might think that RigidBody2D would be the perfect choice to implement the character's movement. In practice, however, you'll find that the realistic physics of the rigid body are not desirable for a platform character. To the player, realism is less important than responsive control and an action feel. As the developer, you therefore want to have precise control over the character's movements and collision response. For this reason, a kinematic body is usually the better choice for a platform character.
The KinematicBody2D node is designed for implementing bodies that are to be controlled directly by the user or via code. These nodes detect collisions with other bodies when moving, but are not affected by global physics properties like gravity or friction. This doesn't mean that a kinematic body can't be affected by gravity and other forces, just that you must calculate those forces and their effects in code; the engine will not move a kinematic body automatically.
When moving KinematicBody2D, as with RigidBody2D, you should not set its position directly. Instead, you use either the move_and_collide() or move_and_slide() methods. These methods move the body along a given vector and instantly stop if a collision is detected with another body. After KinematicBody2D has collided, any collision response must be coded manually.
![]()
After a collision, you may want the body to bounce, to slide along a wall, or to alter the properties of the object it hit. The way you handle collision response depends on which method you used to move the body.
![]()
When using move_and_collide(), the function returns a KinematicCollision2D object upon collision. This object contains information about the collision and the colliding body. You can use this information to determine the response. Note that the function returns null when the movement was completed successfully with no collision.
For example, if you want the body to bounce off of the colliding object, you could use the following script:
extends KinematicBody2D var velocity = Vector2(250, 250) func _physics_process(delta): var collide = move_and_collide(velocity * delta) if collide: velocity = velocity.bounce(collide.normal)
![]()
Sliding is a very common option for collision response. Imagine a player moving along walls in a top-down game or running up and down slopes in a platformer. While it's possible to code this response yourself after using move_and_collide(), move_and_slide() provides a convenient way to implement sliding movement. When using this method, the body will automatically slide along the colliding surface. In addition, sliding collisions allow you to use metho...