Mastering Qt  5
eBook - ePub

Mastering Qt 5

Create stunning cross-platform applications using C++ with Qt Widgets and QML with Qt Quick, 2nd Edition

Guillaume Lazar, Robin Penea

Share book
  1. 534 pages
  2. English
  3. ePUB (mobile friendly)
  4. Available on iOS & Android
eBook - ePub

Mastering Qt 5

Create stunning cross-platform applications using C++ with Qt Widgets and QML with Qt Quick, 2nd Edition

Guillaume Lazar, Robin Penea

Book details
Book preview
Table of contents
Citations

About This Book

An In-depth guide updated with the latest version of Qt 5.11 including new features such as Quick Controls and Qt Gamepad

Key Features

  • Unleash the power of Qt 5.11 with C++
  • Build applications using Qt Widgets (C++) or Qt Quick (QML)
  • Create cross-platform applications for mobile and desktop platforms with Qt 5

Book Description

Qt 5.11 is an app development framework that provides a great user experience and develops full capability applications with Qt Widgets, QML, and even Qt 3D. Whether you're building GUI prototypes or fully-fledged cross-platform GUI applications with a native look and feel, Mastering Qt 5 is your fastest, easiest, and most powerful solution. This book addresses various challenges and teaches you to successfully develop cross-platform applications using the Qt framework, with the help of well-organized projects.

Working through this book, you will gain a better understanding of the Qt framework, as well as the tools required to resolve serious issues, such as linking, debugging, and multithreading. You'll start off your journey by discovering the new Qt 5.11 features, soon followed by exploring different platforms and learning to tame them. In addition to this, you'll interact with a gamepad using Qt Gamepad. Each chapter is a logical step for you to complete in order to master Qt.

By the end of this book, you'll have created an application that has been tested and is ready to be shipped.

What you will learn

  • Create stunning UIs with Qt Widgets and Qt Quick 2
  • Develop powerful, cross-platform applications with the Qt framework
  • Design GUIs with the Qt Designer and build a library in it for UI previews
  • Handle user interaction with the Qt signal or slot mechanism in C++
  • Prepare a cross-platform project to host a third-party library
  • Use the Qt Animation framework to display stunning effects
  • Deploy mobile apps with Qt and embedded platforms
  • Interact with a gamepad using Qt Gamepad

Who this book is for

Mastering Qt 5 is for developers and programmers who want to build GUI-based applications. C++ knowledge is necessary, and knowing QT basics will help you get the most out of this book.

Frequently asked questions

How do I cancel my subscription?
Simply head over to the account section in settings and click on “Cancel Subscription” - it’s as simple as that. After you cancel, your membership will stay active for the remainder of the time you’ve paid for. Learn more here.
Can/how do I download books?
At the moment all of our mobile-responsive ePub books are available to download via the app. Most of our PDFs are also available to download and we're working on making the final remaining ones downloadable now. Learn more here.
What is the difference between the pricing plans?
Both plans give you full access to the library and all of Perlego’s features. The only differences are the price and subscription period: With the annual plan you’ll save around 30% compared to 12 months on the monthly plan.
What is Perlego?
We are an online textbook subscription service, where you can get access to an entire online library for less than the price of a single book per month. With over 1 million books across 1000+ topics, we’ve got you covered! Learn more here.
Do you support text-to-speech?
Look out for the read-aloud symbol on your next book to see if you can listen to it. The read-aloud tool reads text aloud for you, highlighting the text as it is being read. You can pause it, speed it up and slow it down. Learn more here.
Is Mastering Qt 5 an online PDF/ePUB?
Yes, you can access Mastering Qt 5 by Guillaume Lazar, Robin Penea in PDF and/or ePUB format, as well as other popular books in Computer Science & Programming in C++. We have over one million books available in our catalogue for you to explore.

Information

Year
2018
ISBN
9781788993890
Edition
2

Even Qt Deserves a Slice of Raspberry Pi

In the previous chapter, we created a QML UI targeted at Android and iOS. We will continue our journey in the embedded world by discovering how we can deploy a Qt application on a Raspberry Pi. The example project to illustrate this topic will be a snake game using the Qt3D modules. The player will control a snaketrying to eat apples to get as big as possible.
In this chapter, you will learn:
  • Discovering Qt3D
  • Configuring Qt for your Raspberry Pi
  • Crafting entities from the factory
  • Building a snake engine in JavaScript
  • Profiling your QML application

Discovering Qt3D

The example project of this chapter will rely on 3D rendering. For this, we will use Qt3D. This part of the framework is divided into various Qt modules that enable the application to have a near-real time simulation of a 3D environment. Built on OpenGL, Qt3D offers a high-level API to describe complex scenes without having to resort to writing low-level OpenGL instructions. Qt3D supports the following basic features:
  • 2D and 3D rendering for C++ and Qt Quick
  • Meshes
  • Materials
  • GLSL shaders
  • Shadow mapping
  • Deferred rendering
  • Instance rendering
  • Uniform Buffer Object
All these features are implemented in the entity component system (ECS) architecture. Each mesh, material, or shader that you define is a component. The aggregation of these components makes an entity. If you wanted to draw a 3D red apple, you would need the following components:
  • A mesh component, holding the vertices of your apple
  • A material component, applying a texture on the mesh or coloring it
These two components will then be regrouped to define the entity Apple. You see here the two parts of the ECS, the entities and components. The overall architecture looks like this:
Each of these components can be regrouped into aspects. An aspect is a "slice" of multiple components working on the same part (rendering, positioned 3D audio, and logic). When the graph of all your entities is processed by the Qt3D engine, each layer of aspects is processed sequentially.
The underlying approach is to favor composition over inheritance. In a game, an entity (an apple, a player, an enemy) can have various states during its life cycle, such as spawning, animating for a given state, a dying animation, and so on. Using inheritance to describe these states will lead to a nerve-wracking tree of AppleSpawn, AppleAnimationShiny, AppleDeath, and so on. It would become quickly unmaintainable. Any modification to a class could have huge impact on many other classes and the number of possible combinations of states would get out of hand. Saying that a state is simply a component for a given entity gives the flexibility to easily swap components and still keep the entity abstraction; an apple Entity element is still an apple, even though it is using the AnimationShiny component instead of the AnimationSpawn component.
Let's see how to define a basic Entity element in QML. Imagine that this is the apple we have been talking about. The Apple.qml file would look like this:
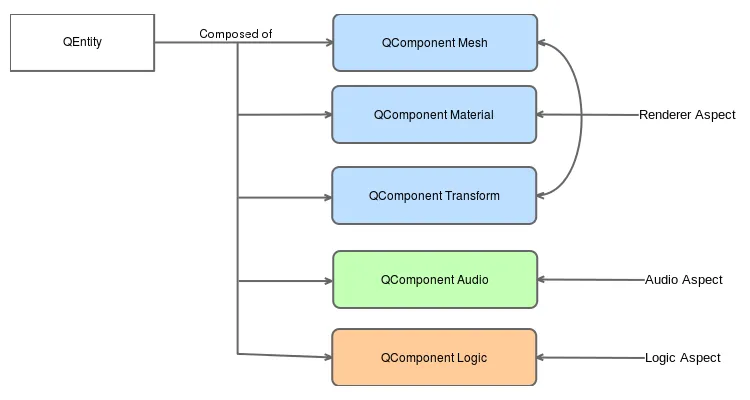
import Qt3D.Core 2.0 import Qt3D.Render 2.0 import Qt3D.Extras 2.0 Entity { property alias position: transform.translation PhongMaterial { id: material diffuse: "red" } SphereMesh { id: mesh } Transform { id: transform } components: [material, mesh, transform] } 
In very few lines, you describe every aspect of the Entity element:
  • Entity: This is the root object of the file; it follows the same QML pattern we studied in Chapter 5, Dominating the Mobile UI.
  • PhongMaterial: This defines how the surface will be rendered. Here, it uses the Phong shading technique to achieve smooth surfaces. It inherits QMaterial, which is the base class for all the material classes.
  • SphereMesh: This defines what type of mesh will be used. It inherits QGeometryRenderer, which also gives the ability to load custom models (exported from 3D modeling software).
  • Transform: This defines the transformation matrix of the component. It can customize the translation, scale, and position of the Entity element.
  • position: This is a property to expose transform.translation for a given caller/parent. This might quickly become handy if we want to move the apple around.
  • components: This is the array containing all the IDs of all the components for the Entity element.
If we want to make this Apple a child of another Entity, it is simply a matter of defining the Apple inside this new Entity element. Let's call it World.qml:
import Qt3D.Core 2.0 import Qt3D.Render 2.0 import Qt3D.Extras 2.0 Entity { id: sceneRoot RenderSettings { id: renderSettings activeFrameGraph: ForwardRenderer { clearColor: Qt.rgba(0, 0, 0, 1) } } Apple { id: apple position: Qt.vector3d(3.0, 0.0, 2.0) } components: [frameGraph] } 
Here, the World Entity has no visual representation; we want it to be the root of our 3D scene. It only contains the Apple we defined earlier. The x, y, z coordinates of the apple are relative to the parent. When the parent makes a translation, the same translation will be applied to the apple.
This is how the hierarchy of entities/components is defined. If you write your Qt3D code in C++, the same logic applies to the equivalent C++ classes (QEntity, QComponent, and so on).
Because we decided to use the World.qml file as the root of our scene, it has to define how the scene will be rendered. The Qt3D rendering algorithm is data-driven. In other words, there is a clear separation between what should be rendered (the tree of entities and components) and how it should be rendered.
The how relies on a similar tree structure called a frame graph. In Qt Quick, a single method of rendering is used, which covers the 2D drawing. On the other hand, in 3D, the need for flexible rendering makes it necessary to decouple the rendering techniques.
Consider this example; you play a game where you control your avatar and you encounter a mirror. The same 3D scene must be rendered from multiple viewports. If the rendering technique is fixed, this poses multiple problems; which viewport should be drawn first? Is it possible to parallelize the rendering of the viewports in the GPU? What if we need to make multiple passes for the rendering?
In this code snippet, we use the traditional OpenGL rendering technique with the ForwardRenderer tree, where each object is rendered directly on the back buffer, one at a time. Qt3D offers the possibility to choose the renderer (Forward Renderer, Deferred Renderer, and so on) and configure how the scene should be rendered.
OpenGL typically uses the double-buffering technique to render its content. The front-buffer is what is displayed on the screen and the back-buffer is where the scene is being rendered. When the back-buffer is ready, the two buffers are swapped.
One last thing to notice at the top of each Entity element is that we specified the following:
import Qt3D.Core 2.0 import Qt3D.Render 2.0 import Qt3D.Extras 2.0 
There are the only Qt3D modules in the import section. Qt3D classes do not inherit Item so cannot be directly mixed with QML components. This inheritance tree of the basic Qt3D building blocks is as follows:
The QNode class is the base class of all Qt3D node classes. It relies on the QObject class to define the parenting relationship. Each QNode class instance also adds a unique id variable, which allows it to be recognized from other instances.
Even though QNode cannot be mixed with Qt Quick types, they can be added to a Q3DScene element (or Scene3D in QML), which serves as the canvas for Qt3D content and can be added to a Qt Quick Item. Adding World.qml to a scene is as simple as this:
Rectangle { Scene3D { id: scene anchors.fill: parent focus: true World { } } } 
The Scene3D element includes a World instance and defines common Qt Quick properties (anchors, focus).

Configuring Qt for your Raspberry Pi

This project targets a new embedded platform, the Raspberry Pi. Qt officially supports the Raspberry Pi 2, but we got the project running without any trouble on a Raspberry Pi 3. If you do not have one of these devices, it might be nonetheless interesting to read this section to know how the cross-compilation works and how to configure your own kit in Qt Creator. The rest of the chapter will work on a desktop platform anyway.
Before diving into the Raspberry Pi's configuration, let's take a step back to understand our aim. Your computer is probably running on an x86 CPU architecture. This means that every program you run will be executed with the x86 instructions set of your CPU. In Qt Creator, this translates to your available kits. A kit must match your target platform. On startup, Qt Creator searches for available kits in your computer and loads them for you.
In Chapter 5, Dominating the Mobile UI, we targeted different platforms, Android and iO...

Table of contents