![]()
Chapter 1
Basic Concepts
Microsoft’s Visual Studio provides a full package of tools for Windows and web programming within a comprehensive development environment. Visual C++ is one of the component languages of Visual Studio along with Visual Basic, Visual C# and Visual F#. It is the most standard of the Visual Studio languages and is reasonably, but not fully, compatible with ISO/ANSI C++ standards. The C++ language contained in Visual C++ produces the fast and efficient programs that are often required for use in scientific, engineering and computer graphics applications. These applications typically involve repetitive computations, iterative calculations, extensive data sorting and graphics operations that are all handled well by C++. At this time, and for the foreseeable future, C++ is the most generally useful programming language for scientific and engineering applications ranging from interactive graphics and automated design to numerical simulation.
This book is focused on the use of Visual C++ and the Microsoft Foundation Classes for the development of Windows programs — that is, for programs intended to operate on a personal computer using the Windows operating system. The book introduces Windows programming at a level that is accessible to people of many technical backgrounds. Through its eleven chapters and an extended series of examples, you can expect to learn how to write your own programs combining the convenience and graphics capabilities of Windows with the utility of C++ programming. You should become well prepared to develop programs for engineering or scientific applications or to move on to more advanced topics in computer graphics programming.
The Companion Media Pack that accompanies this book is available from the publisher’s web page following the directions shown in the Appendix. The media pack contains the complete project files for all of the example projects in the book and also a series of selected executable files which illustrate the scope of the book’s contents. The project files are used in each chapter and provide all of the programming code necessary to compile and build the projects. The code for each project is discussed in detail in the text. The example projects provide the basis for developing competency with Visual C++ and the ability to write meaningful programs including graphics and touch screen capability. The selected executables presented in the media pack are organized by chapter and may be executed directly, with or without the installation of Visual C++ on your computer. They illustrate the step-by-step progress that takes place as we move from chapter to chapter.
Before discussing the example projects of the media pack in more detail, the sections below introduce Visual C++ and provide an initial introduction to programming in the Visual C++ environment. Readers interested in a quick-start can page forward to Section 1.7 where the media pack is more thoroughly described.
1.1Background
Within Microsoft’s Visual Studio, the Visual C++ module makes the management of Windows programming a convenient task. It provides an organizational structure, as well as editing, compiling, linking and debugging capabilities in a single package. Of course, library functions, the Microsoft Foundation Classes (MFC) and a wide range of resources are also part of the package. These make it possible for an application programmer to produce extensive programs with full Windows functionality while having less than a complete mastery of the computer science behind the Windows operating system. The organizational features and available programming tools offered within Visual C++ have made it the environment of choice for an impressive number of engineering application programs including, for example, computer aided design packages.
Compared to the dynamics of the computing world in past years, the programming environment offered by Visual C++ and MFC Applications has been notably stable. Many of the example programs included here originally began in Version 5.0 of Visual C++. Without change, they compiled and executed in Visual C++ 6.0 and have since functioned with only modest adjustments in newer versions of Visual C++. The basic programming concepts of Visual C++ and MFC applications have become well established and have persisted as Visual C++ has evolved over many years. Considering this history and the evolutionary process, learning the basic concepts and programming strategies presented here will remain valuable as Visual C++ continues to develop in the future.
The purpose of the introductory material in this chapter is to provide an initial familiarity with the Visual C++ environment and to begin its use for simple programming tasks. We assume that the reader has had some previous exposure to C/C++ programming — either through a programming course or through self-study. In this introduction and throughout the book you will find that our emphasis is on presenting concepts and strategies to accomplish programming tasks. The intention here is not to provide the full language detail present in most books on computer programming. Although we may occasionally stray into discussions of programming language and syntax, our focus is on the use of Visual C++ for developing computer programs including basic graphics and Windows functionality. We expect to move in that direction with just the right amount of detail. That is, enough detail to learn and understand the programming tasks at hand but not so much detail that we get bogged down in programming intricacies. If you have only a modest background in C/C++, you may find it helpful to have a standard C/C++ textbook at hand as you proceed through our examples. The excellent “help” tools readily available for Visual C++ will also assist you with any details that are not included here.
This chapter introduces the fundamentals of Visual C++ and simultaneously provides a review of C/C++ programming. The chapter is divided into a set of subsections that begin with the simplest of “Hello World” programs to familiarize you with the Visual C++ programming environment. We then present a series of programs using: “while” loops and “for” loops for program control, functions for repeated operations, and keyboard inputs for user interaction. The final section of the chapter includes several programming examples for simple calculations, especially illustrating the basic user interaction needed to control a calculation process. After completing this chapter, you should be ready to move on to Chapters 2 and 3 where arrays, pointers and object-oriented programming are considered. We initially work with programming for the simple console format and its alphanumeric mode. Then, beginning in Chapter 4, we move on to Windows programming and graphics using MFC Applications.
1.2Getting Started with Visual C++
The programs and example files used throughout this book and contained in the accompanying media pack were developed using a full installation of the now current Professional Edition of Visual Studio (Version 2013) working in Windows 8.1. Visual C++ operates within the Visual Studio environment but is not the only available language. Program development with Visual C++ takes place within Microsoft’s Integrated Development Environment (IDE) and it contains many options and possibilities that are outside the scope of this book (in fact, way outside the scope of this book). We will focus exclusively on the set of possibilities that will allow us to move quickly into the use of Visual C++ and MFC Applications for writing Windows programs and using computer graphics in personal computing.
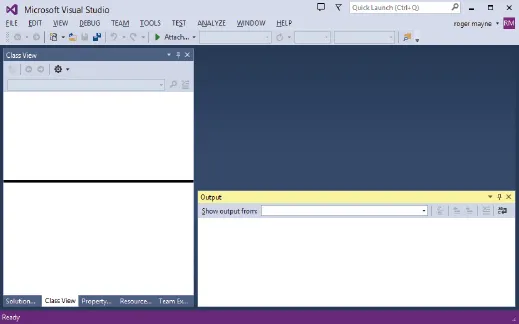
We start by considering Figure 1.1 which shows the typical screen seen as Visual Studio is executed by clicking on its icon from your PC desktop. Of course, we’re assuming here that you have successfully installed Visual Studio (with Visual C++) and that you have created a shortcut on the desktop. This basic Visual Studio screen will appear before you begin any program development. The screen will take on this form once you have closed the Visual Studio “Start Page” by clicking on its “X”. The Start Page is a very useful organizational tool and you will figure it out easily as you begin to accumulate some Visual C++ experience. As shown in Figure 1.1, Visual Studio contains the familiar menu bar and toolbar structure typical of programs that run every day on your PC. If your screen doesn’t initially appear exactly as in Figure 1.1, a few clicks on file tabs, pins and “Xs” can put it in this form. If you get lost in arranging windows, clicking on the menu item Window and then Reset Window Layout in the dropdown menu list (Window > Reset Window Layout) provides a return to the default arrangement.
Figure 1.1 Opening Screen of Visual Studio
The basic screen arrangement of Visual Studio contains three windows for use in writing and compiling programs. The largest window on the upper right is an edit window that displays the active text files in which you may be writing and editing code (if more than one file is active, tabs appear which allow convenient switching from one file to another). The window to the left in Figure 1.1 is a workspace area which allows you to display and control the overall arrangement of the programming project that you have active. At various times, the space may be occupied by the Solution Explorer, a Class View window, a Properties window, etc. This space divides into two or more windows as needed and its contents may be controlled by the tabs beneath it and also by entries under the View menu bar item, by buttons on the toolbar, and by pins and “Xs” which are found in the individual windows. The workspace area can be resized as desired by exploring the window’s right edge with the mouse cursor. At the point where the resize icon replaces the mouse cursor, click and drag the window edge to adjust its size.
In Figure 1.1, the window at the bottom of the screen is the “Output” window where Visual Studio communicates with you. Results from compiling and linking are displayed there — including, of course, compiling errors and warnings. As desired, other information can be displayed as output by making an entry into the “output from” text box. As shown in Figure 1.2, both individual windows can be “undocked” from their positions on the left and bottom edges of the screen. Just click and drag at the title bar on the upper edge of the window. The windows can also be re-docked at one of the other edges of the display if desired. Also, in case you’d like another window to study, a Toolbox window can be displayed on the right of the screen. Just click on the menu item View and then Toolbox in the dropdown menu list (View > Toolbox) or click the appropriate toolbar button (which may have to be added to the toolbar — look for the “add” arrow on the right). Finally, the edit window can be viewed in full screen by clicking on View > Full Screen. The full screen present...