Learn Clip Studio Paint
Create impressive comics and Manga art in world-class graphics software, 2nd Edition
Liz Staley
- 448 pages
- English
- ePUB (mobile friendly)
- Available on iOS & Android
Learn Clip Studio Paint
Create impressive comics and Manga art in world-class graphics software, 2nd Edition
Liz Staley
About This Book
Take your comics and illustrations to the next level with the powerful art tools in Clip Studio Paint 1.8
Key Features
- Overcome "interface overwhelm" with a practical breakdown of the Clip Studio interface
- Comprehensive guide on the Clip Studio Paint with detailed coverage of all the tools and concepts of designing comics
- Streamline your workflow to create faster and easier using Clip Studio's features
Book Description
Clip Studio Paint, the successor to Manga Studio, is used by over four million illustrators and comic creators around the world. This book will guide you through every step of learning this software, from system requirements and installation, all the way through to exporting your work for print or the web. Learn how to create new documents, customize tools to fit your working style, use ruler tools to create anything from straight lines to intricate backgrounds, add 3D elements, create comic panels using the specialized panel tools, utilize screentones and materials, add text and word balloons to your comics, create sound effects, easily flat and color your comics using reference layers, and bring your drawings to life using the animation features.
By the end of this book, you will be able to navigate the Clip Studio Interface and program preferences, customize the various tools, and be able to create your own black-and-white and color illustrations and comics from start to finish.
What you will learn
- Understand the differences between Clip Studio Paint Pro and EX
- Discover how to navigate and customize the user interface
- Creating custom tools that fit your unique style of illustration
- Using the ruler tools to create intricate perspective shots and complex symmetry
- Discover how to use 3D elements in your work
- Learn how to create lettering and word balloons to bring your comic stories to life
- Understand the process of digital art creation from pencils to inks to color
- Understand how to use the animation tools available in Clip Studio Paint
Who this book is for
If you are a beginning digital artist or are switching to Clip Studio from another graphics software, this book is for you. This book is excellent for those with no knowledge of digital art up to intermediate users looking to explore the unique features of Clip Studio Paint.
Frequently asked questions
Information
Preferences, Shortcuts, and Other Commands
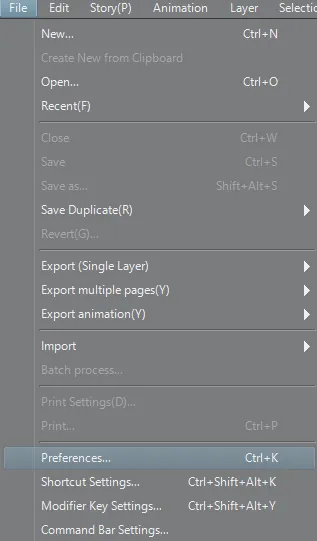
- Changing the program preferences
- Using keyboard shortcuts
- Customizing the Command Bar
- Making and saving workspaces
- Creating new files and templates
Program preferences
Tool category
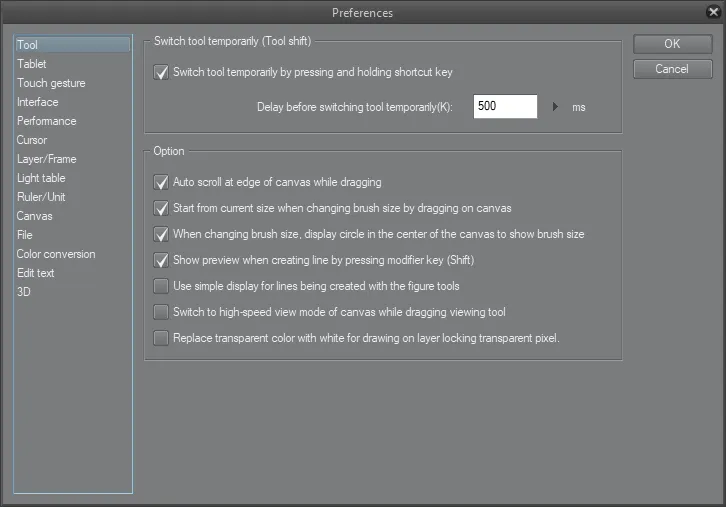
- Switch tool temporarily by pressing and holding shortcut key allows us to switch to a tool, but while holding down the designated shortcut key, and then switch back to the previous tool as soon as the keyboard key is released.
- Delay before switching tool temporarily is the amount of time the key must be held down before the tool is switched temporarily.
- Auto scroll at edge of canvas while dragging allows the canvas scroll to follow the cursor when a tool is dragged outside of the canvas while in use.
- Start from current size when changing brush size by dragging on canvas starts the brush size adjustment from the current size when holding down the Ctrl and Alt keys while dragging the mouse.
- When changing brush size, display circle in the center of canvas will show a circle in the center of the canvas, indicating the new brush size when turned on.
- Show preview when creating straight lines by holding a modifier key will display a preview of the line being drawn by holding the Shift key and clicking with a drawing tool.
- Use simple display for lines being created with the figure tools will use a simple display when creating lines with the Direct Draw - Figure set of sub tools. When it is turned off, the lines being created will be previewed with their actual line width and color.
- Switch to high-speed view mode of canvas while dragging viewing tool will put the canvas in fast view mode when dragging with a tool such as the Zoom or Move tool. This can reduce the required processing capacity.
- Replace transparent color with white for drawing on layers with locked transparent pixels will use white for drawing tools when a transparent color is selected on a layer with locked transparent pixels.
Tablet category
- Under the Using Tablet Service, there is an option for Wintab or for TabletPC. Select Wintab when using a regular graphics tablet, such as a Wacom brand tablet that plugs into your computer. Select TabletPC when using a Tablet computer such as a Windows Surface tablet.
- The Use mouse mode in setting for the tablet driver should be turned on when mouse mode is enabled by the tablet driver settings.
- The Set tablet operation area with application setting configures the display area and tablet operation area to Clip Studio Paint when turned on. These settings should be used when the tablet driver software doesn't have these options.
Touch gesture category
Interface category
- Automatically activate IME when editing text layer can be used when entering Japanese characters into a text layer.
- Automatically switch IME when typing text into panel changes the IME mode when inputting characters. Both IME settings are used for Japanese character input.
- Under the Color setting, the drop-down menu can be used to change the interface from the Light color scheme to the Dark color scheme. The Density slider to the right of the drop-down can be adjusted left or right to change the brightness or darkness of the color scheme.
- Under Touch Operation Settings, the checkbox can be used to activate adjusting the interface to be suitable for touch operations. Setting the buttons below to Small, Default, or Large options will adjust the elements of the interface accordingly. When using Clip Studio Paint on a computer with a touchscreen, it is helpful to activate this preference.
- Configure basic layout of the palettes to one for tablets will switch the user interface to one that is suitable for tablet devices.
Performance category
- Destination to create virtual memory is the option that you can use to specify the disk drive where Clip Studio Paint can create virtual memory. If you have a secondary hard drive dedicated to creating virtual memory for programs, this is where to specify it. Be sure that the folder specified is in a destination with enough capacity, otherwise, the program may become unstable.
- Allocate to application allows you to specify the percentage of system ...