
eBook - ePub
Practical Lessons In Metal Turning - A Handbook For Young Engineers And Amateur Mechanics
- 182 pages
- English
- ePUB (mobile friendly)
- Available on iOS & Android
eBook - ePub
Practical Lessons In Metal Turning - A Handbook For Young Engineers And Amateur Mechanics
About this book
This classic handbook for students of metal work contains a complete introduction to the subject, with chapters on everything from recognising equipment to producing finished work. Written with the beginner in mind, it is full of simple instructions and handy tips, making it ideal for amateurs with practical interest in metal work. Contents include: "Tools and Tool Holders", "Measuring Appliances", "Chucks and Mandrels", "How to Centre Work for the Lathe", "Driving Work Between Lathe Centres", "Turning Work Between Centres", "Chuck and Face-Plate Work", "Drilling and Boring in the Lathe", "Screw Cutting", etc. Many vintage books such as this are increasingly scarce and expensive. It is with this in mind that we are republishing this volume now in an affordable, modern, high-quality edition complete with a specially-commissioned new introduction on metal work.
Trusted by 375,005 students
Access to over 1.5 million titles for a fair monthly price.
Study more efficiently using our study tools.
Information
PRACTICAL LESSONS IN METAL TURNING
CHAPTER I
TOOLS AND TOOL HOLDERS
ONE of the most important factors in the production of good lathe work is the use of correctly shaped tools, and it is therefore highly essential that the beginner in metal turning should clearly understand the principles which underlie the making of a turning tool. A correctly shaped tool properly applied to the work will cut cleanly and well, and will leave a smooth, even surface behind it. A badly shaped tool tears or scrapes the metal instead of cutting, and, moreover, absorbs more power in removing a given quantity of material.
The shape given to any particular tool is determined partly by the kind of metal to be turned and partly by the nature of the work the tool has to do. The chief points to be borne in mind are that the cutting angle should be keen enough to cut well, while strong enough to stand the strain of cutting without breaking, and that it should be so applied to the work as to afford sufficient “clearance” underneath to prevent it rubbing instead of cutting, and sufficient relief, or “top-rake,” as it is termed, to enable the cuttings to easily come away from the metal. This is shown in fig. 1, which illustrates a slide-rest tool of a suitable shape for turning wrought iron or mild steel. Fig. 2 shows a perspective view of this tool. In fig. 1, B is the cutting-angle, A the “angle of clearance,” and C the “angle of top-rake.” The angle B varies slightly according to the metal which is being turned, certain cutting angles having proved by experience to be the best suited to different metals. For example, for wrought iron and mild steel, an angle of about 55 degs. gives the best results, while for cast iron a somewhat more obtuse angle, say from 58 degs. to 60 degs., is best. Differences so exact as this, however, may be disregarded in practical work, and it may be taken that an angle of about 58 degs. will be found satisfactory for all-round work on the above-named metals. For heavy cuts on cast iron a more obtuse cutting angle may occasionally be required to give the necessary strength to the point of the tool.
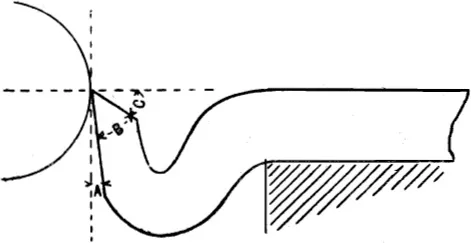
FIG. 1.
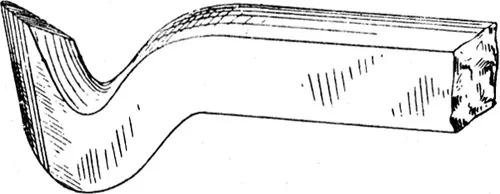
FIG. 2.
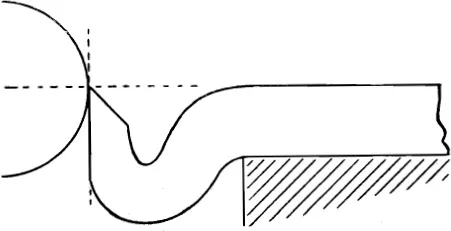
FIG. 3.
The cutting angle being thus determined, the “clearance” and the top-rake have still to be provided for. The object of the clearance is to enable the tool to cut without rubbing against the work, as would be the case if the tool were shaped as in fig. 3 or fig. 4. For this purpose a very small angle, 3 degs. or 4 degs., is sufficient; and, indeed, an excess of clearance is injurious, as it weakens the point of the tool. This will be clear from the drawing in fig. 5, which shows an exaggerated example of clearance. The cutting angle B being kept the same as in the previous drawings, it is apparent that not only does the excessive clearance weaken the tool by taking away the support from the cutting edge, but it prevents any top-rake being given to the tool, with the result that it will only scrape instead of cutting. While dealing with the subject of clearance, it may be well to emphasise the necessity of grinding the side faces of the tool which form the cutting edge perfectly flat. This is a matter which requires some care and skill in grinding to accomplish, but inattention to this point is a not infrequent source of trouble to the beginner. Although the general angles may be fairly correctly obtained, careless grinding sometimes causes a rounding-off of the faces close to the cutting edge, as shown at A in fig. 6. Such a rounding-off at the cutting edge, however small, causes rubbing to take place, and destroys to a large extent the cutting efficiency of the tool.
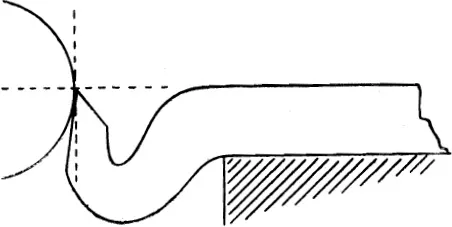
FIG. 4.
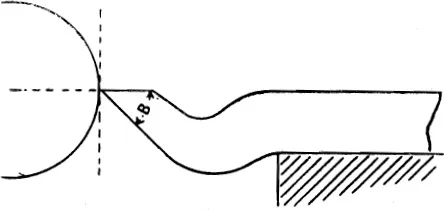
FIG. 5.
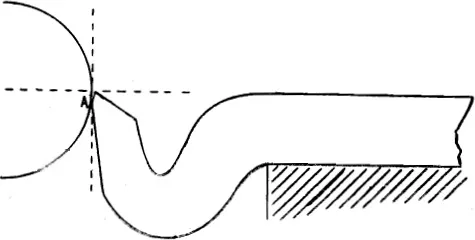
FIG. 6.
To get the best results from a tool it is necessary to slope the top surface sideways as well as backwards from the point, the highest side being the leading side in the direction in which the tool is moved when cutting. This is known as side-rake, and is shown in the end elevation view in fig. 7. The tool really removes more metal with its side edge than with the front edge, and it is found in practice that the effect of the side-rake is to materially lessen the power required to feed the tool along, since the cutting edge thus presented penetrates the metal so much more easily. A tool with side-rake is, however, only suitable for traversing in one direction, but as nearly all turning work is done with the tool moving from right to left this is no real disadvantage.
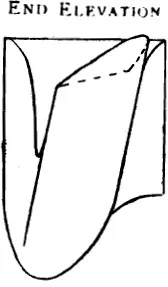
FIG. 7.
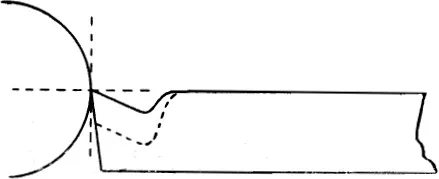
FIG. 8.
The tool shown in figs. 1 and 2 is sometimes termed a “swan-neck” tool, by reason of the curved form in which it is forged. It is an excellent shape to use, and once made will last a much longer time than a straight tool as shown in figs. 8 and 9. In the straight form, the cutting angle is exactly the same, and at first the tool would do as good work as the other. It is, however, more trouble to grind on the top-face, and the more it is ground away the weaker it becomes, this being very evident when it has been ground down as far as the dotted line shown in fig. 8. In the swan-neck form of tool, the grinding away of the top-face does not affect the strength at all.
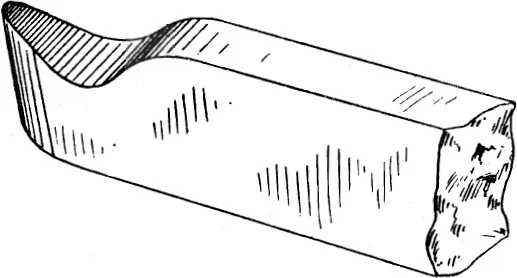
FIG. 9.
For all tools used in a horizontal position, as most slide-rest tools are, the cutting point should be exactly level with the centre of the work. Fig. 1 shows a tool applied in this position. If the point be placed too high, as in fig. 10, the work will rub against the tool; while if placed too low, as in fig. 11, the tool will scrape instead of properly cutting. When a tool has been re-sharpened, and the upper surface thereby ground away, a piece of packing must be placed under the body of the tool to raise the point to the correct position. The packing must, however, raise the tool bodily in a horizontal position and not merely tilt the front up, as in this case the clearance angle of the tool would be destroyed, as shown in fig. 12. Similarly, if a tool when first made be too high, it should not be tilted down to bring it level with the centre of the work, as shown in fig. 13, for then the angle of clearance becomes too great and the top-rake too small. A few actual trials in the lathe with the position of the tool altered in various ways will soon enable the reader to grasp the importance of these facts. It may be here pointed out that the smaller the diameter of the work to be turned, the more important it is to apply the tool at the correct level.
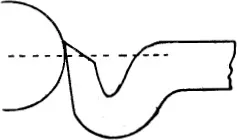
FIG. 10.
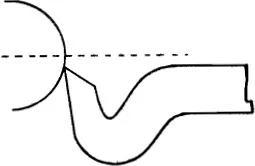
FIG. 11.
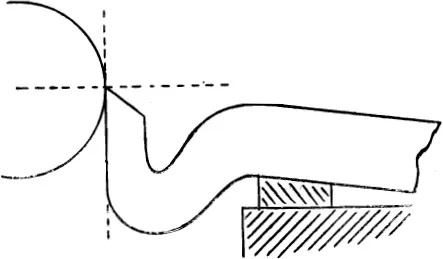
FIG. 12.
FIG. 13.
A difference of 1-16th of an inch in the height of the tool, while of practically no moment when turning an ...
Table of contents
- Cover
- Title
- Preface
- Preface to the Third Edition
- Contents
- Chapter I Tools and Tool Holders
- Chapter II Measuring Appliances
- Chapter III Chucks and Mandrels
- Chapter IV How to Centre Work for the Lathe
- Chapter V Driving Work Between Lathe Centres
- Chapter VI Turning Work Between Centres
- Chapter VII Chuck and Face-Plate Work
- Chapter VIII Drilling and Boring in the Lathe
- Chapter IX Screw Cutting
Frequently asked questions
Yes, you can cancel anytime from the Subscription tab in your account settings on the Perlego website. Your subscription will stay active until the end of your current billing period. Learn how to cancel your subscription
No, books cannot be downloaded as external files, such as PDFs, for use outside of Perlego. However, you can download books within the Perlego app for offline reading on mobile or tablet. Learn how to download books offline
Perlego offers two plans: Essential and Complete
- Essential is ideal for learners and professionals who enjoy exploring a wide range of subjects. Access the Essential Library with 800,000+ trusted titles and best-sellers across business, personal growth, and the humanities. Includes unlimited reading time and Standard Read Aloud voice.
- Complete: Perfect for advanced learners and researchers needing full, unrestricted access. Unlock 1.5M+ books across hundreds of subjects, including academic and specialized titles. The Complete Plan also includes advanced features like Premium Read Aloud and Research Assistant.
We are an online textbook subscription service, where you can get access to an entire online library for less than the price of a single book per month. With over 1.5 million books across 990+ topics, we’ve got you covered! Learn about our mission
Look out for the read-aloud symbol on your next book to see if you can listen to it. The read-aloud tool reads text aloud for you, highlighting the text as it is being read. You can pause it, speed it up and slow it down. Learn more about Read Aloud
Yes! You can use the Perlego app on both iOS and Android devices to read anytime, anywhere — even offline. Perfect for commutes or when you’re on the go.
Please note we cannot support devices running on iOS 13 and Android 7 or earlier. Learn more about using the app
Please note we cannot support devices running on iOS 13 and Android 7 or earlier. Learn more about using the app
Yes, you can access Practical Lessons In Metal Turning - A Handbook For Young Engineers And Amateur Mechanics by Percival Marshall in PDF and/or ePUB format, as well as other popular books in Technology & Engineering & Mechanical Engineering. We have over 1.5 million books available in our catalogue for you to explore.