Assessing students' knowledge has always been a primary concern for anyone involved in teaching activities. When it comes to eLearning, assessment is both a pedagogical and a technical issue.
On the pedagogical side, one of the factors that characterizes the eLearning experience is that learners sit alone in front of computers or mobile devices. As teachers, we have to leave lanterns along the learner's path to make sure that the lonely learner does not get lost and confused. Constant assessment helps in keeping the learners on track. By giving them many opportunities to test and validate their knowledge, the learners can build new knowledge on solid grounds.
On the technical side, Captivate contains a powerful quizzing engine that lets you insert different kinds of Question Slides in your projects. At the end of the Quiz, Captivate is able to send a detailed report to a Learning Management System (LMS). An LMS is a server that is used to host eLearning content and track the learner's progression with your online courses.
In this chapter, you will perform the following:
- Inserting various kinds of Question Slides in your Captivate projects, using several different techniques
- Exploring how some of the objects of Captivate can be added to the Quiz
- Creating Knowledge Check questions throughout the course
- Using Knowledge Check Questions as overlay slides of Interactive Videos
- Creating a Question Pool and inserting random Question Slides in the project
- Exploring and setting Quiz Preferences
- Providing feedback to the students by using the branching capabilities of the Question Slides and the Quiz
- Setting up the reporting to an LMS
- Discussing the SCORM, AICC, and xAPI standards used to communicate the quiz results to the LMS
Preparing your work
To get the most out of this chapter, reset the Captivate interface to default. If you are using the default interface mode, just close and restart Captivate. If you use the advanced interface mode, use the Window | Workspace | Reset 'Classic' menu item to reset Captivate to default. In this chapter, you will use the exercises stored in the Chapter07 folder. If you get confused by any of the step-by-step instructions, take a look at the Chapter07/final folder, which contains a copy of the files, as they will be at the end of this chapter.
Introducing the Quiz
During the first part of this chapter, you will insert a Quiz at the end of the takeTheTrain.cptx project. For pedagogical reasons, it is important to introduce the Quiz to the students. You should explicitly state what is going to happen and how the student will be graded. You will now insert one more slide in the project, using the following steps:
- Open Captivate.
- Open the Chapter07/takeTheTrain.cptx.
- Use the Filmstrip to go to slide 21.
- Use the Slides | Content Slide icon on the Toolbar to insert a new slide in the project. Confirm that the new slide is slide 23 of the project.
Remember that Captivate inserts new slides after the selected one. But this case is a bit special. Because slide 22 is used as an Overlay Slide for the Interactive Video of slide 21, these two slides form a single system. Therefore, the new slide has been inserted after that system. In other words, the new slide is slide 23, regardless of slide 21 or 22 being the selected one at the time of the insertion of the new slide.
- In the Properties inspector, apply the Title&Text Master Slide to the new slide.
- Double-click the Title placeholder and type Time for the Quiz.
- Double-click the Caption placeholder and type the following text: Answer the following questions the best you can.[Enter] Your answers will be reported to the LMS. [Enter] You must score 50 % or higher to pass.
- Draw a Rounded Rectangle Smart Shape in the bottom area of the slide.
- With the rounded rectangle selected, look at the Properties inspector.
- Select the Use as Button checkbox and apply the shape_As_Button style.
- Change the text of the button to Start the Quiz.
- Adjust the size and the position of the button to your taste.
- Don't hesitate to add additional decorative elements (such as a Character image). Also, feel free to modify the properties of the existing objects further.
- Arrange the Timeline of the new slide, making sure that the Start the Quiz button stops the playhead at the end of the slide and jumps to the next slide when being clicked.
See how easy and fast it is to insert new slides when a Theme is applied to the project. Because the visual aspect is, for the most part, taken care of by the Master Slides and the Object Styles, you can concentrate on the content to deliver.
Your new slide should look similar to the following screenshot:
Creating Question Slides
In Captivate, a Question Slide is a very special type of slide. When inserting the first Question Slide in a project, you automatically create a Quiz. There are many options that you can set either for each individual Question Slide or for the entire Quiz.
Although very powerful, the Quiz engine of Captivate has some limitations. While it is possible to insert regular slides in between the Question Slides, all the Question Slides of a project (excluding the Knowledge Check questions) belong to the same Quiz. In other words, each project can only contain a single Quiz.
Captivate supports eight types of Question Slides. In the upcoming sections, you will explore each of these question types, one by one.
Inserting the first Question Slide
To get started, you will now insert the first Question Slide in your project by performing the following steps:
- Return to the Chapter07/takeTheTrain.cptx project.
- Use the Filmstrip panel to go to slide 23. Notice that the project currently contains 24 slides.
- Click the Slides | Question Slide icon on the Toolbar. You can also use the Quiz | Question Slide menu item to perform the same action. The Insert Questions dialog opens.
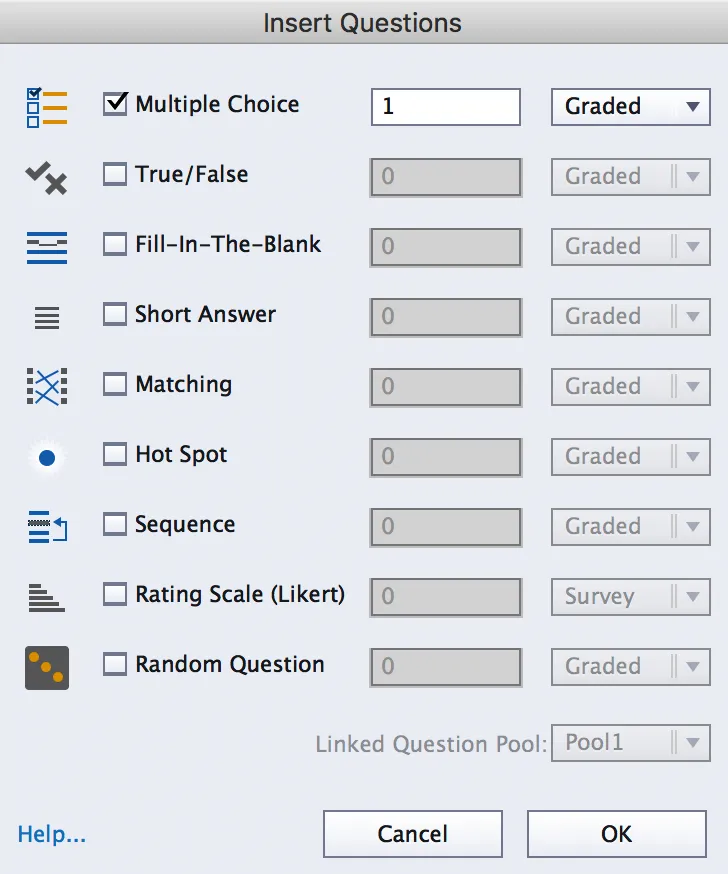
The Insert Questions dialog lists the types of Question Slides available in Captivate. For this first example, you will add a single Multiple Choice question to the project.
- In the Insert Questions dialog, select the Multiple Choice checkbox.
- Open the Graded drop-down list associated with the Multiple Choice question.
The dropdown provides three options: Graded, Survey, and Pretest:
- Graded: This type of question has correct and incorrect answers. For example, Does Belgium have an extensive train network? (True/False) is a question that has a correct and an incorrect answer, so it is a graded question (by the way, the answer is True!).
- Survey: This type of question is used to gather the learner's opinion. As such, it has no correct or incorrect answer. For example, Would you recommend this eLearning course to your friends? (Yes/No) is a survey question.
- Pretest: This type of question is graded, but is not a part of the Quiz. In other words, the answer to a Pretest question is not considered when calculating the score of a Quiz. Also, these answers are never reported to the server. A pretest is used to assess the student's knowledge before taking the course. It is possible to add branching based on the outcome of the pretest. For example, the students passing the pretest can skip the course if they want to. But the students failing the pretest have to take the course to gain the required knowledge.
There is a fourth type of Question Slide available in Captivate called Knowledge Check Slides. These will be covered at the end of this chapter.
In this example, you will add a single Graded Multiple Choice question.
- Select Graded in the drop-down list.
Make sure the Insert Questions dialog looks like the following screenshot:
- Click the OK button to generate the Question Slide and to close the Insert Questions dialog.
Take a look at the Filmstrip. It now contains 26 slides. This means that the operation you ...