Unreal Engine 4 Game Development Quick Start Guide
eBook - ePub

Unreal Engine 4 Game Development Quick Start Guide

Programming professional 3D games with Unreal Engine 4

  1. 202 pages
  2. English
  3. ePUB (mobile friendly)
  4. Available on iOS & Android
eBook - ePub

Unreal Engine 4 Game Development Quick Start Guide

Programming professional 3D games with Unreal Engine 4

About this book

Learn how to use Unreal Engine 4 by building 3D and multiplayer games using Blueprints

Key Features

  • Learn the fundamentals of Unreal Engine such as project templates, Blueprints, and C++
  • Learn to design games; use UMG to create menus and HUDs, and replication to create multiplayer games
  • Build dynamic game elements using Animation Blueprints and Behavior Trees

Book Description

Unreal Engine is a popular game engine for developers to build high-end 2D and 3D games.

This book is a practical guide, starting off by quickly introducing you to the Unreal Engine 4 (UE4) ecosystem. You will learn how to create Blueprints and C++ code to define your game's functionality. You will be familiarized with the core systems of UE4 such as UMG, Animation Blueprints, and Behavior Trees. You will also learn how to use replication to create multiplayer games. By the end of this book, you will have a broad, solid knowledge base to expand upon on your journey with UE4.

What you will learn

  • Use project templates to give your game a head start
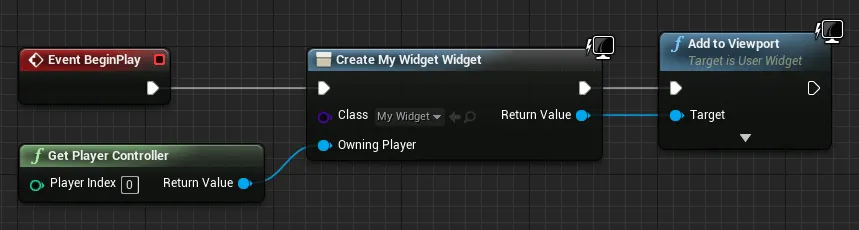
  • Create custom Blueprints and C++ classes and extend from Epic's base classes
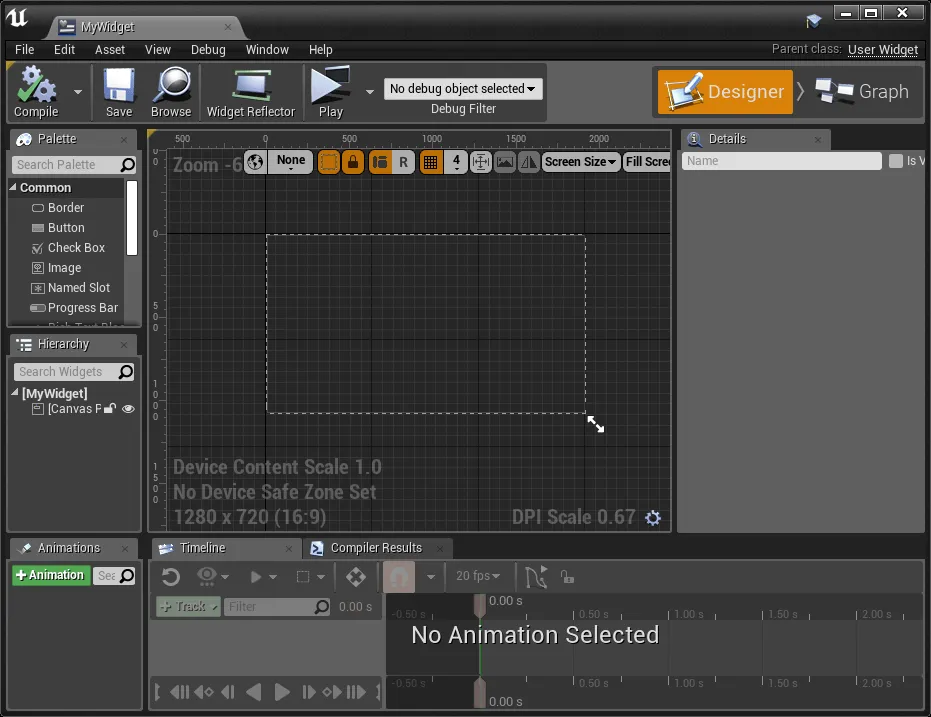
  • Use UMG to create menus and HUDs for your game
  • Create more dynamic characters using Animation Blueprints
  • Learn how to create complex AI with Behavior Trees
  • Use replication to create multiplayer games
  • Optimize, test, and deploy a UE4 project

Who this book is for

Readers who already have some game development experience and Unity users who would like to try UE4 will all benefit from this book. Knowledge of basic Object-Oriented Programming topics such as variables, functions, and classes is assumed.

Frequently asked questions

Yes, you can cancel anytime from the Subscription tab in your account settings on the Perlego website. Your subscription will stay active until the end of your current billing period. Learn how to cancel your subscription.
No, books cannot be downloaded as external files, such as PDFs, for use outside of Perlego. However, you can download books within the Perlego app for offline reading on mobile or tablet. Learn more here.
Perlego offers two plans: Essential and Complete
  • Essential is ideal for learners and professionals who enjoy exploring a wide range of subjects. Access the Essential Library with 800,000+ trusted titles and best-sellers across business, personal growth, and the humanities. Includes unlimited reading time and Standard Read Aloud voice.
  • Complete: Perfect for advanced learners and researchers needing full, unrestricted access. Unlock 1.4M+ books across hundreds of subjects, including academic and specialized titles. The Complete Plan also includes advanced features like Premium Read Aloud and Research Assistant.
Both plans are available with monthly, semester, or annual billing cycles.
We are an online textbook subscription service, where you can get access to an entire online library for less than the price of a single book per month. With over 1 million books across 1000+ topics, we’ve got you covered! Learn more here.
Look out for the read-aloud symbol on your next book to see if you can listen to it. The read-aloud tool reads text aloud for you, highlighting the text as it is being read. You can pause it, speed it up and slow it down. Learn more here.
Yes! You can use the Perlego app on both iOS or Android devices to read anytime, anywhere — even offline. Perfect for commutes or when you’re on the go.
Please note we cannot support devices running on iOS 13 and Android 7 or earlier. Learn more about using the app.
Yes, you can access Unreal Engine 4 Game Development Quick Start Guide by Rachel Cordone in PDF and/or ePUB format, as well as other popular books in Computer Science & Desktop Applications. We have over one million books available in our catalogue for you to explore.

Information

Creating HUDs and Menus Using UMG

Now that we have some semblance of a newly built game, we need to take the next step and start adding a UI to Awesome Game. Unreal Engine has a system called Unreal motion graphics (UMG), which it uses to make interfaces. This is accomplished through the use of widgets, which are premade UI elements, such as buttons, images, and sliders. We can use these elements to build our heads-up displays (HUDs) and menus.
Using UMG is almost the same as using Blueprints, but there is additional functionality that we use when we are visually designing our UI.
In this chapter, we'll cover the following topics:
  • The Widget Blueprint window
  • Setting up an interactive menu
  • Commonly used widgets
  • Adding widgets to other widgets
So, let's get started.

The Widget Blueprint window

The first thing we need to do is create our own widget by going through the following steps:
  1. In the Content Browser, navigate to the ThirdPersonBP\Blueprints folder.
  2. Right-click on the folder, then, at the bottom of the menu, hover over User Interface and click on Widget Blueprint.
  1. Name it MyWidget. We now have our Widget Blueprint asset, which is represented by a health bar icon, as shown in the following screenshot:
  1. Double-click on the Widget Blueprint asset and you should see the Designer menu for our Widget Blueprint asset appear as follows:
This is where we will add our UI elements—that is, all of the buttons, health bars, and other HUD and menu elements will be created in this Designer window.
In the top-right of this window, you will see the Designer and Graph buttons. If you click on Graph, you will see our familiar Blueprint window where we can add variables, functions, and code. We will be using this window very soon, but for now, let's go back to the Designer window.

Showing Widget Blueprints in our game

Before we dive into creating and customizing our Widget Blueprints, we first need to display them in our game. We will begin by using our MyWidget Blueprint as a HUD.
There are several ways we can add the HUD widget, and there are also a number of places where we can put the code, such as in a custom PlayerController class or in a HUD class; however, to keep things simple, we will use our ThirdPersonCharacter class, which is in ThirdPersonBP\Blueprints. Let's set this up by going through the following steps:
  1. Open up the ThirdPersonCharacter Blueprint and navigate to Event Graph.
  2. Right-click on the Code window and type BeginPlay to place a BeginPlay event.
  3. Next to it, right-click on the window and type Create Widget to place a constructor for the widget classes.
  4. Connect the BeginPlay output to the widget constructor input.
  5. In Class input, select MyWidget from the drop-down menu.
  6. Widgets require a PlayerController class as their owner, so, under the BeginPlay event, right-click and type Get Player Controller to place that node.
  7. Connect the Get Player Controller output to the Owning Player input of the widget constructor.
  8. This code will create the widget, but we need to do one more thing to display it. Drag a connection from the Return Value output of the widget constructor and type Add To Viewport to create a function call, which should automatically connect to the execution output.
The code in our ThirdPersonCharacter class should be as follows:
Compile, save, and close the ThirdPersonCharacter Blueprint and head back to our My Widget Designer window. We've set up our widget to display, but right now, there's nothing on it. So let's fix that by going through the following steps:
  1. In the upper-left corner of the Designer window, you'll see a Palette tab, which has a list of available widgets that we can add to our UI. In the Common category near the bottom, you will see Text. Drag the property into the main Designer window.
  2. By default, text will display Text Block, so let's change that as well. In the right-hand side Details tab, under the Content category,...

Table of contents

  1. Title Page
  2. Copyright and Credits
  3. About Packt
  4. Contributors
  5. Preface
  6. Introduction to Unreal Engine 4
  7. Programming Using Blueprints
  8. Adding C++ to a Blueprint Project
  9. Creating HUDs and Menus Using UMG
  10. Animation Blueprints
  11. AI with Behavior Tree and Blackboard
  12. Multiplayer Games
  13. Optimization, Testing, and Packaging
  14. Another Book You May Enjoy