![]()
Once your book is formatted exactly the way you want it to appear to readers--the cover page, front matter, book content, and back matter are all in place--you're ready to create your e-book formats.
I sell my e-books in nine (9) popular formats, which I explained earlier. These are, in the order in which I create them for each book I make:
- PDF
- LIT
- HTML
- EPUB
- PRC & MOBI
- LRF, PDB, & RB
In the following sections, I'll talk about how I create each of these files and explain which inexpensive programs can be used. Links to the websites for these programs are located in the appendix.
Remember, there are many different ways to format and create e-books. This is just the way I do it. If you follow these steps, you will make the same quality e-books I make. I'll talk more about distributing the e-books and getting them in front of readers later.
* * * *
Creating PDF E-Books
To create a PDF file, you will need to download a PDF creation program. When PDF was a new file format, you needed to have a copy of the full version of Adobe Acrobat (not Acrobat Reader) to create them. The program is quite costly, though, so fortunately there are free alternatives you can use to create a PDF file.
One of the best free programs out there is CutePDF. The only disadvantage to using a free program is you can't edit the PDF file directly. You print to the program from your word processing software and save the file in PDF format. But you can't replace pages, add bookmarks, or optimize your PDF file to reduce the file size with CutePDF.
PLEASE NOTE: Other free or inexpensive PDF creation programs may let you do these things. I don't know because I don't use them--I use the full version of Adobe Acrobat to create and modify my PDF e-books. If you plan to sell multiple e-books and want to make the investment, I highly recommend buying the full version of Acrobat as a business expense.
* * * *
To create a PDF e-book:
- Open your e-book document in Word (or the word processing software program of your choice).
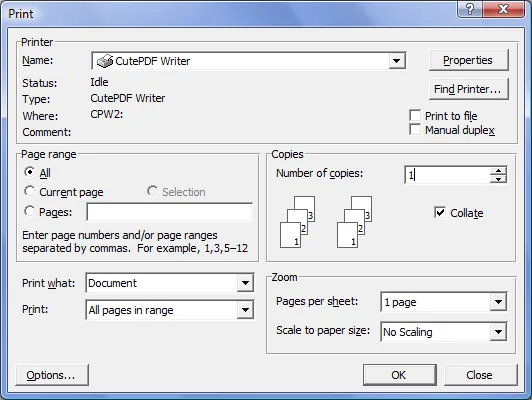
- Click on FILE from the toolbar, then PRINT. DO NOT click on the Print icon on the Standard toolbar, because the program will try to print your file to the computer's default printer. If you have a physical printer installed on your system, chances are that's the default and your e-book will begin printing from the actual printer and not to PDF.
- In the pop-up that appears, select your PDF printer. If you're using CutePDF, you'll see that listed. If you're using Adobe, don't choose the Distiller option. You want "Adobe PDF."
- Next, click the PROPERTIES button. Make sure you're printing in Color or your cover page won't display properly in the PDF file.
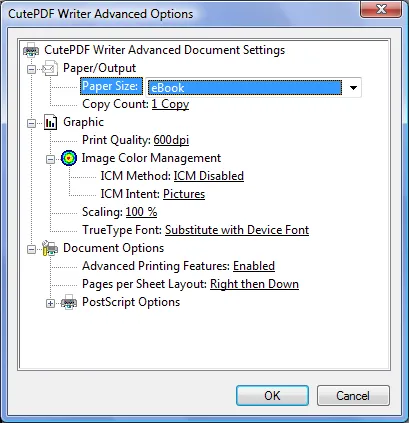
- Click the ADVANCED button. Here you will select the custom page size from the options listed. If you didn't add your paper size to your printer properties as I mentioned earlier, it won't appear in the list here. When that happens, even though you set your document properties to a specific page size, the PDF file will be saved in your default page size. If that happens, close your word processing program, add the paper size to your PDF printer properties, and try printing the PDF again.
- Click OK until all the boxes close. The PDF printer will spool the document, then another pop-up will come up, asking where you want to save the file.
* * * *
If you have a full version of Adobe Acrobat or another program that will allow you to manipulate the PDF file, I recommend making a few changes to the finished e-book file.
- The cover and any images in the e-book will have a white border around them, because they're images on the page and not the image files themselves. If you open the PDF file and replace the image pages with actual image files (saved at the same size of your e-book pages--for a 6" x 9" e-book, use a 300 DPI image of 1800 x 2700, as mentioned previously). This will make the images full-sized, and they will "bleed" to the edge of the e-book. It will make the presentation of the e-book much nicer.
- To replace a page with an image file, open the PDF file and navigate to the page you want to replace. In Acrobat, click on DOCUMENTS from the toolbar, then REPLACE PAGES. You will be able to find the page on your system (be sure to change the file type you're trying to open from PDF to JPG). Click on your image, then click SELECT. Click OK to move through the pop-ups and the page will update to the image file instead.
- Next, go through the PDF file and add a bookmark at every chapter or section heading to allow readers to jump through the book easily. In Adobe Acrobat, just highlight the chapter title and hit CTRL+B.
- Finally, optimize the PDF file. In Adobe Acrobat, click on ADVANCED from the toolbar, then choose PDF OPTIMIZER. You will be prompted to save the file, then given options to help you compress the file and reduce the file size.
* * * *
If you don't have a full version of Adobe Acrobat, you may be able to find free sites that allow you to upload a PDF file and compress it to a smaller size. While it isn't necessary to compress the file, readers will appreciate smaller file sizes (particularly if they have several hundred e-book files on their system) and many distributors limit the size of files you can upload to their servers. Since PDF files can be easily compressed, it's worth looking into how to make your PDF e-books smaller if possible.
* * * *
Creating LIT E-Books
In 2011, Microsoft announced it would be discontinuing support for their Microsoft Reader software, which reads e-books in LIT format. In response to this, many distributors are phasing out LIT e-books and will no longer accept them from publishers.
Since the LIT format is proprietary property of Microsoft Corporation, there aren't many different ways to create an LIT file. The best--and easiest--is to use the Read in Microsoft Reader plug-in for Microsoft Word. Unfortunately, this plug-in only works with some versions of Word--specifically, Word 2000, 2002, 2003, and XP. It is not compatible with Office 2007 or higher, and doesn't work with any other word processing software.
You can download the plug-in from Microsoft's site. If you don't have a version of Word with which to use it, there are other options to create an LIT file. Calibre says it can convert to LIT, though in my experience, trying to do so crashed the program and the e-book file never loaded on my system. Another program called Readerworks was created specifically to make LIT formatted e-books. While there is a free version available, it is limited to what it can do when it comes to customizing the finished e-book. Unfortunately, because Microsoft is discontinuing MS Reader and the LIT format, the paid publisher version of Readerworks doesn't seem to be available for sale any longer.
This section will explain how to use the Read in Microsoft Reader plug-in to create an LIT e-book. If you don't have the plug-in or can't use it, don't worry. This e-book format is on its way to becoming obsolete anyway.
* * * *
To create an LIT e-book:
- Download and install the Read in Microsoft Reader plug-in from Microsoft's website (a direct link to the web page is in the appendix).
- Open your e-book document in Word (this is the only program which supports the plug-in).
- Once the plug-in is installed, you should see a new button on the Standard toolbar that looks like a lower-case letter R with three green leaves sprouting out of it. This is the plug-in button. Click on it to begin the conversion process.
- If you don't see the button, you can still access the program from the toolbar. Click on FILE, then select READ. A pop-up window will open to begin the e-book conversion.
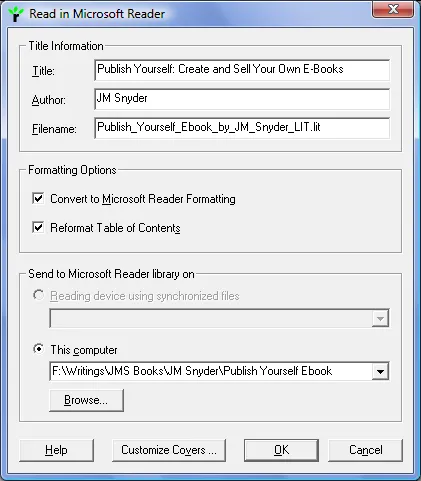
- On the pop-up, you will see the Title and Author Name for the book. This draws directly from the information you entered in the document's PROPERTIES tab. If this is incorrect, you can edit it here but I recommend changing it in the Properties, as well.
- The file name will appear as the current name of the document with an LIT extension. Make any changes you wish to the file name here. I always add _LIT at the end of the file name, as I mentioned previously.
- You don't have to make any changes to the options in the middle of the pop-up. The default options will create your e-book without a problem.
- At the bottom of the window is the path where you want the e-book to be saved. Click on Browse to navigate to the folder where you want to save the file.
- PLEASE NOTE: For some reason, the program always inserts carets before and after the drive initial. If you want to save the file in the default location already listed, you will have to remove these carets or you will get an error message.
- Finally, click on CUSTOMIZE COVERS button at the bottom of the window. A new pop-up will appear, giving you options for the cover art. Click the Browse button to navigate to the folder where your e-book's cover art is saved and select one of the JPGs you created of your cover art. I always use the largest one, but this can make the file size very large. Anything over 1000 x 1500 pixels should work.
- Click OK twice and the plug-in will run. Word will close the file and reopen it before the conversion is complete. This is normal.
- When the file is saved in LIT format, a pop-up will appear giving you the option of opening it in MS Reader to view the final file.
* * * *
If you have images in your e-book, make sure they are inserted instead of linked or they won't display in your LIT e-book. To do this, add the images by clicking on INSERT from the toolbar, then PICTURE, then selecting your images. Don't cut and paste them from another file. They won't show up in the final e-book.
* * * *
Creating HTML E-Books
Let me say it upfront--you don't have to actually know how to write HTML code to create an HTML e-book. You can create it from your word processing software with just a few clicks of the mouse. However, please be aware that to purists, the HTML code generated by Microsoft Word or any other similar program is very clunky and cluttered. If you know HTML and create an e-book in this manner, you will be surprised at the amount of excess code tha...