The easy, self-paced guide to the powerful WordPress platform
WordPress 24-Hour Trainer, 3rd Edition provides a comprehensive, unique book-and-video package that focuses on the practical, everyday tasks you will face when creating and maintaining WordPress websites. This easy-to-use, friendly guide will show you how to create and edit pages, integrate your site with social media, keep your site secure, make content more search engine friendly to help drive website traffic, troubleshoot the most common WordPress issues, and much more.
This updated edition of WordPress 24-Hour Trainer covers the latest features of WordPress 4.0 and 4.1 in an easy-to-use format:
Fully-illustrated guides to key tasks you'll need to perform with WordPress.
At the end of each lesson a list of related plugins you can install to make WordPress an even more powerful tool.
Step-by-step guides at the end of lessons to help you practice what you just learned.
Videos that show you first hand some of the concepts in each lesson.
WordPress 24-Hour Trainer, 3rd Edition is your perfect real-world guide to fully leveraging this powerful platform.
Trusted by 375,005 students
Access to over 1.5 million titles for a fair monthly price.
Lesson 13: Working with Images in the Content Editor
Lesson 14: Using the WordPress Image Editor
Lesson 15: Working with Image Galleries
Lesson 16: Adding Video and Audio
Lesson 17: Adding Documents
Lesson 11 The Basics of Adding Media Files
Up to now, you've learned about entering, editing, styling, and laying out text content. In this lesson, you begin the same process for media files, which primarily means images, but also includes video, audio, and documents.
There are two scenarios for adding new media files to WordPress:
Uploading and inserting them into the content of a specific Post or Page
Uploading them to the Media Library for later use
Each of these is demonstrated with images because they're the most common media files you'll use, but the basics apply to other media types as well.
Uploading and Inserting an Image into a Post
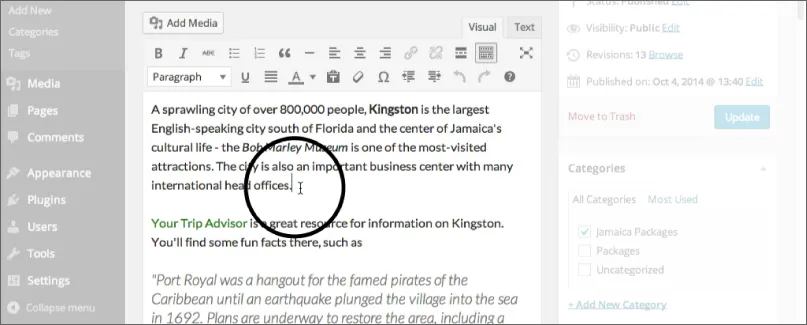
Adding images to the content of a Post (or, of course, a Page) is a simple process that begins with deciding where you want the image to appear. Then place your cursor at that point in your text, as shown in Figure 11.1.
Figure 11.1
Don't worry if you change your mind about the location after uploading. Moving an image within the Content Editor is a matter of dragging and dropping it to a new spot.
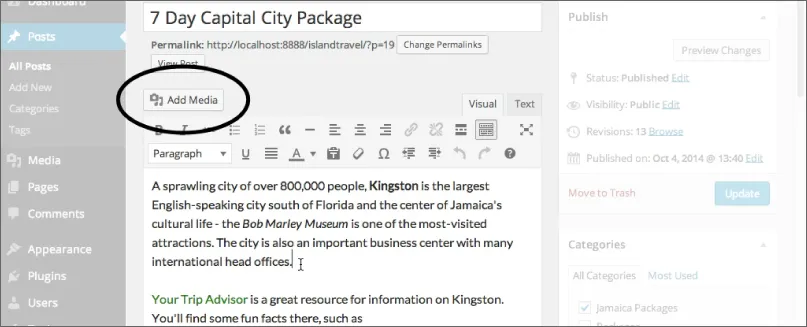
Now you're ready to add the image by using the Add Media button located at the top left of the Content Editor, as shown in Figure 11.2.
Figure 11.2
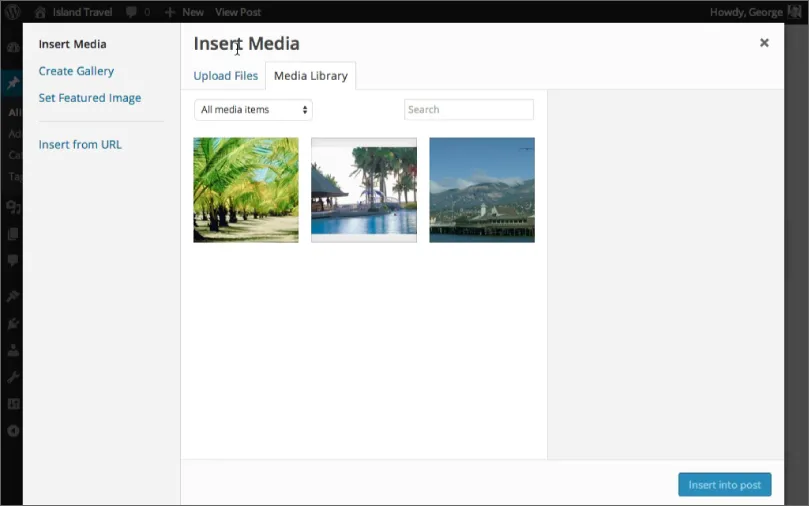
Click the Add Media button to produce a pop-up window known as the Media Uploader, as shown in Figure 11.3.
Figure 11.3
Make sure the title at the top of the Media Uploader says Insert Media. This window can perform a number of functions (see Lesson 12, “The Media Uploader Window”), which are listed at the left side. If the Insert Media title isn't showing, simply click its link on the left side menu.
In the center area of the Insert Media screen, you have two tabs representing the two choices you have for inserting media content into your Post:
Upload Files—Choose new files from your computer.
Media Library—All files already uploaded to WordPress.
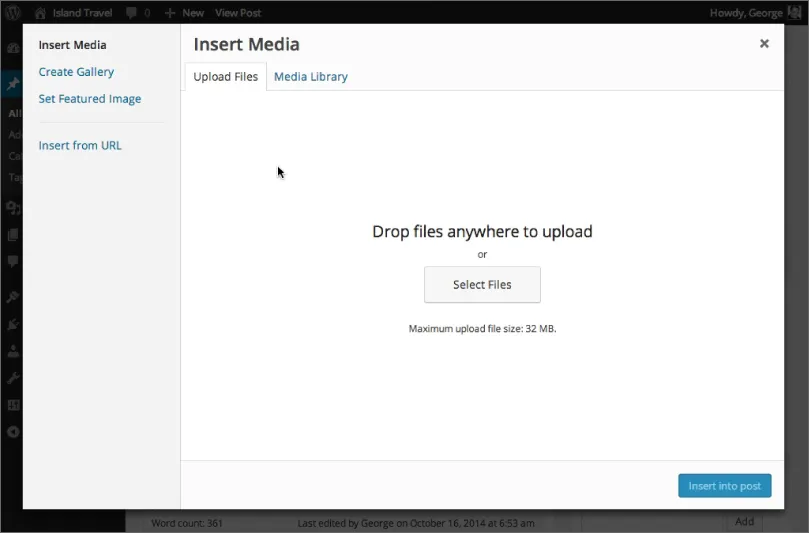
In this case I'll be uploading a new image, so I click the Upload Files tab, and now the Media Uploader screen looks like Figure 11.4.
Figure 11.4
I can either drag my file(s) to the center area of the window or use the Select Files button and get the traditional pop-up window allowing me to choose from files on my computer.
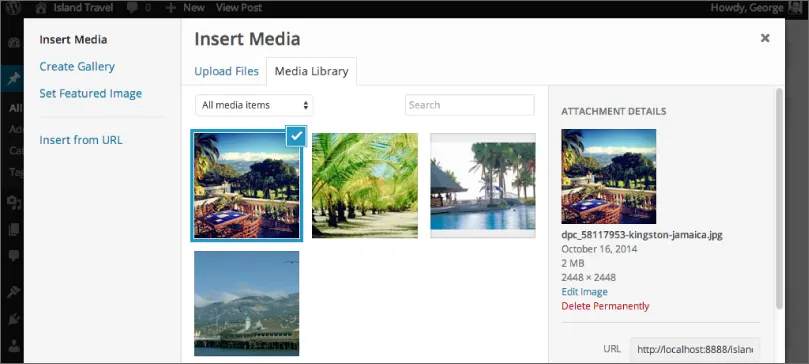
You see a progress bar during the uploading process, and when that's complete, the screen shows two thumbnails of your image: one on the right side and one in the center area with a blue check mark, as shown in Figure 11.5.
Figure 11.5
That check mark confirms that this is the image you'll be inserting, so you're ready to click the blue Insert Post button at the lower right side.
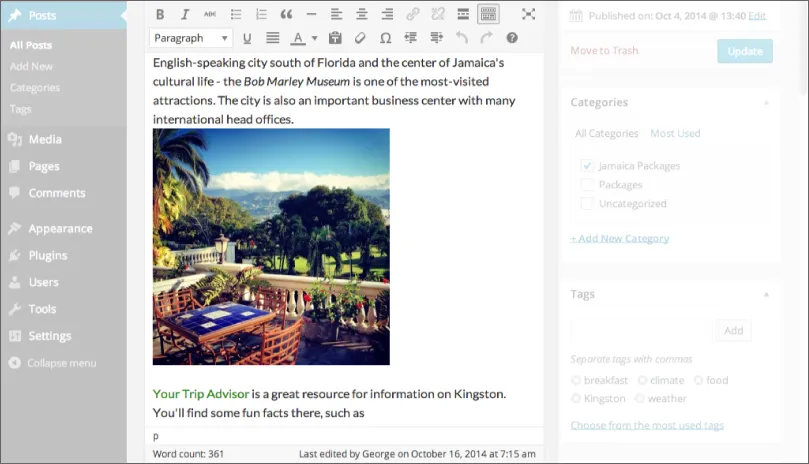
Now there are a number of options on the right side of the Media Uploader screen (discussed in Lesson 12), but for the moment I'll click the Insert into Post button, and you see the result in Figure 11.6.
Figure 11.6
Although you can see the image in your content, remember you still need to click the Update button for WordPress to save the inserted image.
In Lesson 13, “Working with Images in the Content Editor,” you can see more about how to position images exactly the way you want, but for the moment you can see how straightforward it is to place an image in your content.
You can repeat this process to add as many images as you want for a particular Post. However, if you have a lot of them, you might consider creating a Gallery, which is covered in Lesson 15, “Working with Image Galleries.”
For mobile users on a narrow screen, the Media Uploader screen looks a little different. The menu on the left is at the top left instead and toggles you between the various choices, as you can se...
Table of contents
Cover
Table of Contents
Introduction
Section I: Before You Start
Section II: Firing Up WordPress
Section III: Working with Written Content
Section IV: Working with Media Content
Section V: Managing Your Content
Section VI: Making Your Site Social
Section VII: Choosing and Customizing Themes
Section VIII: Becoming Search Engine Friendly
Section IX: Maintenance and Security
Section X: Adding Functionality Using Plugins
Section XI: References
Advertisement
End User License Agreement
Frequently asked questions
Yes, you can cancel anytime from the Subscription tab in your account settings on the Perlego website. Your subscription will stay active until the end of your current billing period. Learn how to cancel your subscription
No, books cannot be downloaded as external files, such as PDFs, for use outside of Perlego. However, you can download books within the Perlego app for offline reading on mobile or tablet. Learn how to download books offline
Perlego offers two plans: Essential and Complete
Essential is ideal for learners and professionals who enjoy exploring a wide range of subjects. Access the Essential Library with 800,000+ trusted titles and best-sellers across business, personal growth, and the humanities. Includes unlimited reading time and Standard Read Aloud voice.
Complete: Perfect for advanced learners and researchers needing full, unrestricted access. Unlock 1.5M+ books across hundreds of subjects, including academic and specialized titles. The Complete Plan also includes advanced features like Premium Read Aloud and Research Assistant.
Both plans are available with monthly, semester, or annual billing cycles.
We are an online textbook subscription service, where you can get access to an entire online library for less than the price of a single book per month. With over 1.5 million books across 990+ topics, we’ve got you covered! Learn about our mission
Look out for the read-aloud symbol on your next book to see if you can listen to it. The read-aloud tool reads text aloud for you, highlighting the text as it is being read. You can pause it, speed it up and slow it down. Learn more about Read Aloud
Yes! You can use the Perlego app on both iOS and Android devices to read anytime, anywhere — even offline. Perfect for commutes or when you’re on the go. Please note we cannot support devices running on iOS 13 and Android 7 or earlier. Learn more about using the app
Yes, you can access WordPress 24-Hour Trainer by George Plumley in PDF and/or ePUB format, as well as other popular books in Design & Web Design. We have over 1.5 million books available in our catalogue for you to explore.