Building Cross-Platform Apps using Titanium, Alloy, and Appcelerator Cloud Services
eBook - ePub

Building Cross-Platform Apps using Titanium, Alloy, and Appcelerator Cloud Services

  1. English
  2. ePUB (mobile friendly)
  3. Available on iOS & Android
eBook - ePub

Building Cross-Platform Apps using Titanium, Alloy, and Appcelerator Cloud Services

About this book

Skip Objective-C and Java to get your app to market faster, using the skills you already have

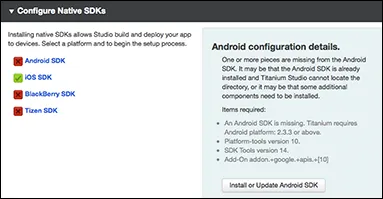
Building Cross-Platform Apps using Titanium, Alloy, and Appcelerator Cloud Services shows you how to build cross-platform iOS and Android apps without learning Objective-C or Java. With detailed guidance given toward using the Titanium Mobile Platform and Appcelerator Cloud Services, you will quickly develop the skills to build real, native apps— not web apps—using existing HTML, CSS, and JavaScript know-how. This guide takes you step-by-step through the creation of a photo-sharing app that leverages the power of Appcelerator's cloud platform, and establishes fundamental concepts before adding advanced techniques. Coverage extends beyond the development process to include expert advice for deployment on the App Store or Google Play, and more.

The mobile app market is estimated at over $2.4 billion per year. These apps were traditionally built using Objective-C or Java, which can be complex and daunting to learn. Now you can use JavaScript on the Titanium framework to build amazing apps that run native on iOS and Android devices, and get your app to market faster with this guide.

  • Integrate Cloud Services APIs into the app framework and UI
  • Set up user accounts, and capture and store photos
  • Work with location-based services and share via social media
  • Deploy on the App Store, Google Play, and more

When a great idea is in the works, no one wants to put it on hold to learn an entirely new skillset. Now there's an alternative. Get that app to market fast, using existing skills and powerful new tools, and grab a piece of that multi-billion-dollar market. Building Cross-Platform Apps using Titanium, Alloy, and Appcelerator Cloud Services is your ticket to the front of the line.

Frequently asked questions

Yes, you can cancel anytime from the Subscription tab in your account settings on the Perlego website. Your subscription will stay active until the end of your current billing period. Learn how to cancel your subscription.
No, books cannot be downloaded as external files, such as PDFs, for use outside of Perlego. However, you can download books within the Perlego app for offline reading on mobile or tablet. Learn more here.
Perlego offers two plans: Essential and Complete
  • Essential is ideal for learners and professionals who enjoy exploring a wide range of subjects. Access the Essential Library with 800,000+ trusted titles and best-sellers across business, personal growth, and the humanities. Includes unlimited reading time and Standard Read Aloud voice.
  • Complete: Perfect for advanced learners and researchers needing full, unrestricted access. Unlock 1.4M+ books across hundreds of subjects, including academic and specialized titles. The Complete Plan also includes advanced features like Premium Read Aloud and Research Assistant.
Both plans are available with monthly, semester, or annual billing cycles.
We are an online textbook subscription service, where you can get access to an entire online library for less than the price of a single book per month. With over 1 million books across 1000+ topics, we’ve got you covered! Learn more here.
Look out for the read-aloud symbol on your next book to see if you can listen to it. The read-aloud tool reads text aloud for you, highlighting the text as it is being read. You can pause it, speed it up and slow it down. Learn more here.
Yes! You can use the Perlego app on both iOS or Android devices to read anytime, anywhere — even offline. Perfect for commutes or when you’re on the go.
Please note we cannot support devices running on iOS 13 and Android 7 or earlier. Learn more about using the app.
Yes, you can access Building Cross-Platform Apps using Titanium, Alloy, and Appcelerator Cloud Services by Aaron Saunders in PDF and/or ePUB format, as well as other popular books in Computer Science & Software Development. We have over one million books available in our catalogue for you to explore.

Information

Chapter 1

Installing and Configuring Appcelerator

THIS CHAPTER BRIEFLY outlines the installation process for the Appcelerator tools. More detailed step-by-step instructions can be found on the Appcelerator site at http://docs.appcelerator.com/titanium/3.0/#%21/guide/Setting_up_Studio-section-37540095_SettingupStudio-installingstudio.

Setting Up Titanium

To install Titanium Studio, download the installer from the Appcelerator website. You will need to log in using your Appcelerator credentials, so register for an account if you haven’t done so already.
After launching Titanium Studio, you will need to configure native SDKs for each platform you want to support. Android works on both Mac and PC, but to develop for iOS you will need a Mac. See http://docs.appcelerator.com/titanium/3.0/#!/guide/Quick_Start for more information.

Installing Titanium on the Mac

To install Titanium Studio on the Mac, download Titanium Studio from Appcelerator and install it. Then install Xcode and the Android SDK. The following sections cover this process in detail.

Installing Titanium Studio IDE

  1. Register for an account at www.appcelerator.com.
  2. Download Titanium Studio at www.appcelerator.com/titanium/download, as shown in Figure 1-1. The download will begin automatically.
    9781118673256-fg0101.tif
    Figure 1-1: Downloading Titanium Studio from Appcelerator.
  3. Open the disk image and drag the Titanium Studio folder into Applications, as shown in Figure 1-2.
    9781118673256-fg0102.tif
    Figure 1-2: Dragging the Titanium Studio folder into the Applications folder.
  4. Open Applications ⇒ Titanium Studio ⇒ TitaniumStudio, as shown in Figure 1-3.
    9781118673256-fg0103.tif
    Figure 1-3: Launching Titanium Studio.
  5. Check the box to use this folder as the default, and then click OK. See Figure 1-4.
    9781118673256-fg0104.tif
    Figure 1-4: Selecting a workspace.
  6. Log in using the account you created earlier. See Figure 1-5.
    9781118673256-fg0105.tif
    Figure 1-5: Logging in to use Titanium Studio.

Installing Xcode

Titanium Studio opens the Dashboard by default. You can reach the Dashboard again by clicking on the red home icon shown in Figure 1-6.
9781118673256-fg0106.tif
Figure 1-6: The Titanium Studio Dashboard is always accessible by clicking the red home icon.
  1. Click the Get Started tab.
  2. Scroll down to the Configure Native SDKs section and select iOS SDK. Click the Install or Update iOS SDK button on the left. See Figure 1-7.
    9781118673256-fg0107.tif
    Figure 1-7: Selecting iOS SDK from the Configure Native SDKs section.
  3. On the next window, click the Configure button. See Figure 1-8. This will launch the Mac App Store and take you to the Xcode download page, as shown in Figure 1-9.
    9781118673256-fg0108.tif
    Figure 1-8: Platform Configuration window (iOS).
    9781118673256-fg0109.tif
    Figure 1-9: Installing Xcode from the Mac App store.
  4. When it’s finished, there should be a green checkmark next to iOS SDK, as shown in Figure 1-10.
    9781118673256-fg0110.tif
    Figure 1-10: Configuring of the Native SDK section is complete.
  5. Launch Xcode and...

Table of contents

  1. Cover
  2. Title Page
  3. Table of Contents
  4. Introduction
  5. Chapter 1: Installing and Configuring Appcelerator
  6. Chapter 2: Introducing Appcelerator Cloud Services
  7. Chapter 3: Appcelerator Titanium Alloy Overview
  8. Chapter 4: Building a Cross-Platform Social Photo-Sharing Application
  9. Chapter 5: Development Process for Cross-Platform Apps
  10. Chapter 6: Integrating Comments
  11. Chapter 7: Integrating User Accounts with Appcelerator Cloud Services
  12. Chapter 8: Working with Friends and Followers
  13. Chapter 9: Working with Maps and Locations
  14. Chapter 10: Sharing via Facebook, Email, and Twitter
  15. Chapter 11: Push Notifications
  16. Chapter 12: Settings and User Management
  17. Chapter 13: Going to Market: Deploying to the App Store and to Google Play
  18. End User License Agreement