A Trip Around the Board
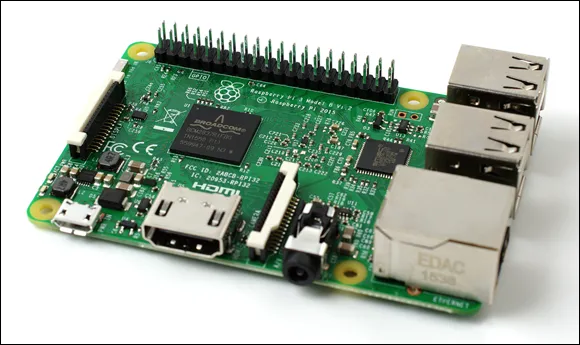
Since its launch as a mere two models, the Raspberry Pi family has expanded considerably. The current range consists of five mainstream models: the Raspberry Pi Model A+, Raspberry Pi Model B+, Raspberry Pi 2, Raspberry Pi 3 (see Figure 1-1), and Raspberry Pi Zero. Aside from the Zero, which is a cut-down model designed specifically for the lowest-possible cost and minimum board footprint, all models share a roughly similar design differing only in features such as the number of USB ports, presence or absence of network ports, and the power of their processor. The range also has a sixth, less-common, member: the Raspberry Pi Compute Module; designed for industrial use in customised carrier boards, the Compute Module runs the same software as its mainstream stable mates, but is otherwise beyond the scope of this book.
If you are the owner of an original-model Raspberry Pi, either the Model B or cut-down Model A, congratulations: you have a collector's item on your hands. The majority of the material in this book is entirely applicable to your boards, though there are some differences, including an inability to use add-ons adhering to the Hardware Attached on Top (HAT) standard, as described in Chapter 16, “Add-On Hardware”. If you find yourself needing features missing from your early board, consider retiring it and picking up a Model A+, Model B+, or faster Raspberry Pi 2 or 3; if you're on a budget, look at the cheaper Raspberry Pi Zero.
In the rough centre of all Raspberry Pi boards is a square semiconductor, more commonly known as an integrated circuit or chip. This is the system-on-chip (SoC) module, which provides the Pi with its general-purpose processing, graphics rendering, and input/output capabilities. Depending on the model, this may be the original Broadcom BCM2835, the faster quad-core BCM2836, or the more powerful still 64-bit BCM2837. In the case of the Model A+, B+, and Zero, stacked on top of that chip is another semiconductor which provides the Pi with memory for temporary storage of data while it's running programs; on the Raspberry Pi 2 and 3, this chip is instead located on the underside of the board. This type of memory is known as random access memory (RAM), because the computer can read from or write to any part of the memory at any time. RAM is volatile, meaning that anything stored in the memory is lost when the Pi loses power or is switched off.
Below the SoC are the Pi's video outputs. The wide silver connector is a High-Definition Multimedia Interface (HDMI) port, the same type of connector found on media players and many satellite and cable set-top boxes. When connected to a modern TV or monitor, the HDMI port provides high-resolution video and digital audio. A composite video port, which is designed for connection to older TVs that don't have an HDMI socket, is provided as part of the black and silver 3.5 mm AV jack to the right of the HDMI socket. The video quality is lower than is available via HDMI, and only lower-quality analogue audio can be used. You'll need a 3.5 mm AV adapter cable to use the composite video output, but you can use the analogue audio output with any standard 3.5 mm stereo audio cable.
The Raspberry Pi Zero has a somewhat different layout. In place of a full-size HDMI socket is a mini-HDMI socket, which requires a mini-HDMI to HDMI cable or adapter to connect to a TV or monitor. The Pi Zero also lacks the 3.5 mm AV jack of the larger Pi models; there is no analogue audio output by default, and composite video is available only by soldering a cable or RCA jack to the two empty holes on the upper left of the board marked TV.
The pins to the top left of the Pi compose the general-purpose input/output (GPIO) header, which you can use to connect the Pi to other hardware. The most common use for this port is to connect an add-on board. An example, the Sense HAT, is described in Chapter 16. The GPIO port is extremely powerful, but it’s fragile. When handling the Pi, always avoid touching these pins, and never connect anything to them while the Pi is switched on.
The plastic and metal connector below the GPIO port is the Display Serial Interface (DSI) port, which is used to connect digitally driven flat-panel display systems. These are rarely used because the HDMI port is more flexible, though the official Raspberry Pi touchscreen accessory is one of the few displays to make use of the port. A second plastic and metal connector, found to the right of the HDMI port, is the Camera Serial Interface (CSI) port, which provides a high-speed connection to the Raspberry Pi Camera Module. For more details on the CSI port, see Chapter 15, “The Raspberry Pi Camera Module”.
The Pi Zero, again, has a different layout: there is no DSI port available on this model of Pi, and a compact CSI port is used in place of the full-size version found on the larger Pi models. This compact CSI port requires the use of an adapter cable or board to connect to the Raspberry Pi Camera Module. Older revisions of the Pi Zero have no CSI port at all and cannot use the Camera Module as a result.
At the very bottom left of the board is the Pi's power socket. This is a micro-USB socket, the same type found on most modern smartphones and tablets. Connecting a micro-USB cable to a suitable power adapter, detailed in Chapter 2, “Getting Started with the Raspberry Pi”, switches the Raspberry Pi on. Unlike a desktop or laptop computer, the Pi doesn't have a power switch and will start immediately when power is connected. For the Raspberry Pi Zero, the power socket is found on the far right of the board rather than the far left.
On the underside of the Raspberry Pi board on the left-hand side is a micro-SD card slot. A Secure Digital (SD) memory card provides storage for the operating system, programs, data and other files, and is non-volatile. Unlike the volatile RAM, it will retain its information even when power is lost. In Chapter 2, you'll learn how to prepare an SD card for use with the Pi, including installing an operating system in a process known as flashing. The Pi Zero has the micro-SD card slot on the top side of the board, rather than the underside.
The right-hand edge of the Pi will hav...