Quick Start: Falling from a Tightrope
In This Chapter
Planning the production
Creating and positioning objects
Adding a camera and lights
Rendering a preview
Animating with keyframes
Running a MassFX simulation
Rendering the final animation
When you first sat down to use the Autodesk® 3ds Max® 2013 software, you were probably focused on one goal—creating cool 3D images and animations. I know that many of you bought 3ds Max to make money, claim a tax write-off, earn a way to Hollywood, or impress your girlfriend or boyfriend, but I'll just ignore those reasons for now. The goal is to create something cool.
If you've perused this book's Table of Contents or thumbed through its many pages, you've seen sections on modeling, materials, dynamics, and other topics. But if you're like me, you don't want to wade through tons of material before you have something to show off to Mom. (Actually, if you're like me, you opened straight to the special-effects section, in which case you won't be reading this.)
The purpose of this Quick Start is to give you a taste of what 3ds Max can do. This soaring view of the software from 20,000 feet is intended to show you the big picture before you delve into the details. It exposes you to some of the most common features and, I hope, whets your appetite for the more in-depth chapters to follow.
This part of the book is intended for those new to the software. If you're an experienced user, your mom no doubt is already impressed with your work, so you can happily advance to whichever chapter appeals to you. (Forgive me for catering to the newbie, but we were all beginners once.)
Planning the Production
For this Quick Start, we'll take a trip to the circus to see a character on the tightrope that really shouldn't be there. But don't worry, because the plan is not to have him stay around long. In this example, you'll use the ragdoll feature in the MassFX system to automate the spectacular fall. This gives you a chance to set up a scene, create and position some primitive objects and lights, and work with the MassFX system to animate the untimely accident.
The first thing to consider is setting up the scene. For this sequence, we need some simple cylinders to create the tightrope and the balancing pole. We also need a spotlight aimed right at the character, and we need a character. For the character, we're going to use a simple default biped character. After the objects and lights are in place, we can turn our attention to the animation process. We'll start by animating the character struggling to keep its balance for about 30 frames; then we'll turn control over to the MassFX system and let it compute the remaining motions of the fall.
On the CD
After each of the following tutorials, I saved the scene file. You can find these files in the Quick Start directory on the book's CD.
Setting Up the Scene
This section on setting up is divided into several simple tutorials. The first step in the production is to create all the objects we need. Then we can position them where we need them.
After the models are in place, we can create the ground plane, and then we're ready to add a camera and light.
Tutorial: Creating the objects
Your first step begins with creating and positioning the tightrope and the balance pole. Then you can create the biped skeleton and position it at its initial location. To create and position the objects, follow these steps:
1. Reset the interface with the Application Button⇒Reset menu command. Answer Yes in the warning box that appears to confirm the reset.
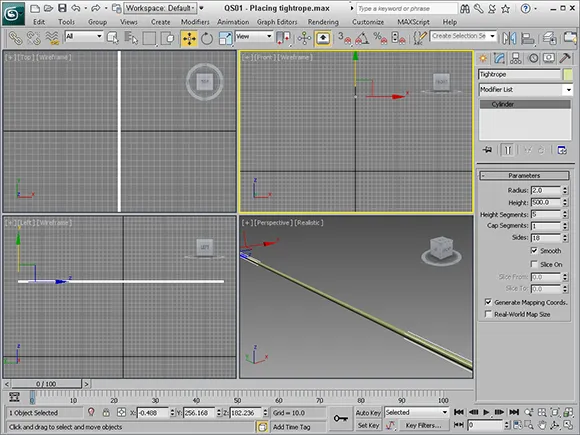
2. In the Command Panel, click the Cylinder button, drag in the Front viewport to create a circular base, and then click and drag again to define the cylinder's height. In the Parameters rollout, set the Radius to 2 and the Height to 500. Then type the name Tightrope in the Name field in the Name and Color rollout.
Note
This Quick Start uses Generic Units. You can change the units using the Units Setup dialog box, which you open using the Customize⇒Units Setup menu command.
3. Click the Select and Move button on the main toolbar, and drag the red X-axis to the left in the Left viewport to center the tightrope about the origin. Then drag the green Y-axis upward in the Left viewport to move the tightrope above the ground plane.
4. Drag on the ViewCube in the Perspective viewport until the view changes so that the tightrope object runs diagonally through the viewport.
The tightrope is positioned, as shown in Figure QS.1.
Figure QS.1
The tightrope is now in place.
Tutorial: Balancing the biped
The next object to add is the biped, which we need to balance on the tightrope.
To position the balanced biped on the tightrope, follow these steps:
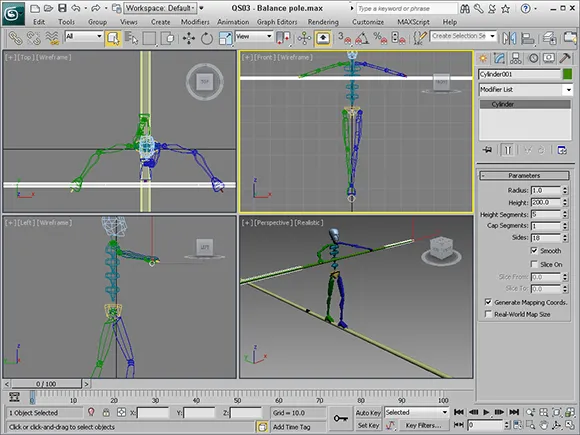
1. Select the Create⇒Systems⇒Biped menu command, and drag in the Top viewport to create a biped skeleton. The height of the biped should be about half the height from the ground to the tightrope.
2. Using the Select and Move tool in the main toolbar, drag the green Y-axis in the Left viewport upward to position the biped so its feet are just above the tightrope.
3. Select the biped's right foot, and move it in the Front viewport to be centered over the tightrope and in the Left viewport to be behind the left foot. Then repeat similar moves for the right foot until the body is balanced with the left foot in front of the right foot standing on the tightrope.
4. With the biped's feet in place, select and move the tightrope upward until it just touches the bottoms of both feet.
5. Click the Select and Rotate tool in the main toolbar, and rotate the left and right upper arms until they stick straight out from the body on either side.
The biped skeleton is now balancing nicely on the tightrope, as shown in Figure QS.2. He'll be all right as long as he doesn't try to move.
Figure QS.2
The biped is balanced on the tightrope.
Tutorial: Adding a balance pole
Next, we'll add a balance pole to the scene. This should make the biped feel safer, but actually we just want to have another object that will be falling along with our character.
To add a balance pole, follow these steps:
1. Click the Geometry button in the Command Panel, and click the Cylinder button. Then click and drag in the Left viewport to set the circular base and again to set the cylinder height. Create a cylinder that runs parallel to the biped's arms. Set the Radius value to 1 and the Height to 200.
2. Click the Hierarchy panel in the Command Panel, and click the Affect Pivot Only button in the Adjust Pivot rollout. Then click the Center to Object button, and click the Affect Pivot Only button again to exit pivot mode. This moves the pivot point to the center of the balance pole.
3. Move the cylinder in the Left viewport so it's in front of the biped, and center it on the tightrope in the Top viewport.
4. Select and rotate the upper arms in the Top viewport toward the balance pole about 15 degrees and then downward in the Front viewport about 15 degrees also. Then select and rotate the lower arm until the hands are over the balance pole in the Top viewport.
5. Finally, select and move the balance pole upward in the Left viewport until it is just under the hands.
The balance pole is now in place, as shown in Figure QS.3.
Figure QS.3
The balance pole surely makes the biped feel more comfortable.
Adding a Camera and Light
The modeling phase, which usually is quite time-consuming, went really quickly when we used the ...