Chapter 1
How Can I Use My Desktop Space Efficiently?
The MacBook Pro’s Desktop is the area displayed on its screen. Like a physical desktop, you place things (in this case, icons and windows) on it to focus your attention on them and use their content. As you work, your Desktop naturally becomes cluttered with windows for applications, documents, and system tools. Keeping control of all these windows helps you make the most of your Desktop space. With all the great Desktop management tools that the Mac’s OS X operating system offers, it’s much easier to keep your MacBook Pro’s Desktop neat and tidy than it is a physical desktop.
Setting the Finder Desktop’s Icon Preferences
By default on a new MacBook Pro or in a new installation of OS X on a MacBook, icons for the MacBook Pro’s hard drive, external hard drives, DVDs, CDs, and servers do not appear on the Desktop. This keeps the entire space on the Desktop clear for your files and folders. (If you upgraded to a new version of OS X or used the Migration Assistant to transfer the contents of another Mac to your MacBook Pro, the drive icons that display are whatever was previously set.)
To access drives, whether or not they appear on the Desktop, open a Finder window (choose File→New Finder Window or press
+N in the Finder, or double-click a folder or drive icon) and click them in the Sidebar to open their contents.
The folders and files you see on the Desktop are determined by the contents of the Desktop folder, which is located within your Home folder (choose Go→Home in the Finder to see the Home folder’s contents). If you don’t want a folder or file taking up space on your Desktop, move it into a different folder within your Home folder. In addition to having a neater appearance, this also helps you work more efficiently because it’s easier to find folders and files if they’re here rather than scattered on your Desktop.
Perform the following steps to show or hide Desktop icons:
1. Choose Finder→Preferences. The Finder Preferences dialog appears.
2. Go to the General pane, if it isn’t already visible.
3. Select and deselect the check boxes for the icons that you want to see and don’t want to see, respectively, on your Desktop. For example, to hide the icon for the MacBook Pro’s internal hard drive or any external hard drive connected to it, deselect the Hard Disks check box. As you deselect the check boxes, the related icons disappear from your Desktop.
To set the size, grid spacing, text size, and other options for the Desktop, click the Desktop so no Finder windows are selected. Choose View→Show View Options, and use the resulting panel to configure these settings for your Desktop. The title of this panel indicates the object for which you are configuring the view options, so it should be Desktop. You can use this same command with any folder to set its view options.
Working with Finder Windows
Much of the time that you are working on your Desktop will involve Finder windows. Two areas of Finder windows that you will use frequently are the Sidebar and the toolbar, in addition to the window itself. You can use these features as they are, but you can also customize them to make your Desktop space more efficient.
Using Finder windows
Finder windows are essentially lists of what’s in whatever drive or folder you opened. Double-click a drive or folder to open a Finder window. If you open a drive or folder from the Desktop, a new Finder window opens for its contents. If you open a drive or folder from within a Folder window, the Finder window displays its contents in place of whatever it was previously showing.
A quick way to open a new Finder window in the Finder is to choose File→New Window or to press
+N. That way, you can look at contents from different locations at the same time, and even copy or move items across them.
If you drag items from one Finder window to another, the items are moved if the Finder windows are showing contents from folders on the same drive. They are copied if the Finder windows are showing the contents of folders from different drives. Hold down the Option key when dragging to copy files on the same disk, and hold down the Option key when dragging to move files to a different disk; holding Option reverses the standard behavior.
Close unwanted Finder windows by clicking the Close button at the upper left of the window or by pressing Shift+
+W. Note that this shortcut is new to OS X 10.9 Mavericks and had been just
+W in previous versions of OS X.
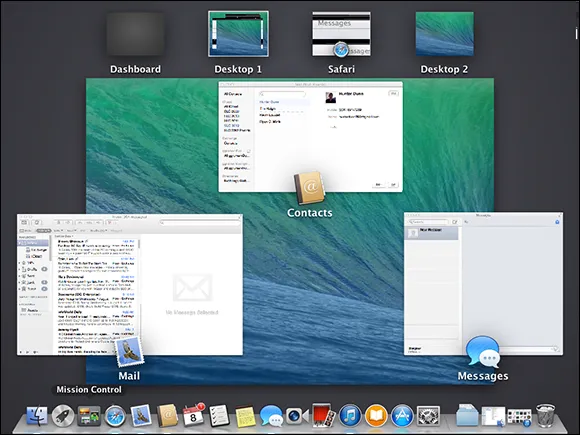
Mavericks introduces a new capability in Finder windows called Finder tabs that reduces clutter on the Desktop. It works just like a browser’s tabbed panes do: Each pane has its own tab that you click to switch to that pane, as
Figure 1.1 shows. Create a new tabbed pane by choosing File→New Tab or pressing
+T. You can drag items from one tab to another: From the open pane, just drag the item to the tab of the other pane.
To close a tabbed pane, hover the pointer over its tab, and click the X icon that appears on the left side of the tab, or just press
+W to close the active (open) pane.
1.1 OS X Mavericks lets you have multiple tabbed panes in the same Finder window, to decrease Desktop clutter.
Using and configuring the Sidebar
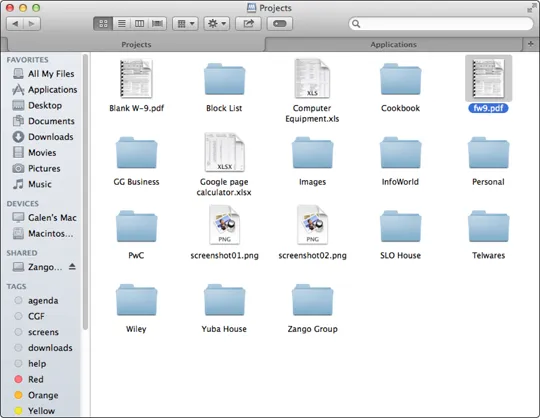
The Finder’s Sidebar makes it easy to get to specific locations, meaning folders, drives, and even files. It comes preloaded with a set of aliases (shortcuts) to common locations, but you can add items to, or remove them from, the Sidebar so it contains aliases to the items you use most frequently.
The Sidebar is organized into sections, as shown in Figure 1.2. You control which ones display by using the Finder Preferences dialog (choose Finder→Preferences). The process is similar to how you control which disk icons appear on the Desktop, except that you go to the Sidebar pane in the dialog rather than the General pane, and then check and uncheck the desired options to control what displays, as shown in Fi...